To build a privacy fence for your entertainment area, start by staking your perimeter and checking for utilities before digging 24-inch post holes at 72-inch intervals. Set posts in concrete, ensuring they’re level. Install horizontal supports, then attach vertical slats working from the center outward. Consider adding decorative elements like lattice panels or lighting for evening ambiance. Choose durable materials like cedar or vinyl that complement your outdoor space. The perfect backyard retreat awaits with just a few more key steps.
Planning Your Entertainment Area Privacy Fence
Why spend time outdoors when neighbors can see your every move? A well-planned privacy fence creates the seclusion you deserve for outdoor entertaining.
Begin by determining your fence location along a straight line. Use stakes and string to map the perimeter, which helps you visualize the space and calculate materials needed. For standard privacy walls, position posts approximately 72 inches apart. Before digging, call to check for underground utility lines and review local regulations.
Assess your ground conditions—slightly damp soil can actually benefit concrete setting. Plan to dig post holes about 24 inches deep, starting with end posts to establish your fence line. Use a level on your guide string to ensure posts will align properly. For sloped areas, make adjustments to maintain consistent panel heights while preserving your fence’s straight, cohesive appearance.
Selecting the Right Materials for Durability and Style
When it comes to privacy fence materials, your choice determines both the look and longevity of your outdoor sanctuary. Cedar stands out for its natural decay resistance and workability, available in both stained and untreated options. For maximum durability, consider Port Orford or Alaskan Yellow cedar varieties that excel at repelling insects.
If you’re seeking minimal maintenance, vinyl offers impressive longevity without the upkeep wood demands. Your budget might stretch further with this option over time.
Don’t overlook mixed-material designs that combine wood with metal posts or incorporate brick accents for enhanced stability and visual interest.
| Material | Durability | Maintenance |
|---|---|---|
| Cedar | High | Moderate |
| Vinyl | Very High | Very Low |
| Mixed | Excellent | Varies |
Whatever you choose, proper finishing with stains or paint will significantly extend your fence’s lifespan.
Measuring and Preparing the Fence Layout
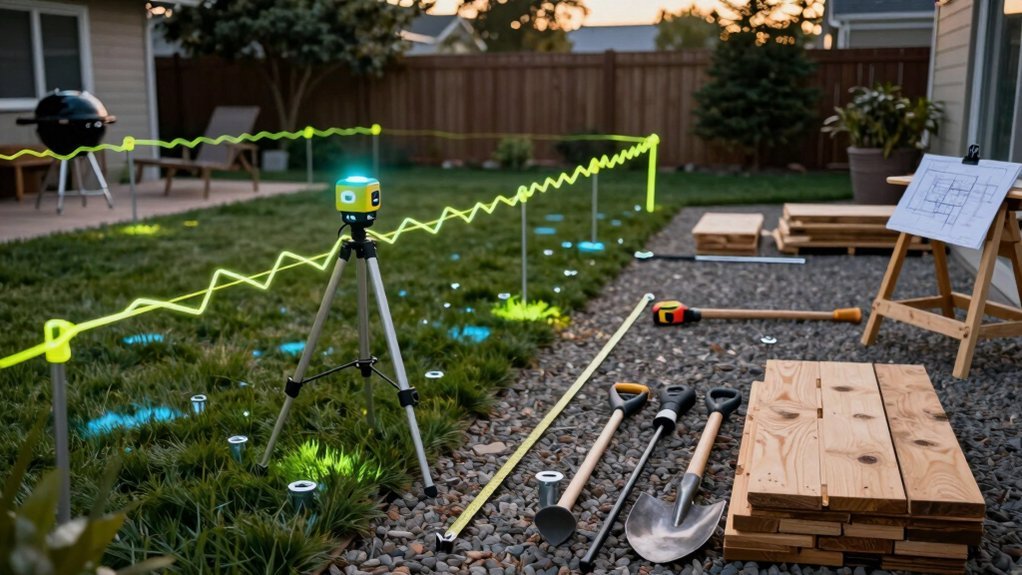
You’ll need to establish your fence perimeter with string lines tied around stakes, ensuring perfectly straight runs before breaking ground. Calculate your post spacing by planning for standard 8-foot sections, remembering that a typical 32-foot run requires 5 posts with 88 inches between the outer posts’ centers. For sloped terrain, maintain level fence panels by adjusting your post heights while following the contour of the ground with your string line.
Precise Measurement Techniques
Proper measurement stands as the foundation of any well-built privacy fence. Begin by securing a string between stakes to establish a straight fence line as your primary reference guide. This simple technique prevents costly alignment issues later.
For a typical 32-foot fence with five posts, space your outer posts exactly 88 inches apart to accommodate four equal panels. Mark center lines on the ground to ensure your bottom pickets (16 per section at 5.5 inches each) align properly between posts.
When digging your post holes along the string line, maintain a consistent 24-inch depth. Always set corner posts first, followed by middle posts. Before pouring concrete, verify post tops are level using a line level and confirm each post stands perfectly plumb with a 4-foot level.
String Line Installation
Before breaking ground on your privacy fence, establishing a precise string line creates the blueprint for your entire project. Drive stakes at your fence corners, then tie string tightly between them to mark your fence’s exact path. For a 32-foot stretch, you’ll need five posts with four panels between them.
| Tool | Purpose | Key Tip |
|---|---|---|
| Line Level | Ensures horizontal accuracy | Hang at string center |
| Measuring Tape | Confirms exact spacing | Measure twice, place once |
| Marking Spray | Indicates post positions | Use bright, visible color |
Before digging, check for underground utilities and local regulations. When installing your string line, ensure it’s taut and verify post placement will accommodate your planned 16-inch picket spacing. This careful preparation guarantees consistent privacy gaps while creating an even, professional appearance throughout your entertainment area.
Post Spacing Calculations
Calculating accurate post spacing forms the foundation of a professional-looking privacy fence. After installing your string line between planned end posts, you’ll need to determine precise intervals for your center posts. For standard privacy sections, maintain approximately 72 inches between posts to accommodate typical two-panel kits.
Remember to factor in the actual width of each post when calculating the overall spacing. Start by measuring your total fence run, then subtract the combined width of all posts to determine available space for gaps between panels. Divide this figure by the number of sections needed to ensure equal spacing throughout.
Before marking final post positions, always check for underground utilities and obtain any required permits. Use your string line with a line level to verify that post tops will align perfectly across the entire fence length.
Installing Posts and Creating the Framework
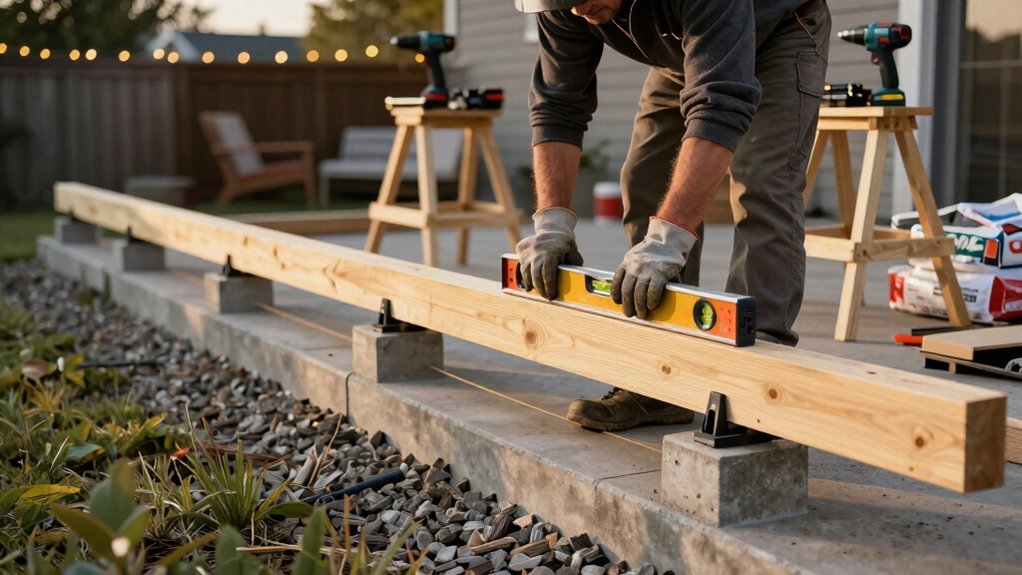
The foundation of your privacy fence begins with properly installed posts and a solid framework. Start by digging 24-inch deep holes at each marked post position along your string line. Install corner and end posts first, followed by middle posts, maintaining 72-inch spacing between them.
Position each post in its hole and use a line level on your string to ensure consistent height. Check for plumbness with a 4-foot level before filling holes with concrete. Pre-drill holes in your posts for added stability when securing them in concrete.
Verify that all posts form a straight, level line before proceeding to slat installation. This careful framework preparation guarantees your privacy fence will stand strong while creating the perfect backdrop for your entertainment area.
Attaching Privacy Slats and Panels
When installing privacy slats, you’ll need to center each board between posts, ensuring equal spacing for a professional appearance.
You should secure each board with two screws at both the top and bottom, working outward from the centerline to maintain consistent alignment.
For proper support, position your top horizontal support about 3 ½ inches down from the post tops and use a level throughout the installation process.
Spacing and Alignment Tips
Proper spacing and alignment make all the difference between a professional-looking privacy fence and one that appears hastily constructed. Start by using a level along the bottom of posts to ensure even alignment before attaching any components.
Maintain approximately 72 inches between posts when installing multiple panels to create consistent spacing throughout your privacy wall. When inserting slats, they should slide smoothly into grooves without binding—if they’re too tight, trim slightly for easier installation.
Don’t cut all slats at once. Measure and cut progressively to accommodate ground unevenness and slopes. For uniform appearance, center alignment between posts is crucial. Mark a center line and build outward evenly, using two screws at both top and bottom per board for secure attachment and even spacing.
Securing Boards Properly
Securely attaching privacy slats and panels creates the backbone of your entertainment area fence, ensuring both stability and longevity.
Begin by cutting your 2x4s slightly longer than the measured space between posts for a snug fit. Drill 1½-inch pocket holes and use outdoor-rated screws to create weatherproof joints that withstand the elements.
Position your top brace approximately 3½ inches from the fence top, then align middle and bottom boards using a level for perfect straightness. Mark a center line between posts to ensure equal spacing, and secure each board with two screws at both top and bottom.
Continue building outward, installing eight boards on each side of your center mark. Finally, attach lattice panels on top, cutting from standard 48″ and 28″ sheets as needed to complete your privacy barrier.
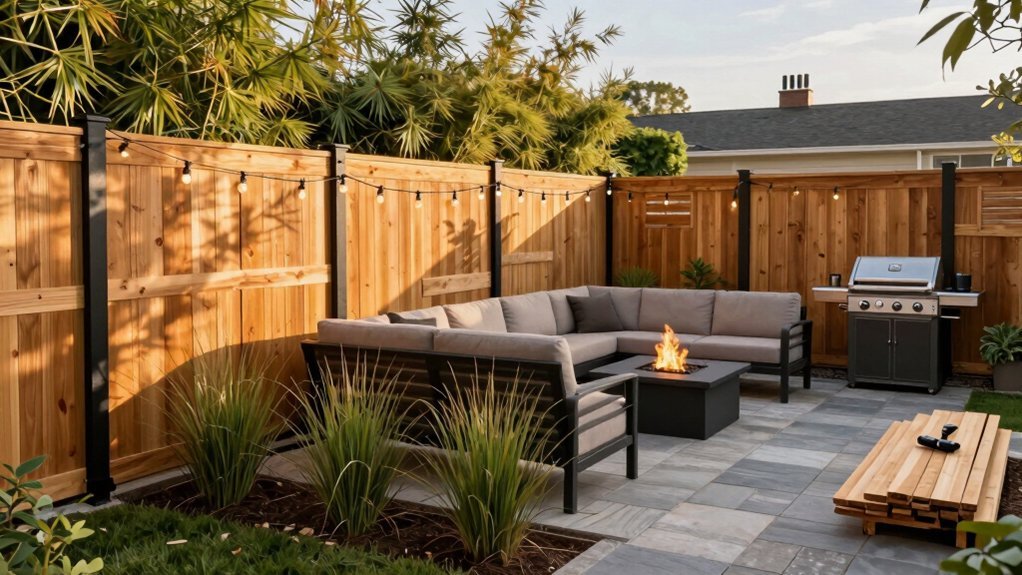
Adding Decorative Elements to Your Privacy Fence
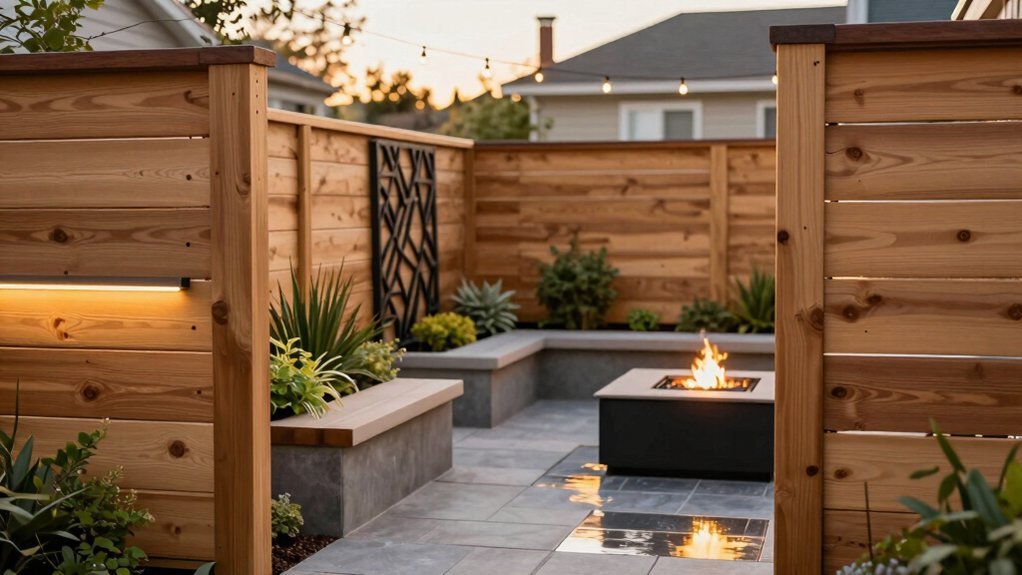
Why settle for a plain privacy fence when you can transform it into a stunning focal point for your entertainment area? Add lattice between sections or along the top to create visual interest while maintaining privacy. Cut pieces from standard 48″ and 28″ panels to fit your design needs.
Install ornamental post caps secured with outdoor-rated wood glue or caulk for weather resistance and a polished look. Incorporate built-in planter boxes or trellises that allow climbing plants to soften straight lines and integrate greenery with your fence structure.
Create visual contrast by combining materials or colors, like stained cedar with soft gray painted elements. Don’t forget functional decorations—hang potted plants, mount decorative panels, or install outdoor lighting to enhance ambiance and extend your entertainment area’s usability.
Incorporating Lighting for Evening Entertaining
When the sun sets on your outdoor gathering, thoughtfully placed lighting transforms your privacy fence into both a practical and enchanting backdrop for evening entertaining. Install in-ground or stake lights along the fence at 6–8 foot intervals to create soft uplighting without harsh glare.
| Lighting Type | Best Placement | Benefits |
|---|---|---|
| In-ground lights | Fence perimeter | Soft upward illumination |
| String lights | Embedded in lattice | Above-eye-level ambient glow |
| Pathway lights | Along walkways | Safe navigation |
| Weatherproof fixtures | Mounting points | Corrosion resistance |
| Smart controls | Accessible location | Adjustable mood settings |
For maximum impact, integrate lights into trellis sections and consider a dimmable system with weatherproof controls to adjust brightness based on the occasion. Always use outdoor-rated fixtures and sealed wiring designed for wet locations.
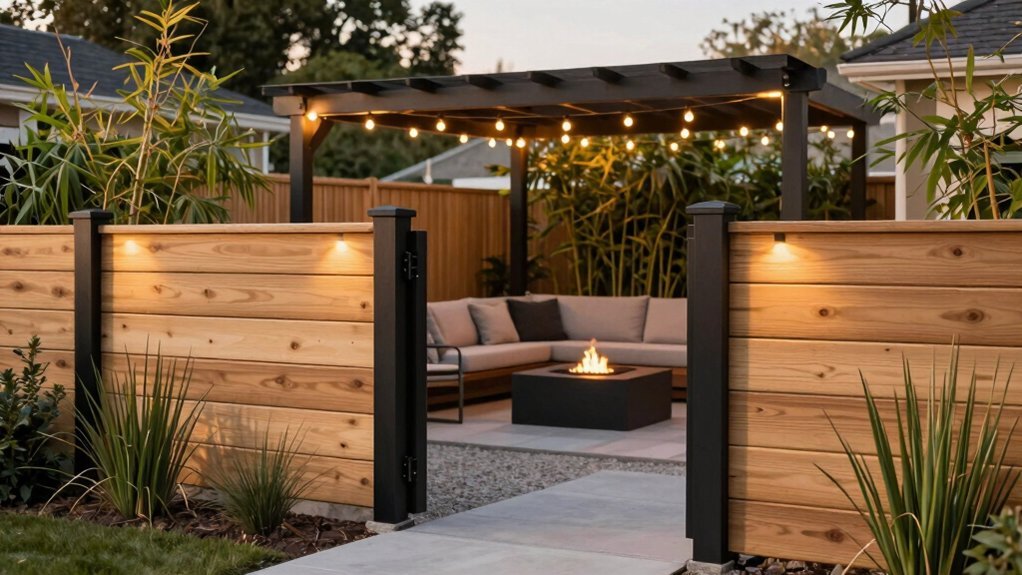
Creating Access Points and Entry Solutions
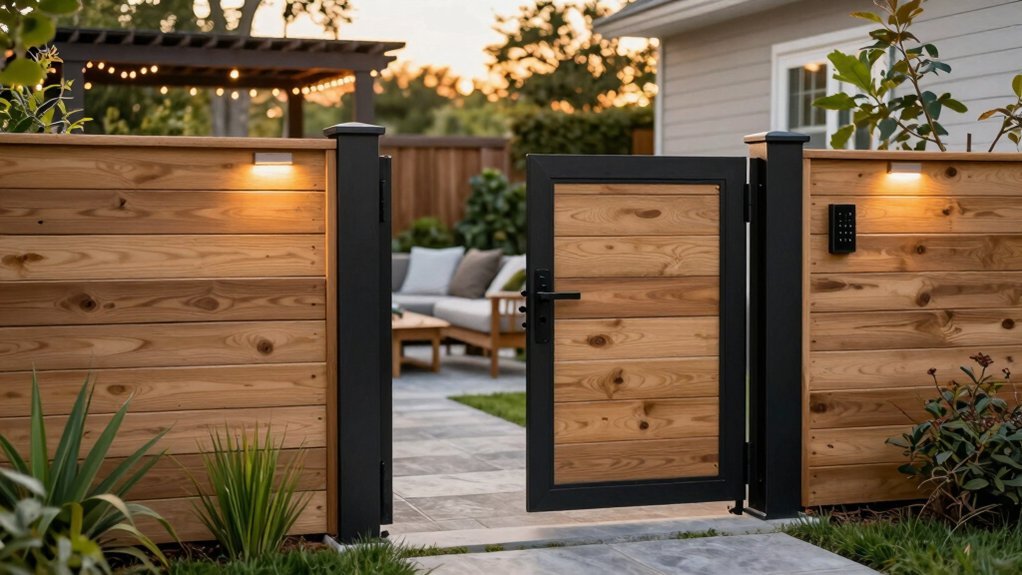
A well-designed access point transforms your privacy fence from a simple barrier into a welcoming entrance for your entertainment space. Consider using a DIY kit approach with three posts to create a two-panel wall that serves as your dedicated entry point.
Begin by pre-drilling and setting posts in concrete approximately 72 inches apart for stability. Install feet and level from bottom to top, ensuring slats slide smoothly into grooves to allow proper gate hinging. Center alignment is critical—mark a center line and place slats on both sides of the center post for balanced entry clarity.
When dealing with slopes, measure the bottom first and cut slats progressively rather than all at once. This approach maintains proper fit around your access point while creating a professional-looking entrance for guests.
Weatherproofing and Maintaining Your Privacy Fence
Once your entry point is perfectly positioned, your focus should shift to protecting your privacy fence against the elements. Use outdoor-rated screws or staples and seal all joints with caulk or outdoor wood glue to create a weather-resistant structure. Always allow treated lumber to dry completely before applying stains or paint for better adhesion.
Installing post caps on every end and top post will shed water effectively and prevent decay at vulnerable joints. For additional protection, consider adding:
- Lattice or slatted tops (12-18 inches) for moisture protection while maintaining airflow
- Outdoor-rated fasteners that won’t rust or stain your wood over time
- Protective sealants appropriate for your climate conditions
Plan for regular maintenance every 2-3 years, including cleaning, inspecting fasteners, and resealing to extend your fence’s lifespan and appearance.
Frequently Asked Questions
Is a Building Permit Required for Entertainment Area Privacy Fences?
You’ll likely need a permit depending on your local building codes. Check with your city’s planning department before starting, as requirements vary by location and fence height.
How Do Privacy Fences Affect Property Values and Neighbor Relations?
Well-maintained privacy fences can increase your property value by enhancing curb appeal. However, you’ll maintain better neighbor relations by discussing your plans before installation to address any concerns they might have.
Can Privacy Fences Be Safely Installed Over Irrigation Systems?
Yes, you can install privacy fences over irrigation systems, but locate and mark all lines first. Consider using surface-mounted posts or adjusting your fence layout to avoid damage.
What’s the Best Height for Blocking Sound Without Feeling Enclosed?
You’ll want 6-8 feet height for effective sound blocking while avoiding a closed-in feeling. Consider lattice or decorative top panels to maintain airiness while still dampening noise.
Are There Eco-Friendly Alternatives to Traditional Fence Materials?
Yes, you’ll find bamboo, reclaimed wood, composite materials made from recycled plastics, and living fences like hedges or vine-covered trellises all provide eco-friendly alternatives to traditional fencing materials.


Leave a Reply