To install deck lighting for evening parties, you’ll want to start by sketching your layout and identifying task lighting areas like grills and serving zones versus ambient spots for seating. Choose weather-resistant LED fixtures with IP65 ratings, then select a low-voltage transformer rated 20% higher than your total wattage. Connect fixtures using waterproof connectors, test each light before finalizing, and add timers or smart controls for effortless operation. The steps below walk you through each phase of the installation process.
Planning Your Deck Lighting Layout for Optimal Ambiance
When you’re ready to transform your outdoor space, creating a thoughtful lighting plan before purchasing any fixtures will save you time, money, and frustration.
Start by sketching your deck’s layout and identifying key areas: stairs, railings, seating zones, and architectural features you want to highlight.
A simple sketch of your deck layout reveals exactly where lighting will make the biggest impact.
Consider how you’ll use the space during evening gatherings. You’ll want brighter task lighting near grills or serving areas and softer ambient lighting where guests relax. Mark potential fixture locations on your sketch, noting which require electrical access.
Think about layering your lighting at different heights. Post cap lights provide overhead illumination, while step lights offer safety and subtle drama. Railing lights create a warm perimeter glow. Balance these elements to avoid harsh shadows or overly bright spots that diminish your party atmosphere.
Essential Tools and Materials for Deck Lighting Installation
Gathering the right tools and materials before you start will help your deck lighting project go smoothly from start to finish.
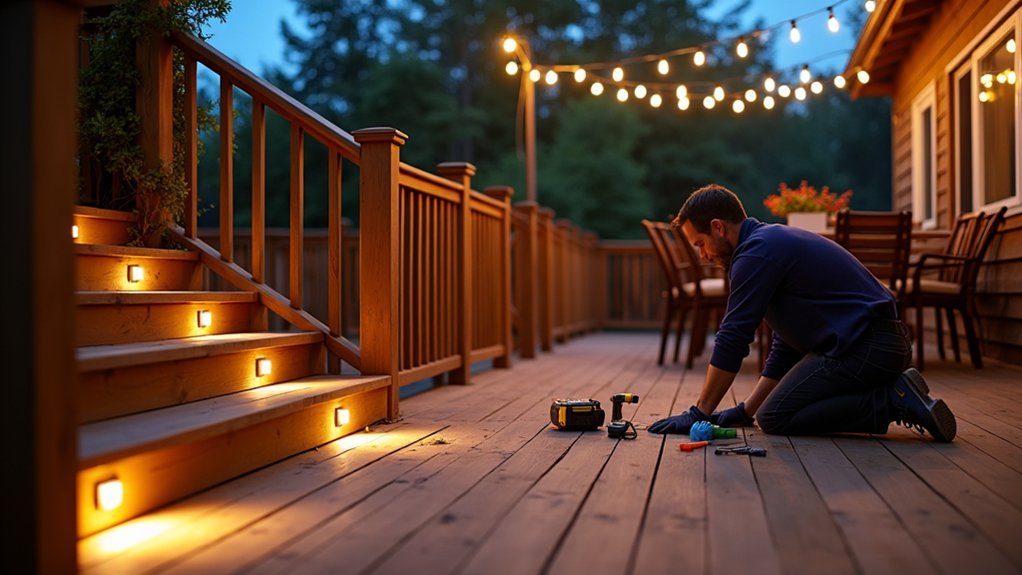
You’ll need a drill with various bits, wire strippers, a voltage tester, and weatherproof connectors to complete the installation safely.
For materials, focus on these three essential categories:
- Lighting fixtures – Choose LED post caps, step lights, or string lights rated for outdoor use
- Wiring components – Select low-voltage cable, a transformer sized for your total wattage, and junction boxes
- Mounting hardware – Stock up on stainless steel screws, brackets, and weatherproof electrical tape
Don’t forget safety glasses and work gloves.
Having everything organized and accessible means you won’t interrupt your workflow with trips to the hardware store.
Understanding Electrical Requirements and Safety Considerations
Before you start running wires across your deck, you’ll need to choose between low-voltage (12V) and line-voltage (120V) systems based on your lighting goals and electrical comfort level.
Low-voltage systems offer safer DIY installation and lower energy costs, while line-voltage setups provide brighter illumination but require professional expertise.
Regardless of which option you select, properly weatherproofing all connections is critical to prevent electrical hazards and guarantee your deck lighting performs safely for years to come.
Voltage Options Explained
Understanding the voltage requirements for your deck lighting project helps you choose the safest and most practical option for your outdoor space.
You’ll encounter three main voltage options when shopping for deck lights:
- Line voltage (120V) – Delivers powerful illumination but requires professional installation and carries higher shock risks in wet conditions.
- Low voltage (12V) – Offers safer installation you can handle yourself, uses a transformer to reduce household current, and works well for most deck applications.
- Solar-powered – Eliminates wiring completely, though performance depends on sun exposure and battery quality.
For evening party lighting, low-voltage systems strike the best balance between safety and brightness.
They’re easier to install, cost less to operate, and won’t pose significant hazards if connections get wet.
Weatherproofing Your Connections
Even the safest low-voltage system can fail if moisture seeps into your connections. You’ll need to protect every wire junction from rain, snow, and humidity to guarantee your deck lighting lasts for years.
Start by using waterproof wire connectors rated for outdoor use. Look for connectors with an IP67 or IP68 rating, which indicates they’re sealed against water intrusion. Apply dielectric grease inside each connection point before sealing—this prevents corrosion and improves conductivity.
Don’t bury connections directly in soil or leave them exposed on your deck surface. Instead, house them in weatherproof junction boxes mounted in protected locations. Seal all cable entry points with silicone or rubber grommets.
Check your connections annually before party season begins, replacing any that show signs of corrosion or degradation.
Choosing the Right Lighting Fixtures for Your Deck Style
Your deck’s architectural style should guide your fixture selection, whether you’re drawn to sleek, minimalist LED options or classic lantern-inspired designs.
Modern fixtures typically feature clean lines and brushed metal finishes, while traditional options offer ornate details and warmer tones that complement rustic or craftsman-style decks.
Beyond aesthetics, you’ll want to prioritize weather-resistant materials like marine-grade stainless steel, copper, or UV-stabilized plastics that can withstand rain, snow, and intense sun exposure.
Modern Vs Traditional Options
When selecting deck lighting fixtures, the choice between modern and traditional styles markedly impacts your outdoor space’s overall aesthetic. Modern fixtures feature clean lines, minimalist designs, and materials like brushed steel or matte black finishes. Traditional options showcase ornate details, warm bronze tones, and classic lantern shapes that complement rustic or colonial architecture.
Consider these factors when deciding:
- Architectural harmony – Match your lighting style to your home’s existing design elements for visual cohesion.
- Functionality needs – Modern LED options often provide better energy efficiency and longer lifespans than traditional incandescent fixtures.
- Ambiance goals – Traditional fixtures create warm, nostalgic atmospheres, while modern designs offer sleek sophistication.
You’ll achieve the best results by staying consistent with your chosen style throughout the entire deck space.
Weather-Resistant Material Considerations
Beyond style considerations, the materials your fixtures are made from determine how well they’ll withstand outdoor conditions year after year. Look for fixtures rated IP65 or higher, which indicates strong protection against dust and water jets.
Stainless steel and marine-grade aluminum resist corrosion best, making them ideal for coastal or humid climates. Brass develops an attractive patina over time while maintaining structural integrity. Avoid standard steel or iron unless it’s powder-coated, as rust will compromise both appearance and function.
For lens materials, choose tempered glass or UV-resistant polycarbonate. Standard plastic yellows and becomes brittle with sun exposure. Rubber gaskets and silicone seals prevent moisture infiltration at connection points.
Check that all wiring components carry outdoor ratings too—indoor-rated parts fail quickly when exposed to temperature swings and moisture.
Installing Low-Voltage Transformer Systems
A low-voltage transformer converts your home’s standard 120-volt current into a safer 12-volt output, making it the heart of any deck lighting system.
You’ll want to mount your transformer near an outdoor GFCI outlet, typically within 5 feet for peak performance.
When selecting and installing your transformer, follow these essential steps:
- Calculate your total wattage by adding up all fixture watts, then choose a transformer rated 20% higher to prevent overloading.
- Mount the transformer at least 12 inches above ground level to protect it from moisture and debris.
- Connect your low-voltage cable to the transformer’s terminals, ensuring tight connections to prevent voltage drops.
Once installed, you can run your cable along deck joists and connect each fixture to complete your lighting circuit.
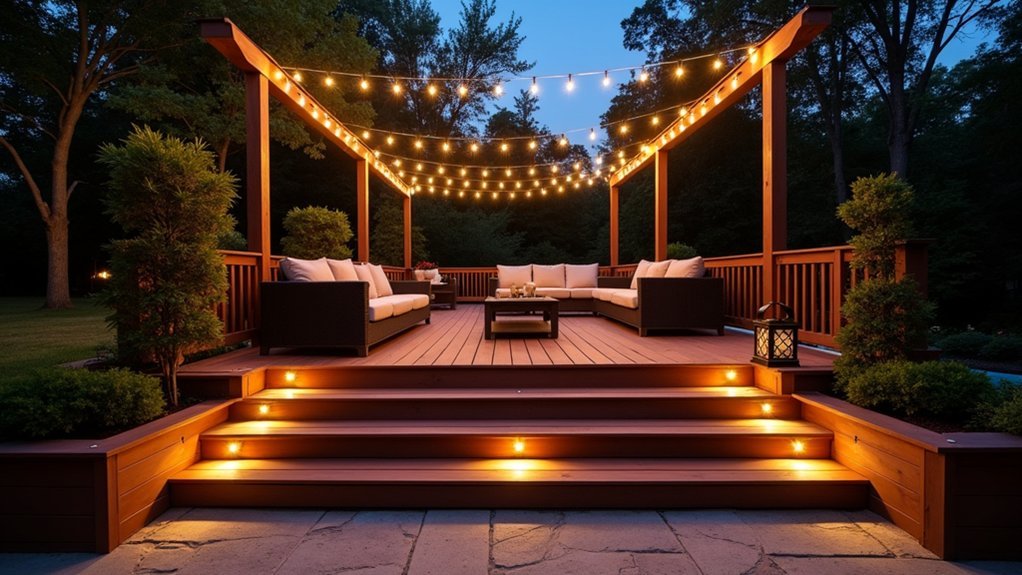
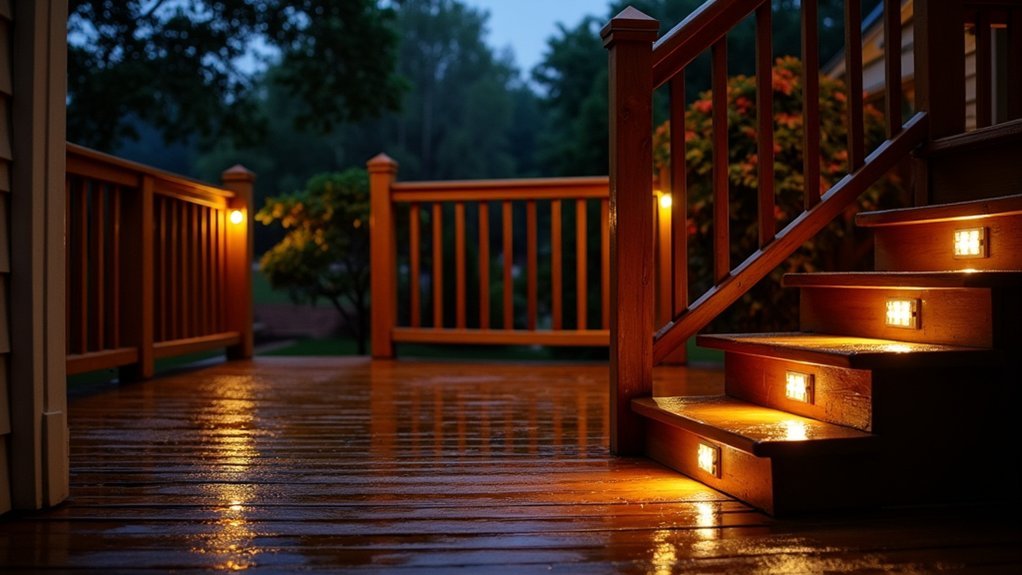
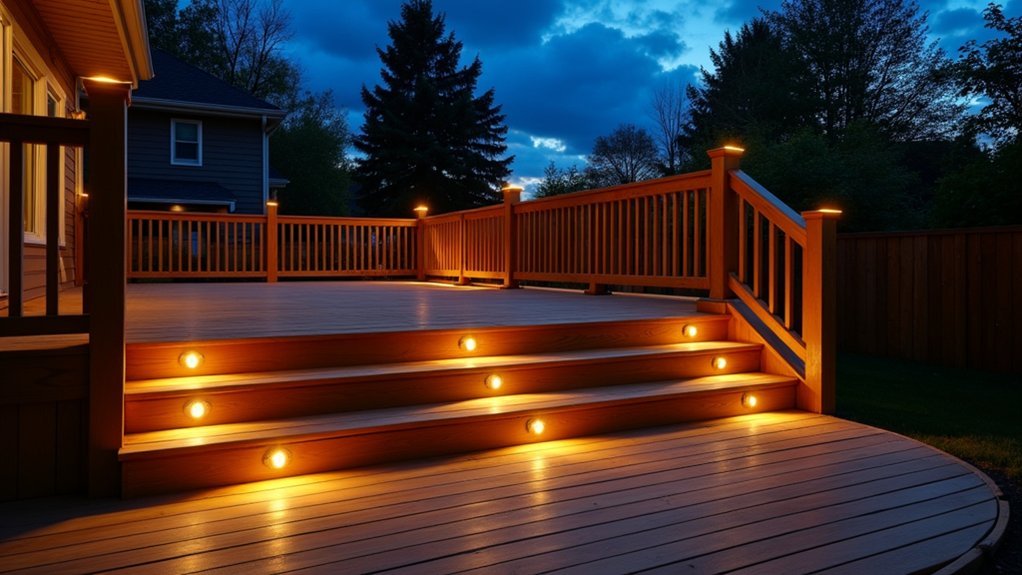
Mounting Post Cap and Rail Lights Along Your Deck Perimeter
Post cap and rail lights typically serve as the most visible elements of your deck lighting design, framing your outdoor space while providing essential safety illumination along walkways and stairs.
Post cap and rail lights frame your deck beautifully while keeping walkways and stairs safely illuminated.
Before mounting, make certain your posts are compatible with your chosen fixtures. Most post cap lights slip directly over 4×4 or 6×6 posts and secure with screws from underneath.
For rail lights, you’ll drill holes through the railing to feed wiring, then attach the fixtures using provided mounting hardware.
Space your lights consistently—typically every 6 to 8 feet—to create uniform illumination without dark spots. Connect each fixture to your low-voltage cable using the manufacturer’s connectors, tucking excess wire neatly along the rail’s underside.
Test each light before finalizing placement, and seal all connections with waterproof caps to prevent moisture damage.
Adding Recessed Stair Lights for Safety and Style
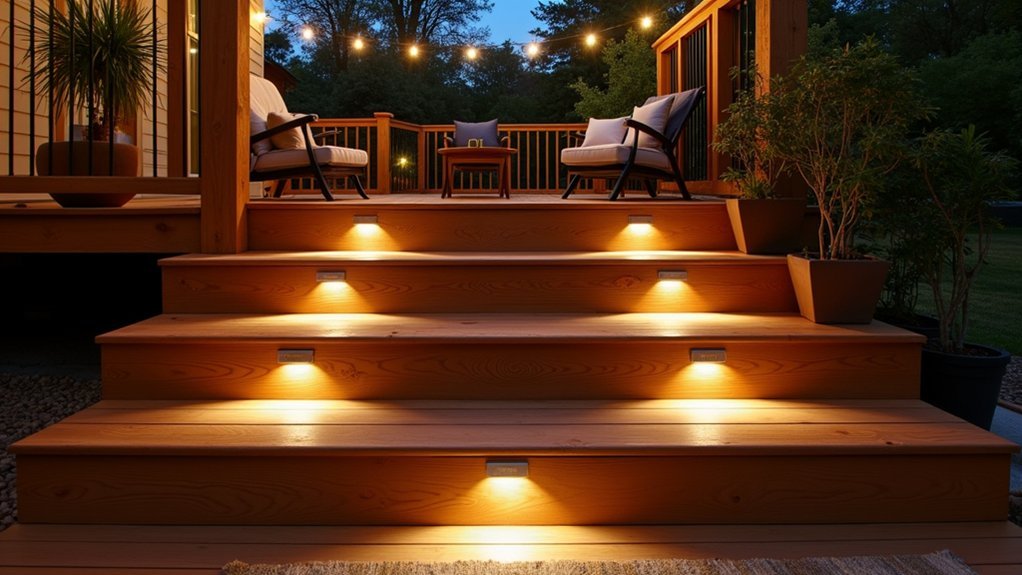
Recessed stair lights improve visibility on your deck steps while creating an elegant, streamlined look that doesn’t interrupt your railing design.
You’ll need to select fixtures rated for outdoor use and sized appropriately for your stair risers or treads. Once you’ve chosen your lights, you can begin the wiring process and install each fixture to transform your stairs into a safer, more inviting pathway.
Choosing Recessed Light Fixtures
When you’re looking to enhance both safety and aesthetics on your deck stairs, recessed light fixtures offer an elegant solution that sits flush with your stair risers or treads. These low-profile lights illuminate each step without creating glare or protruding hazards.
Consider these key factors when selecting your fixtures:
- IP rating – Choose fixtures rated IP65 or higher to withstand moisture, dust, and temperature fluctuations common in outdoor environments.
- Light output – Select fixtures producing 10-20 lumens per step, bright enough for visibility without overwhelming the space.
- Housing material – Opt for stainless steel or marine-grade aluminum to prevent corrosion and guarantee longevity.
You’ll also want fixtures with LED technology, which provides energy efficiency and a lifespan of 25,000+ hours.
Wiring and Installation Steps
Before you begin installing your recessed stair lights, you’ll need to gather the essential tools and materials: a drill with hole saw attachment sized for your fixtures, low-voltage wiring (typically 12-gauge for most residential applications), wire connectors, a transformer rated for your total wattage, and a voltage tester.
Start by marking the placement of each light on your stair risers, keeping them centered or offset based on your design preference. Drill the holes, then run your wiring from the transformer location to each fixture point. Connect the wires using waterproof connectors, maintaining consistent polarity throughout.
Insert each fixture into its hole and secure it according to the manufacturer’s instructions. Test each light before finalizing connections, then seal all exposed wiring with outdoor-rated electrical tape.
Incorporating String Lights and Overhead Lighting Options
String lights and overhead lighting can transform your deck into an inviting outdoor living space that’s perfect for entertaining or relaxing after dark.
Strategic overhead lighting transforms your deck from a daytime space into an enchanting evening retreat.
You’ll want to consider your deck’s layout and existing structures when planning your installation.
Here are three effective approaches for incorporating overhead lighting:
- Zigzag string lights across your deck by anchoring them to posts, railings, or dedicated poles for even illumination
- Install a pergola or shade sail with integrated lighting to create a defined outdoor ceiling
- Mount pendant lights or chandeliers from existing overhead structures for focused task lighting
When hanging string lights, use sturdy hooks rated for outdoor use and make certain all connections remain weather-protected.
You should also connect your overhead lighting to a dimmer switch for adjustable ambiance during evening gatherings.
Connecting Wiring and Testing Your Lighting System
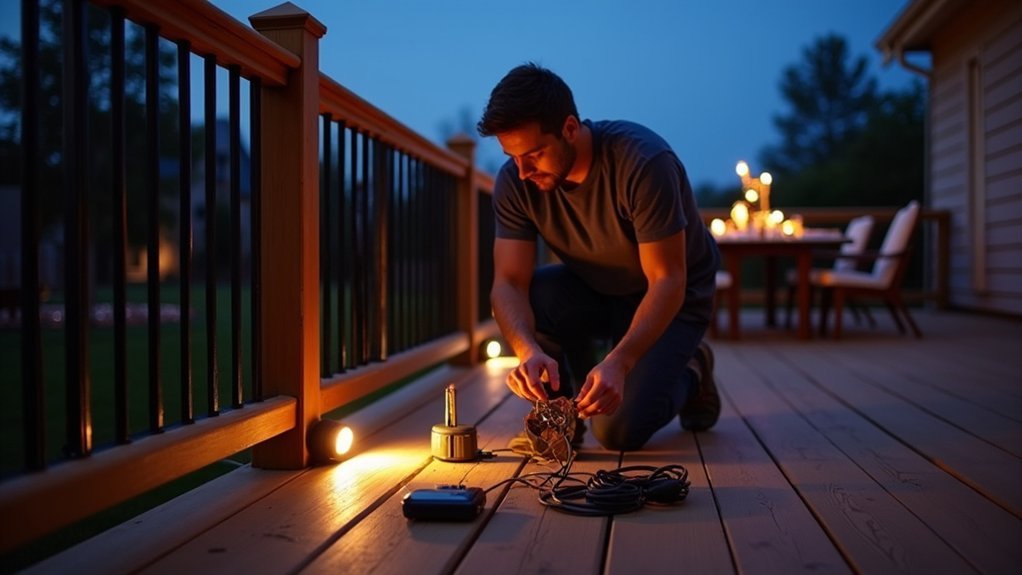
Once you’ve positioned your string lights and overhead fixtures, you’ll need to connect all the wiring to bring your deck lighting system to life. Start by turning off power at the circuit breaker before handling any electrical connections.
Strip approximately half an inch of insulation from each wire end using wire strippers. Match wire colors—black to black, white to white, and green or copper to ground. Secure connections with wire nuts and wrap them in electrical tape for added protection.
Route wires through weatherproof junction boxes to shield connections from moisture.
After completing all connections, restore power at the breaker. Test each light individually, checking for flickering or dim spots that indicate loose connections. Walk your deck at dusk to verify adequate coverage for your evening gatherings.
Setting Up Timers and Smart Controls for Effortless Operation
After you’ve confirmed all your lights work properly, you’ll want to install timers or smart controls to automate your deck lighting.
Basic mechanical timers offer simple on/off scheduling, while digital programmable timers provide more flexibility with multiple settings throughout the evening.
Smart controls take convenience further by connecting to your home’s WiFi network.
You can adjust brightness, set schedules, and control individual zones from your smartphone.
Consider these three setup options:
- Astronomical timers automatically adjust to sunset times year-round, ensuring lights activate precisely when needed.
- Motion sensors trigger pathway lights when guests move through specific areas.
- Smart home integration lets you control deck lighting through voice commands or create scenes for different party moods.
Program your preferred settings before your first evening gathering.
Frequently Asked Questions
How Much Does a Complete Deck Lighting Installation Typically Cost?
You’ll typically spend between $200 and $2,000 for a complete deck lighting installation. Your final cost depends on the lighting type you choose, your deck’s size, and whether you’re hiring a professional or doing it yourself.
Can Deck Lights Be Left on During Rainy Weather?
Yes, you can leave your deck lights on during rainy weather if they’re rated for outdoor use. Check that your fixtures have an IP65 or higher rating, which means they’re protected against water jets.
How Long Do LED Deck Lights Usually Last Before Replacement?
You can expect your LED deck lights to last between 25,000 and 50,000 hours before you’ll need to replace them. That’s roughly 10-20 years of regular evening use, making them incredibly cost-effective.
Will Deck Lighting Significantly Increase My Electricity Bill?
You won’t see a significant increase in your electricity bill. LED deck lights consume minimal energy—typically just a few watts each. Running them for evening parties costs only pennies, making them extremely budget-friendly.
Do I Need a Permit to Install Deck Lighting Myself?
You typically don’t need a permit for low-voltage deck lighting, but you should check your local building codes first. If you’re installing line-voltage fixtures, you’ll likely need a permit and possibly a licensed electrician.


Leave a Reply