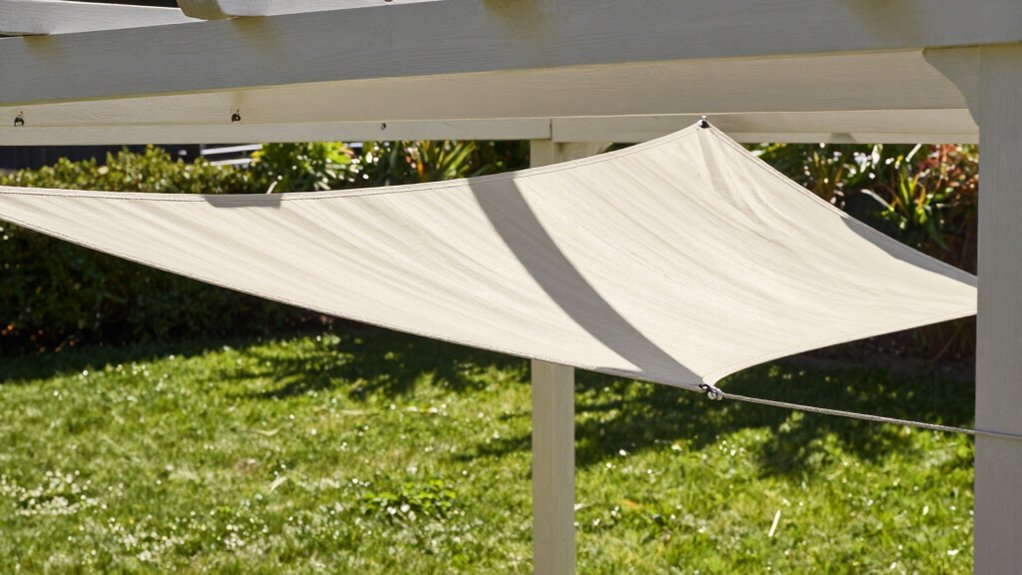
You can secure shade sails to your pergola using wall-mounted hardware kits, free-standing posts, tree attachments, or existing pergola frames. Adjustable pulley systems give you flexible tensioning control, while DIY frame construction offers permanent solutions. You’ll want even tension across all corners to prevent sagging and guarantee durability. Professional installation guarantees proper compliance and workmanship. Each method has distinct advantages depending on your structure type and aesthetic goals, and there’s much more to discover about implementation details.
Wall-Mounted Anchors With Hardware Kits
How can you create a permanent, visually integrated shade sail system on your pergola? Wall-mounted anchors with hardware kits offer an excellent solution. These kits typically include eyelet plates, turnbuckles, carabiners, and nautical rope designed to connect your sail corners securely. You’ll attach the hardware to your pergola’s load-bearing walls, creating a clean, integrated aesthetic while maintaining stability.
Installation ranges from moderate to easy, depending on your chosen kit type. The key to success lies in ensuring your walls can withstand the tension generated by wind and rain. When properly anchored, this method provides robust edge fixation that resists environmental stress effectively.
This attachment approach combines durability with visual appeal, giving your pergola a polished, permanent appearance without compromising functionality or safety.
Free-Standing Posts and Pole Installation
What if you didn’t have to rely on your pergola’s existing structure to support a shade sail? Free-standing posts offer you complete flexibility in positioning your shade wherever it’s needed on your patio.
You can choose between wood or metal poles that match your outdoor aesthetic while withstanding sail tension and weather exposure. The key to success is establishing a solid foundation—aim for a plinth measuring at least 25x25x25 for optimal stability.
Your mounting options include reinforced concrete bases, concrete plinths, or perimeter wall connections when you need extra security. This approach enables truly portable installations you can relocate as your needs change, making free-standing posts an ideal solution for patios lacking suitable wall anchors.
Tree Attachment and Natural Anchor Points

Why settle for artificial structures when nature provides the perfect support system? Tree attachment offers a stunning aesthetic while leveraging existing landscape features.
You’ll want to select a sturdy tree with multiple branches that can distribute tension evenly, preventing stress concentration on any single point.
Install tensioned cables connecting your shade sail to various attachment points along the tree’s canopy. This approach maintains sail tautness and enhances wind resistance. Always use waterproof, UV-protected shade sails designed for outdoor exposure to withstand weather demands.
Plan your attachment strategy carefully to balance loads across multiple points, improving overall stability.
You must protect the tree bark by using proper fasteners and padding, ensuring you don’t damage the tree while securing your sail effectively.
Existing Pergola Structures and Frame Integration
You can transform your existing pergola into an ideal shade sail anchor by leveraging its posts and beams, which eliminates the need for additional freestanding supports.
Before you proceed, you’ll want to assess your pergola’s frame material—whether wood or metal—and confirm it can handle the tension forces that shade sails exert during installation.
With proper wall-mounted or top-mounted brackets paired with strategic placement of attachment points, you’re able to create an integrated system that maintains visual cohesion while ensuring even tensioning and drainage.
Leveraging Existing Posts
When you’ve already got a pergola in place, there’s no need to start from scratch—the existing posts and frame can serve as reliable anchor points for your shade sail. Here’s how you can maximize your current structure:
- Assess load capacity – Verify that your posts can withstand the tension forces from the shade sail without compromising structural integrity.
- Use wall-based mounts – Install collars around posts to secure attachments without drilling into the main framework.
- Maintain visual cohesion – Leveraging existing posts preserves your pergola’s original aesthetic while adding functionality.
- Ensure proper tensioning – Even with established anchor points, maintain correct tension to prevent sagging and guarantee effective rain drainage.
This approach saves time and money while creating a seamlessly integrated shade solution.
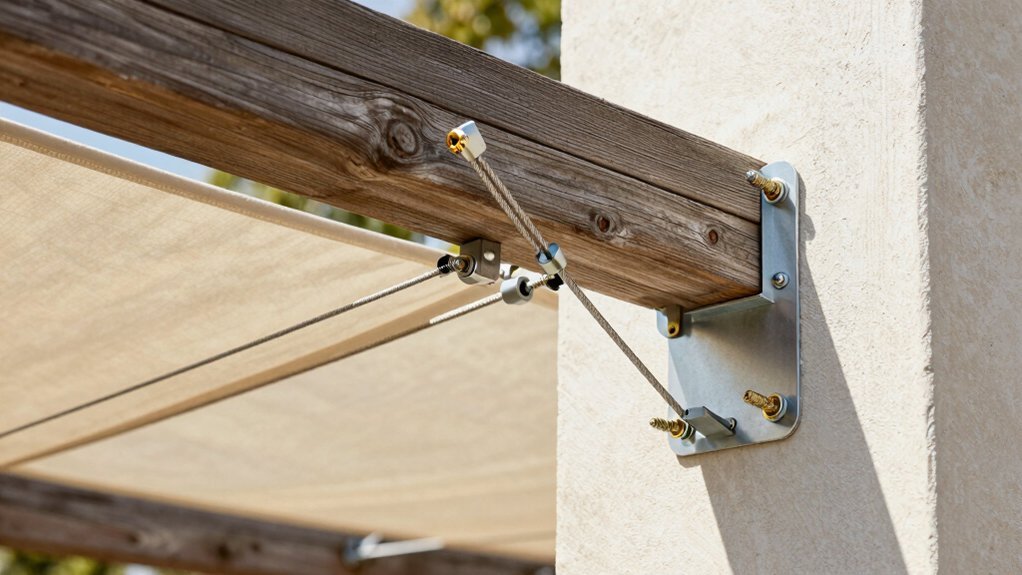
Wall Integration Strategies
Beyond leveraging your pergola’s existing posts, walls themselves become powerful anchor points for shade sail integration. You can mount plates with eyelets directly into your wall structure, creating secure connection points for your sail corners. To maximize stability, you’ll want to ensure your wall can resist the tension forces your sail will exert.
| Mounting Method | Best For | Key Advantage |
|---|---|---|
| Wall plates with eyelets | Pergola walls | Direct corner attachment |
| Wall collars | Vertical mounting | Space-saving, clean look |
| Dedicated anchors | Professional installations | Optimized stability |
| Wall kits | Complete solutions | Includes hardware bundles |
Keep corner heights consistent for even tensioning and proper drainage. Consider dedicated shade sail wall anchor kits designed specifically for pergola installations to achieve professional-grade results and ensure long-term durability.
Frame Compatibility Assessment
How well does your pergola’s existing frame match the demands of a shade sail installation?
You’ll need to assess your frame’s material and structural capacity before proceeding. Here’s what to evaluate:
- Material type – Determine whether you’re working with wood or metal, as each requires different mounting hardware and installation techniques.
- Structural posts and beams – Identify strong anchor points aligned with existing support columns to ensure proper load transfer.
- Frame strength – Consider whether your pergola can withstand lateral forces from tensioned sails, or if reinforcement’s necessary.
- Design specifications – Review original construction plans to understand load ratings and weight limitations.
Matching your shade sail system to your pergola’s actual capacity prevents costly damage and ensures safe, long-lasting performance.
Adjustable Pulley Systems for Flexible Tensioning
If you’re looking to maximize your shade sail’s adaptability, adjustable pulley systems offer a practical solution that complements traditional tensioned cables. These setups let you fine-tune sail height and angle throughout the day, following the sun’s movement without disturbing anchor points.
You’ll appreciate how pulleys maintain even tension during adjustments. When wind picks up or sun angles shift, you can collaborate with others to reposition your sail smoothly and quickly. The cable-and-pulley combination enables controlled tension changes that keep your system balanced.
This flexibility transforms your outdoor space into a genuinely functional gathering area. Rather than settling for a fixed configuration, you’re creating an adaptable shade solution that responds to your needs in real time.
DIY Frame Construction for Custom Mounting
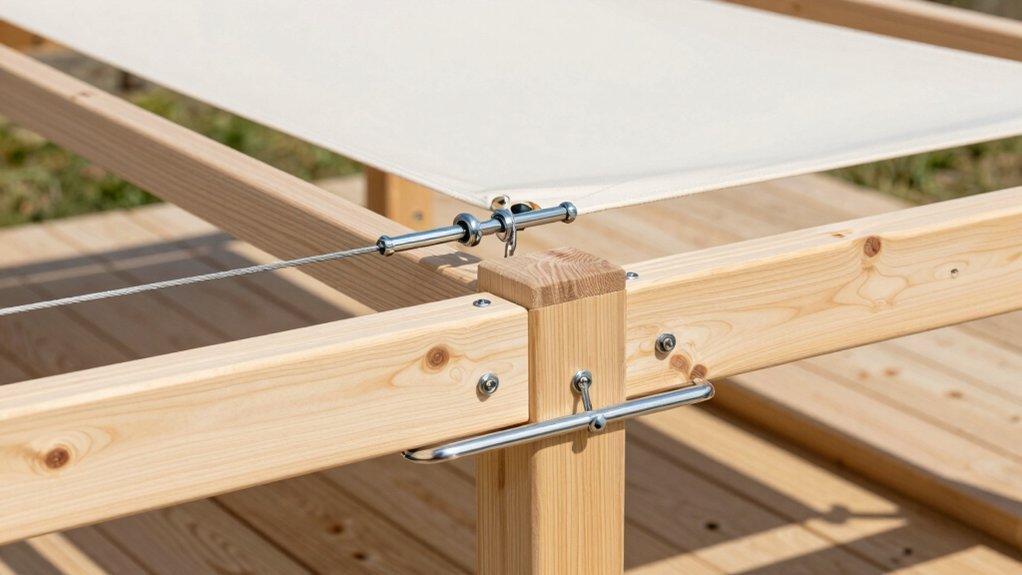
While adjustable pulleys give you the flexibility to reposition your sail throughout the day, a custom DIY frame provides the permanent structural foundation that makes those adjustments possible.
You’ll build a robust frame tailored to your shade sail’s dimensions and layout. Here’s what you need to do:
Build a robust frame tailored to your shade sail’s dimensions and layout for maximum durability and performance.
- Select durable materials like treated wood or metal that withstand weather and tension
- Measure precisely and position posts at exact corners to ensure even tensioning
- Add cross-bracing throughout the frame to prevent racking under wind and sail load
- Install concrete footings or sturdy plinths to anchor the entire structure securely
After assembling your frame, you’ll attach wall or pole anchors that distribute the sail’s tension evenly across all corners. This solid foundation eliminates wobbling and guarantees your shade sail performs reliably for years.
Professional Installation Services and Expert Guidance
When you hire professionals for shade sail installation, they’ll assess your patio’s unique anchor points and site conditions to create a customized plan tailored to your space.
You’ll benefit from their expertise in proper tensioning techniques, ensuring even pressure across all corners and correct drainage alignment for long-term durability.
Additionally, you’ll gain peace of mind knowing that certified installers follow safety and compliance standards while delivering guaranteed workmanship.
Expert Assessment and Planning
Why do so many shade sail installations fail prematurely? Poor planning and inadequate assessment are typically to blame. When you skip expert evaluation, you’ll miss critical details that determine success.
A comprehensive assessment workflow examines:
- Space geometry and existing structures to identify optimal anchor points
- Structural strength and wind load capacity to select appropriate hardware
- Potential obstructions that affect aesthetics and functionality
- Drainage requirements, including strategic corner positioning for water runoff
Professionals evaluate whether walls, poles, or freestanding frames suit your patio best. They’ll plan tensioning systems that distribute forces evenly across all corners while minimizing sagging. This assessment also covers permits, site accessibility, and long-term maintenance needs. You’ll get a durable, compliant installation that performs reliably for years.
Proper Tensioning Techniques
Once you’ve completed your expert assessment and identified the ideal anchor points, you’re ready to focus on the installation step that makes or breaks your shade sail’s performance: proper tensioning.
You’ll want to apply equal force to all corners simultaneously to prevent sagging and ensure wind, rain, and hail resistance. Even tension distributes the load evenly, eliminates water pockets, and improves drainage and appearance. Maintain consistent corner heights throughout the process to facilitate uniform force application.
Consider using adjustable or quick-release mechanisms for precise control during installation. These systems allow you to fine-tune tension at each anchor point. If you’re uncertain about achieving optimal results, consulting a professional installation guide or hiring expert services ensures your shade sail performs reliably for years to come.
Safety and Compliance Standards
How do you ensure your shade sail installation meets local regulations and safety requirements? You’ll want to prioritize both compliance and safety throughout your project.
Start by addressing these critical areas:
1. Check local codes and permits – Research requirements in your area to avoid fines and ensure compliant installations
2 Use weather-rated hardware – Select fixtures designed to withstand your climate’s demands and prevent failure
3 Maintain clearance – Keep your shade sail away from utilities and nearby structures to eliminate hazards
4 Schedule professional installation – Expert services ensure correct tensioning, proper attachment points, and layout considerations that prioritize safety
Regular inspections matter too. You should check hardware for loosening fittings and fabric seams periodically. During severe weather, temporarily remove or disassemble your shade sail to mitigate wind and storm risks. This proactive approach protects your investment and keeps your patio safe.
Frequently Asked Questions
How to Install a Shade Sail on a Pergola?
You’ll attach your shade sail corners to sturdy pergola posts using turnbuckle kits or carabiners. Tighten all corners evenly, positioning one slightly lower for drainage. You’ll guarantee proper tension by resisting the sail’s forces with rated hardware and UV-resistant fabric.
What Can I Attach a Shade Sail To?
You can attach a shade sail to walls, existing structures, dedicated poles, or free-standing posts. You’ll use wall anchors, eyelets, turnbuckles, or carabiners to secure the corners. You should position one corner lower for proper drainage.
What Is the Best Way to Secure a Shade Sail?
You’ll secure your shade sail best by using dedicated poles or wall anchors with turnbuckles, keeping one corner about 25% lower for drainage. Ensure equal tension on all corners, use corrosion-resistant hardware, and anchor everything firmly against wind loads.
How to Install Shade Sail Without Drilling?
You can install a shade sail without drilling by using magnetic attachments with carabiners. Simply attach pot magnets to metal surfaces, connect carabiners to your sail’s metal rings, and secure everything together. It’s a quick, damage-free solution.

Leave a Reply