
Define your outdoor purpose and map zones for cooking, dining, and lounging, then plan smooth indoor-outdoor flow with doors that fully open. Choose durable, cohesive decking, then layer lighting for ambiance and safety. Create comfortable, multi-functional seating around a focal fire or water feature. Add heat sources and shelter for comfort. Bring in greenery, planters, and textiles, while boosting privacy with stylish screens. Design for flexibility and changes, and you’ll unlock a seamless deck space.
Define Purpose and Zone Layout
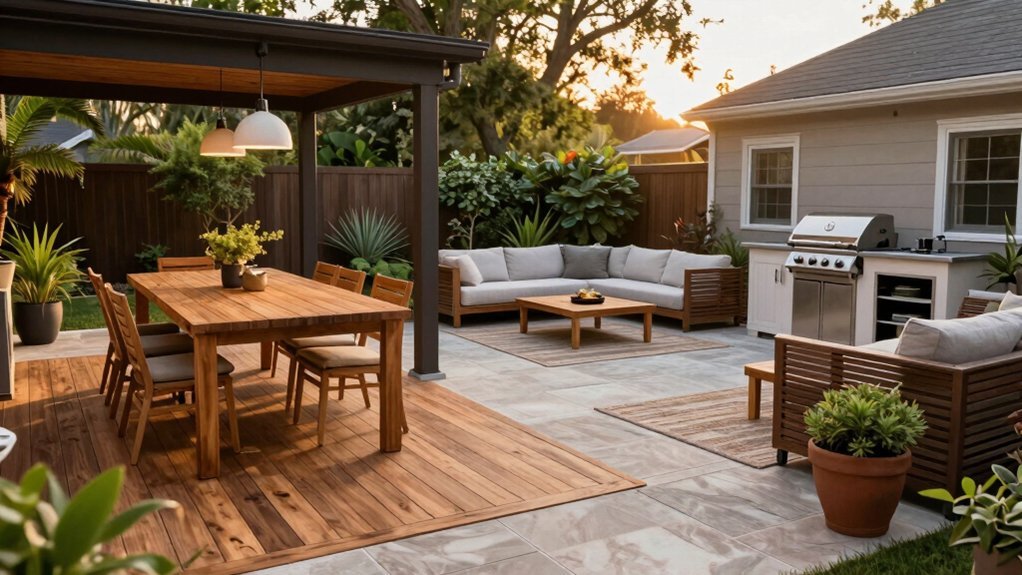
Where should you start when shaping a deck landscape? Begin by defining the outdoor space’s primary function—dining, lounging, or a mixed-use—to guide where you place zones and what furniture you select. Map distinct zones for cooking, dining, and lounging, and plan clear pathways between them so traffic stays smooth. Allocate seating that fits your expected guest count, and consider multipurpose pieces like benches or modular seating to maximize flexibility. Ensure each zone has shelter or shade, such as a pergola or umbrella, so you can use the space year-round. Finally, plan sight lines and access points so guests can move naturally from one zone to another without interruptions. Keep materials cohesive, and align lighting with function to extend evening usability for comfortable all-season gatherings.
Plan Smooth Indoor-Outdoor Flow
You bridge inside and out by aligning the kitchen and dining layouts with the deck and choosing doors that fully open to extend the entertaining space. Maintain a continuous palette from indoors to outdoors and extend the counter or bar onto the deck to keep guests in one zone. Plan clear sightlines, easy entry, and weatherproof lighting and seating so the flow feels effortless from day to night.
Bridge Inside and Out
How can you create a seamless indoor-outdoor flow that feels like one space? Start by aligning your interior kitchen or dining zones with adjacent deck spaces, using bi-fold doors or extending countertops to carve a single, accessible path.
Position seating and dining areas to face the same exterior view as the living room, reinforcing a shared sightline that links rooms.
Use transitional materials and finishes—matching color palettes, cabinetry styles, and decking substrates—to unify indoors and outdoors.
Install weatherproof, easy-access entry points, like wide doorways and covered transitions, to minimize bottlenecks when you move between spaces.
Schedule lighting and climate controls to operate cohesively, so you can enjoy comfort from dusk through late evening in both areas.
This approach keeps everything flowing effortlessly for you.
Seamless Indoor Outdoor Flow
Effortless flow starts with a continuous sightline and clear traffic path that visually and physically links indoor spaces to the deck, using large bi-fold or sliding glass doors to blur boundaries. Design a continuous sightline and traffic path that visually and physically connects indoor spaces to the outdoor deck, using large bi-fold or sliding doors to blur boundaries.
Extend the kitchen counter/serving area onto the deck with a built-in outdoor cabinet and seating, enabling effortless food and drink service between spaces. Use weatherproof transitional elements (rug, cushions, textiles) and retractable shading to maintain comfort and style across both areas. Plan for year-round usability by incorporating a fire pit or heater near the transition zone to extend gatherings from indoors to outdoors as weather changes.
Choose Durable, Cohesive Decking and Surfaces
Choose durable, low-maintenance options—like aluminum or capped composite—to cut upkeep and resist warping.
Weigh natural wood versus composite for look, cost, and maintenance, then harmonize boards, rails, and framing to your home’s exterior palette for a cohesive deck.
For safety, opt for non-slip finishes or textured surfaces in high-traffic areas and carry that texture across any elevated levels to maintain continuity.
Durable, Low-Maintenance Choices
Do you want a deck that stays durable with minimal upkeep? Choose composite decking to cut maintenance, resist fading, staining, and moisture damage, often lasting 25–30 years with little sealing compared to natural wood.
Pair it with aluminum or powder-coated aluminum railings for coastal or high-humidity sites, since they resist corrosion and require less upkeep than painted wood.
Look for slip-resistant textures and non-slip composites to help meet outdoor surface codes in wet climates while keeping footing secure.
Hidden-fastener systems on engineered decking deliver a clean, gap-free surface that fights warping and reduces water infiltration.
Finish with color- and grain-matched deck and fascia options in low-maintenance materials to create a cohesive, durable outdoor room with minimal annual maintenance.
That’s durability you can trust year-round.
Natural Wood Vs Composite
Natural wood decking offers a classic aesthetic, with options like cedar, redwood, and tropical hardwoods that age into a rich patina but require regular sealing and maintenance to prevent weathering and decay. You’ll find cedar and redwood woods are naturally more resistant to rot and insect damage than many other species, yet you still benefit from annual resealing to preserve color and longevity and lasting outdoor resilience.
Natural wood typically has a lower initial cost than high-quality composites, but your maintenance costs (staining, sealing, cleaning) can make lifecycle expenses comparable or higher.
Wood decking can achieve an organic look that’s hard to replicate with composites, and it accepts a variety of stains and finishes for customization. In humid climates, moisture and ventilation matter for longevity.
Aesthetic Cohesion Across Deck
A cohesive deck feels intentional when all elements share a common color palette, texture, and finish. Choose decking and surfaces with a cohesive color palette and texture, such as pairing a warm composite deck with matching fascia and railings to create a seamless look. Maintain material consistency by using the same or complementary woods, composites, or stone for adjacent features like steps, a seating wall, and a built-in bar. Align surface finishes across indoor-outdoor thresholds, ensuring transitions between interior floors and deck materials are level and visually unified. Integrate hardware finishes in a single metal tone to reinforce a cohesive aesthetic. Manifest a unified style by repeating design motifs—like slatted screens, wicker, or cable railings—across railings, privacy walls, and shade structures for lasting impression.
| Element | Material/Finish | Cohesion Tip |
|---|---|---|
| Color & Texture | Warm composite; fascia/railings | Match colors and texture |
| Adjacent Features | Same or complementary woods/stone | Keep a consistent palette across features |
| Thresholds & Hardware | Level transitions; single metal tone | Align finishes; use one metal |
Layer Lighting for Ambiance and Safety
How can you layer lighting to shape both mood and safety on your deck? Layer ambient, task, and accent lighting to create a functional, inviting atmosphere after dark. Use a mix of string lights overhead, low-voltage path lights along edges, and recessed step lighting to boost safety and depth perception.
Place fixtures at seating and dining zones to reduce glare while keeping faces well-lit for conversation. Programmable controls or dimmers let you adjust brightness for intimate gatherings or full outdoor parties. Incorporate solar-powered or low-voltage options to cut energy use while maintaining consistent illumination around the deck perimeter. Solar choices also offer flexibility for shaded corners and planters, ensuring even coverage without hot spots. Program schedules align lighting with events, conserving energy and mood.
Create Comfortable, Multi-Functional Seating
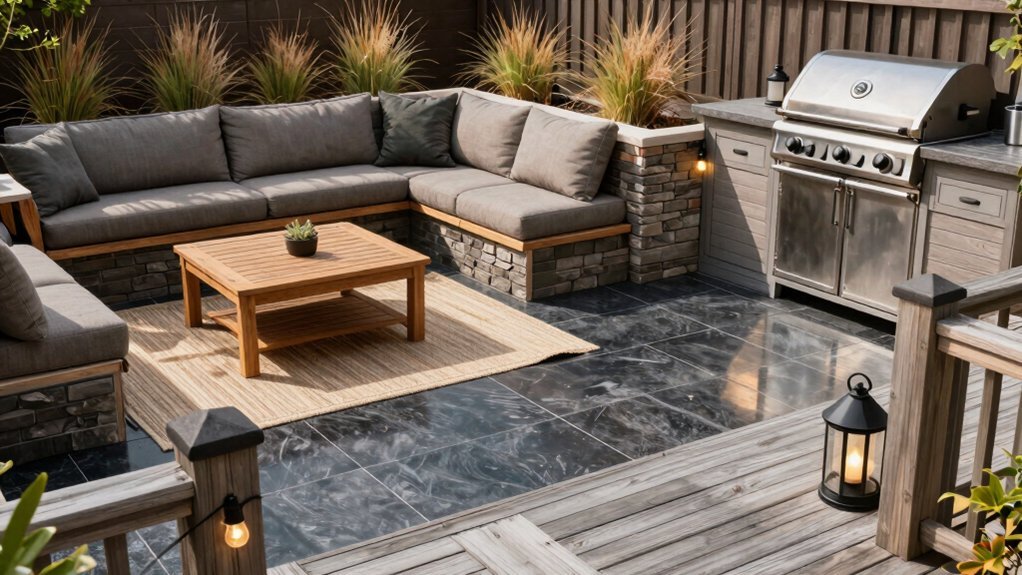
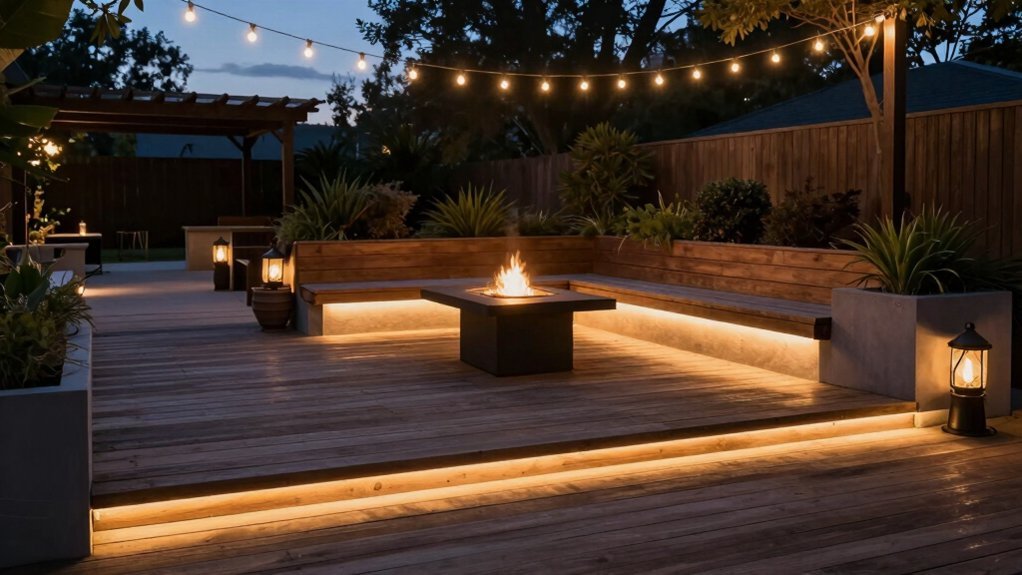
Building on the lighting you’ve set, design seating that’s comfortable, flexible, and guest-ready. Offer multiple options—loveseats, lounge chairs, benches, and stools—to accommodate different group sizes and layouts. Arrange seating in at least two distinct zones to support conversation while keeping walkways clear. Use weather-resistant cushions with quick-dry foam and all-weather fabrics so comfort lasts season after season. Add a mix of seating heights—chairs, ottomans, and low lounges—to suit viewing angles and social dynamics. Position seating around focal points like a fire pit or water feature to encourage lingering conversations and cohesive flow.
> Design two seating zones with weather-ready cushions and mixed heights around a focal fire pit.
- Place intimate clusters around a central blaze to spark conversation.
- Vary heights and textures to encourage guests to mix and mingle.
- Keep walkways clear by using slim dividers or planters, always purposefully.
Integrate Cooking, Dining, and Bar Areas
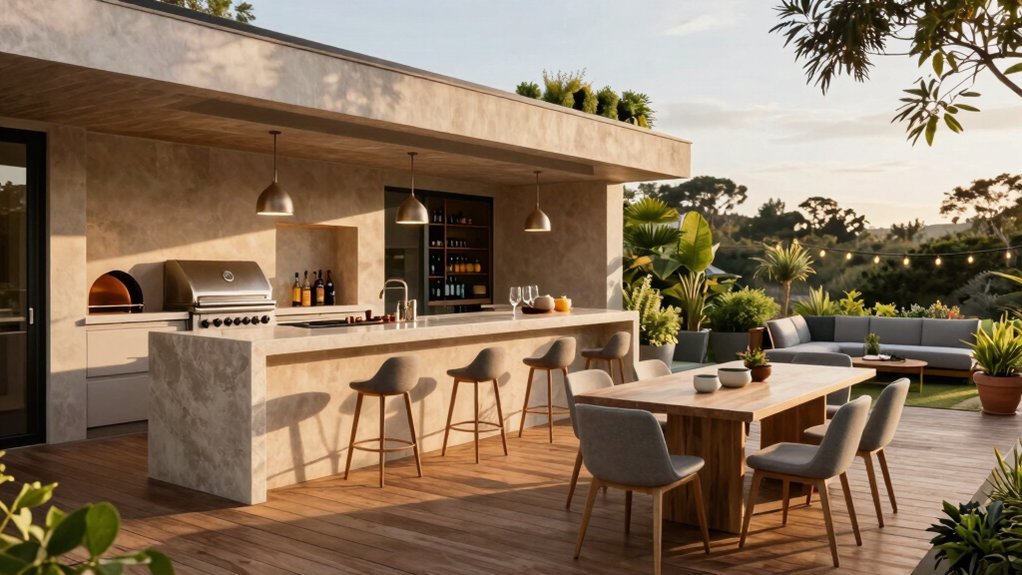
Where you place the outdoor kitchen and bar, you’ll keep sightlines to guests while maximizing flow. Position the cooking zone downwind from dining and seating to minimize smoke exposure while preserving views. Use weather-resistant stainless steel, quartz, and porcelain tile for durability and easy cleaning in exposed areas. Include integrated lighting and outlets around the dining and cooking zones so you can entertain after sunset and grab utensils without hunting. The dedicated bar area, with a mini-fridge and sink plus 2–4 stools, creates a corridor that doesn’t interrupt seating. Build a cohesive layout with two fuel sources (gas and charcoal) and weatherproof countertops to support cooking styles. This setup keeps guests engaged.
| Zone | Feature | Benefit |
|---|---|---|
| Kitchen | Grill, counters | Durable |
| Bar | Mini-fridge, sink | Smooth flow |
| Dining | Lighting, outlets | Night use |
Add Fire, Heat, and Year-Round Comfort
Want to keep the party going as temperatures dip? A gas fire pit offers a safer, spark-reduced option than wood, and you can place it away from overhangs and seating to minimize heat exposure to structures. Outdoor heaters extend sessions by 20–30 degrees, letting you dine and mingle well into cooler evenings. Position heat sources to spark conversation, creating focal points within 6–10 feet of the seating. Use heat elements to enable year-round use, pairing with weather-resistant furniture and cushions that resist moisture and UV. Combine multiple heat sources with shaded, sheltered zones to balance warmth and comfort.
1) Gas-fire setup with a low seating distance for cozy glow.
2) Propane/electric heaters boosting warmth 20–30 degrees.
3) Mixed heat zones with shade for comfort.
Integrate Greenery, Planters, and Textiles
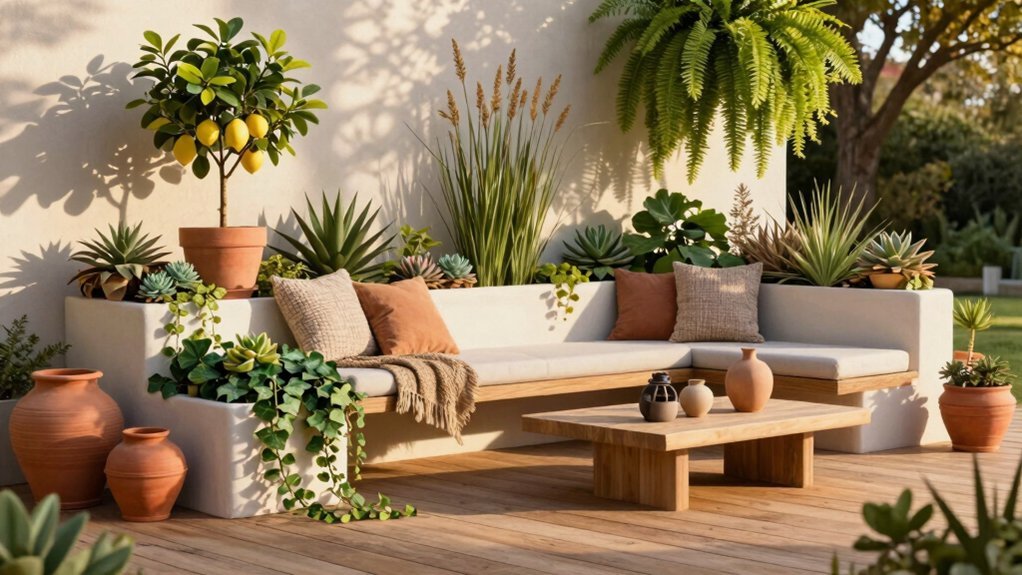
How can you weave greenery into a deck that stays inviting after dark? You mix planters at different heights, using ceramic, resin, and wood textures to create visual interest along walkways and seating areas. Choose durable, weather-resistant textiles in outdoor fabrics such as solution-dyed acrylic to keep colorfast after sun and rain.
Incorporate evergreens and seasonal perennials in containers to maintain year-round structure while letting seasonal color shift. Group plants in small clusters with cohesive color palettes—2 to 3 complementary hues—to avoid clutter and highlight seating and dining zones.
Add lighting-integrated planters or uplights so greenery extends into evening gatherings. Position them near doorways for welcoming paths, and stagger lighting to create depth without glare, encouraging guests to linger and enjoy conversation outdoors tonight.
Enhance Privacy With Stylish Screenings
You can boost deck privacy with slatted privacy screens that balance seclusion with airflow.
By using strategic screen placement, you create focused privacy zones and natural sight lines without sacrificing light.
Opt for adjustable or modular options so you can tailor the setup as your entertaining needs change.
Slatted Privacy Screens
Why settle for bland decks when slatted privacy screens offer both seclusion and style? You get visual division with evenly spaced vertical or diagonal slats, maintaining airflow and light. Choose wood like cedar or teak, composite, or powder-coated aluminum for durability against weather. Spacing and slat thickness set privacy: closer means more seclusion but less outside visibility. Integrated features—hidden fasteners, planters, lighting channels—blend with your architecture. You’ll satisfy codes by ensuring railing-height compliance and guard clearance while preserving aesthetics.
- Visual separation with airflow and framed light, creating depth along every edge
- Material moods—from warm cedar to sleek aluminum—matched with hidden fasteners
- Integrated planters and lighting channels that blend in at dusk
Together, they elevate privacy without sacrificing air, light, or curb appeal at home.
Strategic Screen Placement
Where should you place screening to maximize privacy without stifling view or breeze? Position mounted screens to interrupt direct lines of sight from neighboring yards or windows, but keep prevailing summer breezes flowing.
On multi-level decks, strategic placement can boost privacy by 40–60% while preserving sightlines to scenery, depending on height and spacing. Use weather-rated slats or aluminum panels to resist warping and reduce maintenance compared with wood.
Trellis screens with climbing plants add natural screening, soften the deck silhouette, and increase shade. Remember, screens can double as mounting surfaces for lighting or planters, layering function with aesthetics and further enhancing privacy without crowding your space.
Adjust spacing and height through testing, then swap panels seasonally to keep the view lively and breeze unobstructed.
Design for Flexibility and Future Changes
To design for flexibility, plan distinct zones—seating, dining, cooking, and recreation—and map smooth traffic flow to support dynamic entertaining. You’ll rely on modular furniture and multi-functional pieces, like seating with built-in storage, to adapt spaces for varying group sizes. Adjustable lighting and scalable features—removable partitions or modular screens—let you reconfigure the area for different events. Design with future needs in mind, leaving room for additions such as a secondary dining area, pequeño outdoor kitchen, or elevated seating nearby. Choose durable, weather-resistant materials and finishes that age well, minimizing future changes while preserving flexibility.
- Create a seamless transition between zones with hidden storage.
- Install a lightweight partition that slides away, revealing open space.
- Add scalable modules for future dining, shade, and elevated seating or viewing.
Frequently Asked Questions
How to Balance Sun and Shade Across Zones Throughout the Day?
You’re balancing sun and shade by grouping seating into light, partial shade, and full shade zones; install adjustable screens, umbrellas, or pergolas; use movable furniture and planters to chase sun or retreat to cooler shade.
What Materials Withstand Weather While Matching Existing Deck Finishes?
Choose durable, weather‑resistant materials that match your deck: composite boards, pressure‑treated wood with sealant, vinyl, aluminum, and stone accents; use color‑matched trim, fade‑resistant finishes, and hidden fasteners to keep a seamless, long‑lasting look for you.
How Can You Integrate Outdoor Tech Without Clutter?
You can integrate outdoor tech without clutter by hiding cables, using wireless gear, and mounting devices low and flush. Choose compact equipment, run power through concealed channels, and consolidate controls with a hub you access.
What Is the Best Approach to Seasonal Color Without Upkeep?
Choose versatile, low-maintenance plants and plan for year-round color with perennials, bulbs, and strategic shrubs. You’ll rotate containers with color accents, mulch well, and water smartly, minimizing upkeep while keeping vibrant, seasonally shifting palettes effortlessly.
How to Measure and Plan Load-Bearing Zones for Future Furniture?
Measure your deck beams and joists, identify load zones, and plot furniture areas accordingly. Use a stud finder or plans, factor weights and expansion. Mark zones with chalk, confirm with pro, then design around points.


Leave a Reply