Discover five outdoor movie area landscape plans that balance sightlines, seating, and tech. You’ll define Viewing Zones with a center and a lounge row, keeping a 6–8 foot screen gap and clear paths for safety. Choose low-profile seating, weatherproof screens, and modular furniture. Plan Lighting and Power with a 50 ft extension, a weatherproof projector, and HDMI runs up to 75 feet. Add seasonal tweaks, smart storage, and weatherproofing to stay comfy year-round; tips await.
Define Viewing Zones and Sightlines
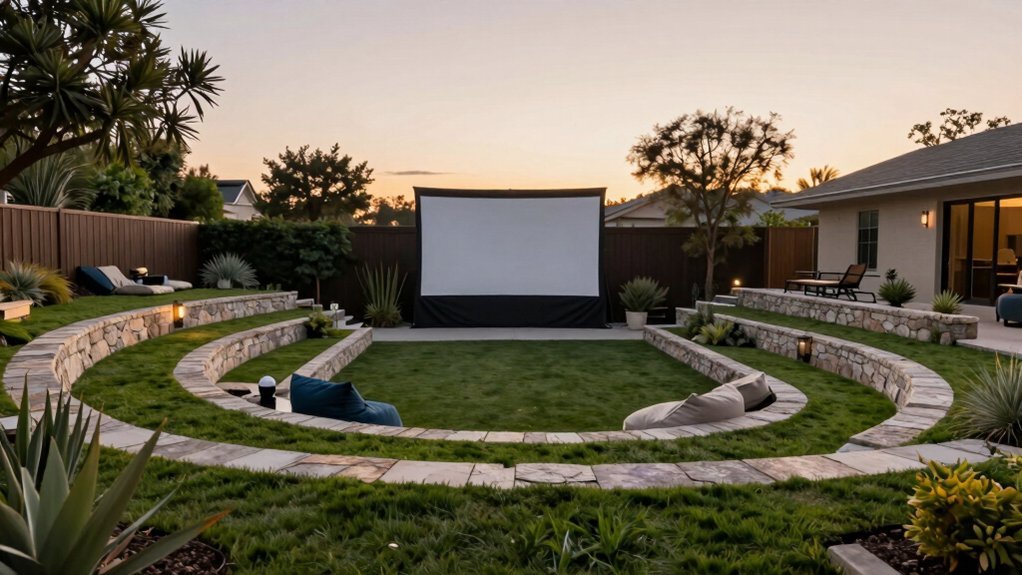
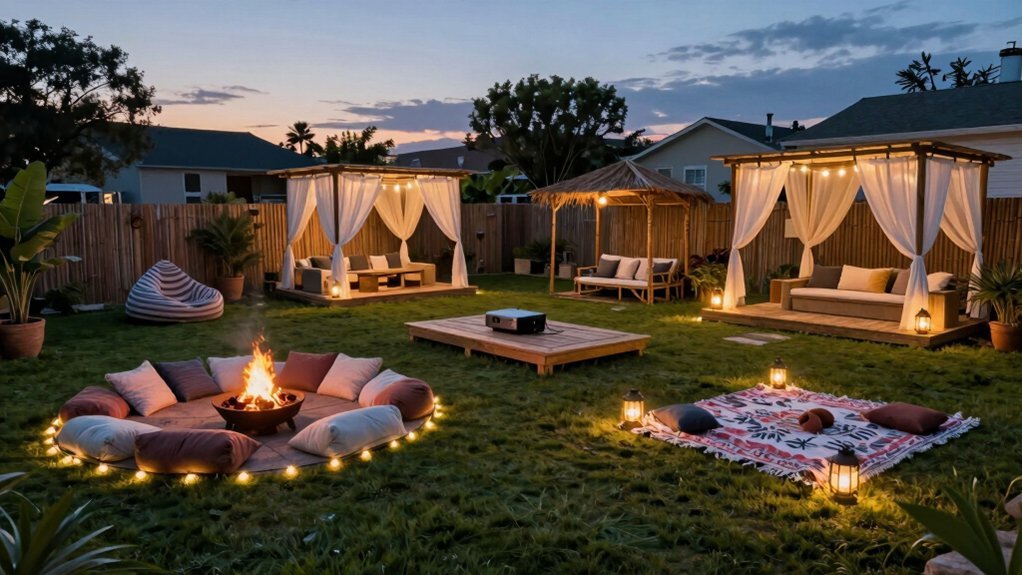
Start by defining your viewing zones: a main center seating area facing the screen and a secondary lounge row to keep sightlines clear for all guests. You set a 6–8 foot gap between the first row and the screen to prevent crowding and ensure comfortable angles. Position on a flat, wind-sheltered spot with minimal sun glare during golden hour, and orient the screen to reduce reflections. Elevate projector on an adjustable tripod or table so the image center aligns with screen height and audience sightlines. Define sightlines by clearing ivy and clutter between screen and seating, and frame the area with ambient lighting rather than direct glare. Keep pathways open and ensure exits remain visible from all seating positions. This fosters safe, comfortable viewing.
Choosing Materials, Seating, and Surfaces
Where should you place materials, seating, and surfaces to maximize comfort and visibility? Start with a flat yard spot that has a clear view, enough room for seating and gear, and some weather protection. Choose seating that blends low profiles with varied comfort, using blankets, cushions, deck chairs, and a large outdoor sofa to keep sightlines to the screen unblocked. Frame the viewing area with clear boundaries and comfortable transitions that keep focus on the screen. Position the screen away from direct sun by noting sunset times and using a backdrop to boost contrast. Plan for weather adaptability with a compact pop-up cover, heaters or a fire pit for cool nights, and a dedicated snack area to keep guests comfortable and ready for snacks.
Lighting, Sound, and Power Planning

How you power, light, and sound an outdoor setup can make or break movie night. Use a long outdoor extension cord (50 ft, 3-outlet) to power the projector and streaming device without trip hazards, and position power sources away from walkways or behind structures to keep paths clear. Elevate the projector with an adjustable laptop tripod or a stable table so screen height aligns for crisp viewing, then run a single HDMI from the indoor receiver to the outdoor projector; consider a 75-foot pre-wired option for longer runs. Pick a projector with at least 3000 lumens and choose weather‑resistant, outdoor‑ready cabling and power setups to ensure reliability. Confirm connections before dusk, test sound levels, and store gear safely after the show for next time.
Seasonal Adaptability and Maintenance Strategies
To keep outdoor movie nights comfortable year‑round, plan for seasonal tweaks—pair a fire pit or outdoor heater for cooler months with shade from trees or awnings for summer. Use modular seating and blankets that can be rearranged to accommodate 6–10 guests per setup, with 10–15 square feet per person as a seating guideline. Install weather-friendly projection screens and projectors (3000+ lumens) that can be used outdoors and relocated indoors afterward. Implement weather adaptations such as a pop-up cover for rain, and choose locations with natural wind protection to maintain screen visibility. Add seasonal décor and lighting to preserve ambiance through daylight changes.
| Idea | Benefit |
|---|---|
| Modular seating | Fits 6–10 guests, flexible layout |
| Weather-ready gear | Quick rain cover, relocate indoors |
| Lighting décor | Keeps ambiance across seasons |
Seasonal tweaks sustain comfort.
Smart Storage and Weatherproofing for Outdoor Cinema Areas
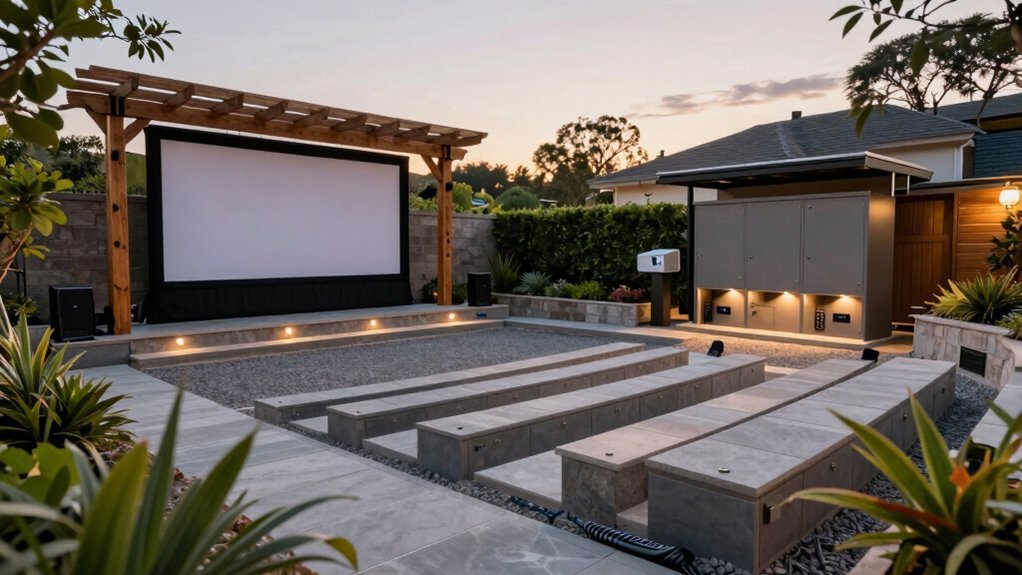
Why risk a ruined movie night when smart storage and weatherproofing keep your outdoor cinema reliable year-round? Use weatherproof enclosures and screens to protect components; mount enclosures at the top of posts with irrigation hidden behind the lower frame to keep the setup clean.
Weatherproof enclosures protect components; mount high and hide irrigation for a clean, reliable setup.
Store projector, screen hardware, and cables in totes or cabinets when not in use to prevent moisture damage.
Plan smart cable management by routing outdoor extension cords behind structures and using longer HDMI cables up to 75 feet to minimize trip hazards.
Choose durable framing (pressure-treated lumber; alternatives include redwood or cedar) for outdoor frames and enclosures to withstand year-round exposure.
Implement quick-access storage: keep popcorn machine, extra blankets, and a first-aid kit in shed or bin for fast setup.
Frequently Asked Questions
What Is the Best Background for an Outdoor Projector?
The best background is a flat, light-colored, non-reflective surface like a white wall or screen, positioned away from direct sun, with a stable frame or stand to keep tension and prevent wrinkles for you consistently.
How to Project a Movie Outdoors?
To project a movie outdoors, set up a 120-inch+ screen, mount a 3000+ lumen projector on a stand, run a cord, connect a Fire TV Stick, and seat viewers 6–8 feet away with lights dimmed.
What Is the Best Budget Outdoor Movie Projector?
Your best budget outdoor option is a 5G WiFi Bluetooth 4K projector. It delivers sharp images, easy streaming, and compatibility with a Fire TV Stick 4K. Pair it with a 120-inch screen for bigger audiences.
What Is the Best Outdoor Furniture for Movie Night?
Choose low seating like deck chairs, blankets, cushions, plus a large outdoor sofa or corner seating; use weather-resistant, movable pieces, plan 10-15 sq ft per person, keep 6-8 ft sightlines, it’s ambient lighting and throws.

Leave a Reply