
You need a dedicated buried outdoor water line with frost protection, proper drainage, and built‑in shut‑offs to deliver reliable pressure at your bar faucet year round. Plan routes that keep feeds organized, install shut‑offs and a blow-out port for winterization, and test the lines under house pressure before burying them 600 mm deep. Check local codes and permits, and consider a plumbed‑in setup for steady supply. Want more details and practical, real-world tips for you?
Planning and Preparation
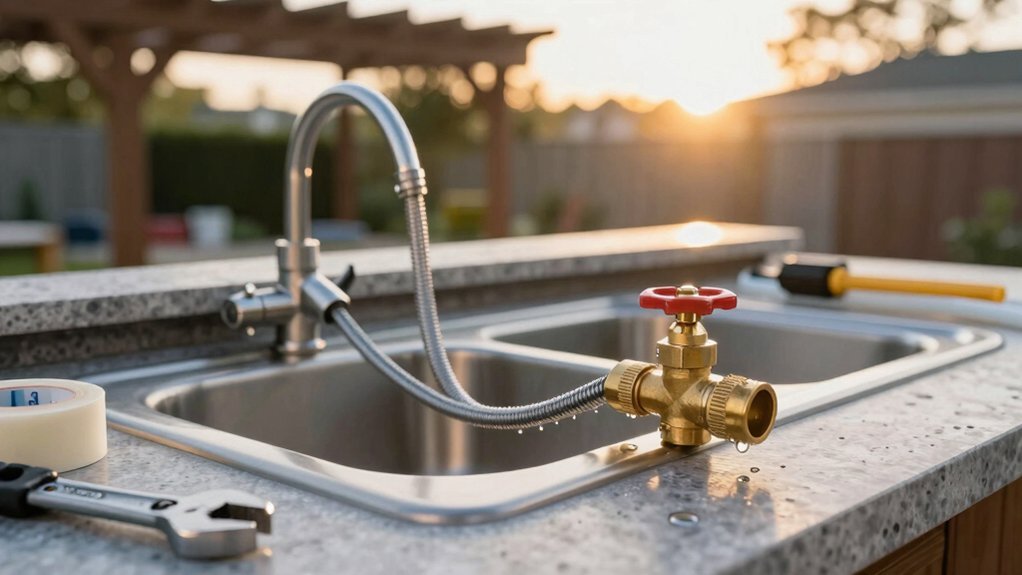
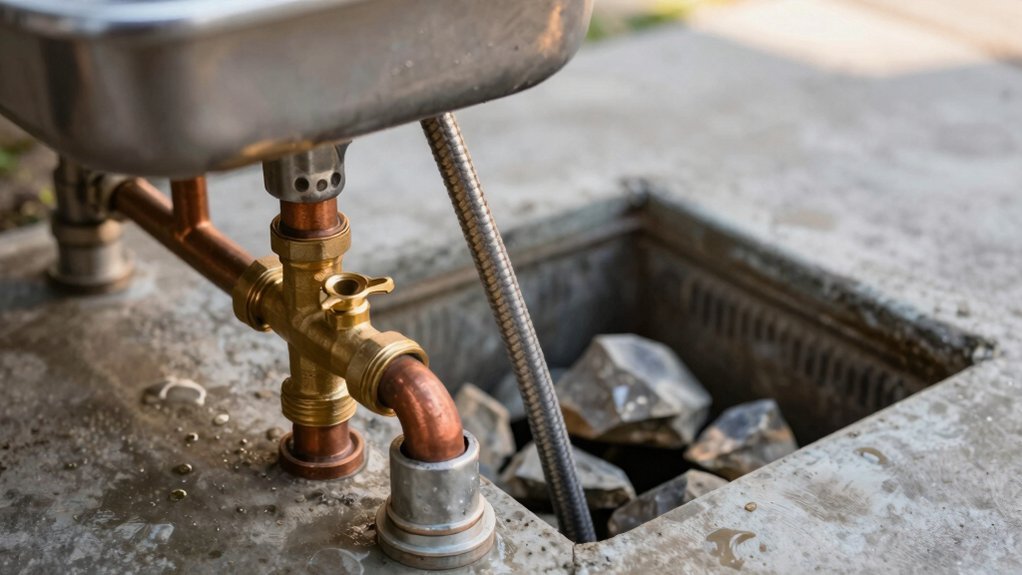
Planning and Preparation sets the stage for a reliable outdoor bar water setup. First you assess spigots and plan a PVC conduit to keep feeds organized. You’re routing hot and cold supplies to the island faucet stops, ensuring pressure at the tap. A shut-off valve and blow-out port go in securely to winterize system, with a barbed end ready to connect to air or water blow-out connectors. You verify PEX lines from the faucet, teeing the blue into the underground cold feed and mapping a hose hookup behind the deck.
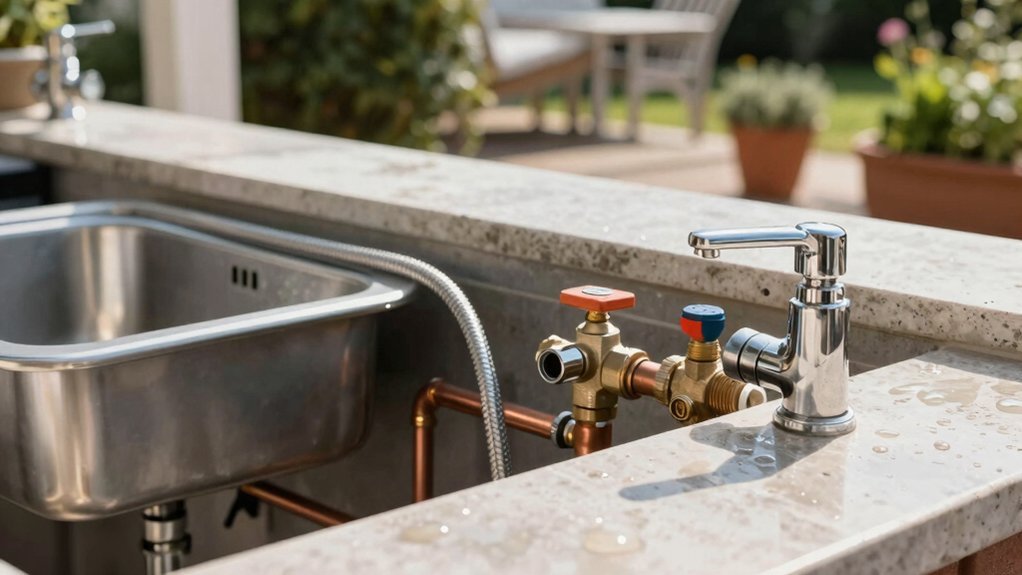
You drill, route two 1/2-inch PEX lines through a PVC path, and install copper-to-PEX adapters behind an insulated wall. Finally, you test for leaks, let it sit overnight, and confirm water at the faucet.
Regulations and Permissions
Before you trench or connect to the main supply, check local building codes and permit requirements with your council to avoid fines or rework.
Your plans may be shaped by HOA rules, zoning restrictions, and whether a formal permit or professional involvement is needed.
If you’re unsure, contact the council or a licensed plumber to confirm what’s required for approvals and ongoing compliance.
Permits and Approvals
Where you live, permits and approvals can vary by council. Local regulations may require permits for plumbing connections to mains drainage or changes to outdoor water supplies. Some areas also demand formal approvals before trenching or running new water or gas lines to an outdoor kitchen. Check whether your existing outdoor spigots suffice or if a dedicated outdoor water line to the sink is needed, and obtain approvals accordingly. For gas-powered outdoor appliances, specialized gas-line work often mandates professional installation and local permits. It’s wise to verify permits and compliance with local authorities or hire a qualified plumber to ensure all regulatory requirements are met. Doing so reduces risks, avoids fines, and keeps your setup ready for seasonal use. Consult early to plan approvals.
Local Building Codes
How do local building codes affect your outdoor bar water setup? Local building regulations vary by council and can require permits for plumbing connections to mains drainage or for outdoor water and gas installations. Before starting outdoor bar water connections, verify whether a dedicated water line to the outdoor area requires approval or inspection. Some jurisdictions restrict DIY plumbing work; professionals may be mandated for main drainage connections or for trenching and utility work.
Regulations may dictate frost protection, pipe burial depths (e.g., UK guidance often calls for at least 600 mm bury depth to guard against freezing), and drainage requirements to prevent odor and water buildup. Always consult council or a qualified plumber/electrician to confirm permit needs and inspections for outdoor water connections.
HOA and Zoning Rules
Why do HOA and zoning rules matter for your outdoor bar water setup? Because approvals shape what you can install, where you can trench, and how you connect mains. In many jurisdictions, you’ll need permits for outdoor plumbing changes or for running water lines from the house to exterior fixtures. You may face inspections after installation to verify fittings, trench depth, and frost protection meet local standards. Many associations restrict non-metallic piping exposed to view or near property boundaries, so check approved materials and installation methods. Non-compliance can trigger fines, force removal or redo of work, and even void homeowner protections if rules aren’t followed. Start by contacting the HOA or municipal zoning office before any digging or fittings. This saves you costly delays.
DIY Vs Professional
DIY outdoor water connections are doable, but you’ll need to know local regulations, permits, and safe practices, since many regions require licensed plumbers for mains connections and certain drainage work. You can complete hookups, but for mains lines, frost protection, or complex routing, you’ll likely want a pro to ensure code compliance and leak-free performance.
Professional installation reduces risks of leaks, frost damage, and code violations, especially for main lines. Using MDPE or PEX with burial depths (600 mm in the UK) protects against freezing and pressure issues. A dedicated outdoor line from the house provides better pressure than repurposing a spigot, but may require trenching and inspections. Winterization is essential, via a dual-valve setup to blow out lines and prevent damage during freezing.
Running Water to Your Outdoor Kitchen
Getting water to your outdoor kitchen starts with a dedicated line that runs from the house to the sink, routed to minimize leaks and exposure to freezing, especially if you’re routing under a deck. In colder climates like the UK, bury pipes at least 600 mm deep to guard against frost and winterline risk. A dedicated line improves pressure for outdoor fixtures over reusing a spigot, and you should plan it early. Drainage accompanies the line to manage wastewater with options like proper sink drainage or a soakaway. Local regs may require permits; seek professional help for mains connections and frost protection.
Run a dedicated, insulated supply from house to outdoor sink, buried 600 mm deep and with proper drainage.
- Run a dedicated supply from the house to the sink
- Use insulated routing
- Bury pipes 600 mm deep
- Provide proper drainage system
Plumbed-in Option
A plumbed-in setup gives you steady pressure and reliable water for outdoor sinks and fixtures, unlike a basic garden hose. You’ll need to guard against frost by burying lines deep and including a shut‑off and winterization bleed.
Also plan drainage and check for any permits or professional oversight so you avoid leaks and freezing problems.
Pressure Reliability Benefits
How does a plumbed-in outdoor bar water system boost pressure reliability? You get a continuous supply from MDPE or PEX lines from the house, not a garden hose hookup, so fluctuations drop.
1) Continuous supply from the house
2) Deep, insulated burial to prevent freeze
3) Dedicated line to outdoor sink and taps
4) Dual-valve winterization for rapid line blow-out.
Buried pipes go at least 600 mm deep, with insulation and winterization valves, so seasonally protected reliability stays high. A dedicated line improves pressure consistency to the outdoor sink and taps, reducing fluctuations versus shared or hose-fed setups. A dual-valve winterization arrangement allows rapid blow-out of lines, preserving pressure integrity while guarding against trapped water that could freeze. Proper routing and secure copper/PEX connections minimize leaks and pressure drop, ensuring steady flow to faucet stops and outdoor fixtures.
Frost Risk Considerations
Why worry about frost if you bury lines at least 600 mm deep and fit a winterization setup? In the UK, burying outdoor water lines this deep helps guard against frost and freezing temperatures, so your bar stays ready even in cold snaps.
A plumbed-in outdoor bar should include a winterization valve setup to blow out lines and prevent remaining water from freezing, protecting fittings and valves. Use brass valves and brass PEX fittings outdoors to resist corrosion and withstand weather.
A dual-valve configuration lets you supply water for normal use or divert to a winterization line for off-season protection. After installation, test by pressurizing the system and letting it sit overnight to confirm there are no leaks before cold-weather use in cold conditions.
Alternative Water Supply Options
When you’re sizing up your outdoor bar, you can choose from several alternative water supply options beyond a fixed plumbed-in line. A basic garden hose connection works for light use, while non-plumbed setups rely on portable containers or manual handling. In frost-prone UK climates, bury water lines at least 600 mm deep and insulate exposed piping to protect against freezing. A dual-valve winterization setup can blow out lines for winter, with valves oriented to direct flow toward interior lines or outdoor hose connections. When mains drainage or permits apply, involve a professional to ensure compliance and proper integration.
1) Garden hose for light use; 2) Portable containers for temporary needs; 3) Non-plumbed gravity-fed setups; 4) Winterization by blowing out lines.
Choose what suits space.
Drainage Solutions
From your water setup, the next step is drainage that keeps the outdoor bar clean and comfortable. A proper drainage system prevents odours, water damage, and pest attraction by ensuring wastewater exits with a slight slope away from living spaces. Route drain lines so they connect to a sink or bar area, and plan pathways that avoid freezing and leaks in exposed or deck-installed sections. Use a downward pitch toward the main line to prevent standing water and promote a consistent flow.
Where mains aren’t accessible, consider soakaways, but check local greywater rules first. If you install one, ensure access for maintenance and guard against clogs. In cold climates, insulate and frost-protect pathways to shield piping. Keep access easy for clearing blockages and leaks.
Connecting to the Main Drainage System
To connect your outdoor bar to the main drainage system, map a direct route from the waste line to the house sewer stack and ensure a proper trap and vent. Plan a gentle slope away from fixtures toward the main line so gravity carries wastewater without pooling.
Check local permits and codes, as many areas require licensed plumbers and inspections for mains connections.
Main Drainage Connection
A main drainage connection should slope slightly toward the main drainage line to keep wastewater moving away from the area and prevent pooling. You’ll connect to the main drain via a dedicated outdoor sink drain connected to the house’s main drainage, or opt for a soakaway where mains access is restricted. Local ordinances may restrict DIY drainage work, so involve professionals or obtain inspector approvals before trenching or tying in. A proper design prioritizes odor control and pest prevention, requiring a functional, tested system rather than relying on buckets. When planning, ensure future expansions and venting are accounted for, plus proper sewer gas sealing.
- Slope toward the main line for flow.
- Choose between dedicated drain or soakaway.
- Check permits.
- Plan for expansions and venting.
Slope and Drainage Path
How should you ensure proper drainage from the outdoor bar sink? Create a natural slope from the sink to the main drainage so wastewater flows without pooling. Tie the outdoor drainage line into the house main drainage with a slight downward pitch to maintain gravity-fed flow. Plan a dedicated drainage route that avoids low spots and pooling, especially near the deck or island. Use a trap and venting as required by local codes to prevent sewer gases and preserve drainage performance. If tying into existing drainage isn’t possible, consider a soakaway option, ensuring it complies with greywater rules and local regulations. Test for slope accuracy after installation and seal connections to avoid leaks. Keep debris out of the line with a cleanout access installed.
Permits and Codes
What permits do you actually need to connect outdoor bar drainage to the mains? Local regulations vary by council and may require approvals or permits before you start. Plumbing connecting to mains drainage usually needs official approval, so check early. Verify whether your outdoor spigot connections suffice or you’ll need a dedicated main line. In some regions, permits depend on project scope, such as trenching or main drainage connections. Always obtain necessary approvals before beginning installation to ensure compliance and avoid penalties.
1) Confirm approvals with your council and submit required forms.
2) Check whether spigots meet code or need a new main line.
3) Plan for trenching, backfill, and inspection steps.
4) Schedule permits and inspections before any digging.
Compliance saves time, money, avoids penalties, and headaches later.
Soakaway System
Where a soakaway fits your outdoor kitchen, it disperses effluent by letting it infiltrate the surrounding soil rather than into a sewer. A soakaway is an underground drainage system you can use as an alternative to mains drainage for occasional use or when hard connections are impractical. Local greywater rules and regulations often restrict soakaway use, so you’ll need to ensure compliance with drainage and environmental guidelines. The system’s effectiveness hinges on soil permeability and careful design, usually a perforated trench filled with gravel to promote infiltration. You’ll want to plan to avoid freezing, odors, and groundwater contamination, and you may need permits or approvals from your local council before installation. Consult a licensed plumber or environmental adviser for site assessment and compliance steps specific.
Do Outdoor Kitchens Need to Be Plumbed In?
Outdoor kitchens usually need a dedicated water line from the house to supply a sink, with careful routing to prevent leaks and guard against freezing in cooler climates. You’ll determine whether a sink is essential or if a portable setup fits your space, since some configurations skip a permanent line altogether and rely on containers or a hose for basic use.
Outdoor kitchens usually require a dedicated water line with leak-free, freeze-proof routing; choose sink or portable options.
- Different routing considerations to prevent leaks and protect against freezing
- Sink vs. no-sink setups, including portable containers or hose connections
- Drainage is essential to avoid odours and water damage
- Frost-prone areas require burying lines and insulation
Note that local regulations and permits may govern outdoor plumbing connections to mains drainage, so consult a professional before your installation to stay compliant and safe too.
Benefits of Plumbing
Why settle for sporadic water at your bar when a dedicated supply from your home’s system gives you steady pressure and reliable access for sinks and fixtures? With a plumbed outdoor bar, you gain a dedicated supply line that feeds your setup, improving pressure and reliability for entertaining areas.
It also reduces trips indoors, streamlines cleanup, and supports continuous use during poolside gatherings. To protect your investment, winterization valves and insulated routing guard against freezing, preventing leaks and burst pipes. A separate drainage path prevents odours and water buildup, keeping your space compliant with wastewater management.
Choose durable materials like MDPE or PEX with brass fittings and proper sealing to minimize leaks and corrosion in exposed outdoor environments. That’s reliable flow for every event.
Considerations for Non-Plumbed Options
How practical are non-plumbed options for your outdoor bar, and what trade-offs come with them? They skip permanent water lines, keeping setup simple, but you lose steady pressure and hot water. Consider the key non-plumbed approaches below:
- Basic garden hose connections for light use, sacrificing continuous supply.
- Soakaway drainage when mains drainage isn’t accessible, mindful of local greywater rules.
- Portable containers and manual drainage, offering lower cost and flexibility, yet needing frequent management.
- Check local regulations and permits before installing any non-permanent systems, as DIY plumbing may be restricted.
Non-plumbed setups shine when you prioritize ease and speed, but budget for potential leaks, spills, and more hands-on management. Plan drainage thoughtfully and respect local rules to stay compliant at all.
Maintaining and Winterizing
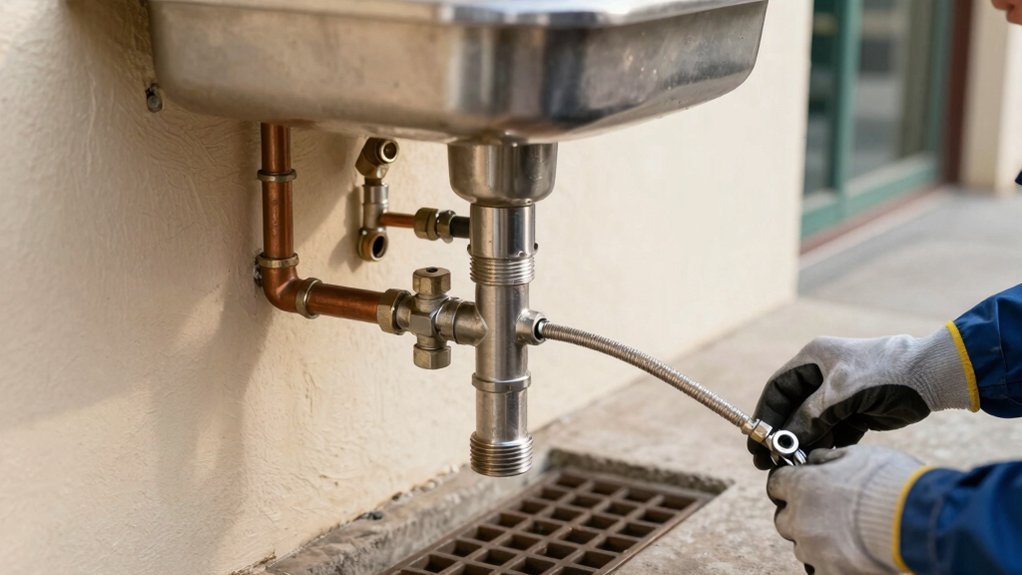
You may have weighed non-plumbed options for quick setup, but maintaining and winterizing your outdoor bar ensures reliability when temps drop. The system uses a dedicated winterization setup with a secondary valve to blow lines out, plus a shut-off valve at the house for winterization capability. PEX lines (hot and cold) run from a faucet valve through a copper-to-PEX path, routed underground in a 3-inch thin-wall PVC conduit. A brass valve and PEX fittings, secured with a Ryobi crimper, keep hot and cold lines attached to faucet stops and valves. Winterization directs flow away from exterior lines via a dual-valve arrangement, isolating indoor lines. Verification involves pressurizing from the house, checking copper joints and house connections, then letting the system sit overnight before confirmation.
Frequently Asked Questions
What Are the Components of an Outdoor Water Spigot?
You have an outdoor water spigot that consists of a shut-off valve, the spout, and a handle to control flow. It may include winterization shut-off, supply lines, and connectors for hoses or PEX copper links.
How to Supply Water to an Outdoor Kitchen?
You supply water to an outdoor kitchen with a dedicated hot and cold line from your house, routed through MDPE/PEX, you’ll have shut‑offs, frost protection, a winterization valve, and pressure testing for leaks and safety.
What Type of Pipe Is Used for Outside Water Lines?
MDPE, PEX, or copper are commonly used for outside water lines. You should bury MDPE at least 600 mm for frost protection, route with care, and consider a dual-valve winterization setup to blow out lines.
What Are the Four Types of Water Supply?
Those four water supplies are plumbed-in mains connections, existing outdoor spigots, dedicated outdoor lines with a winterization valve, and non-plumbed options like portable containers or hoses, giving you fixed, semi-fixed, dedicated, or portable setup choices.


Leave a Reply