
Plan your layout to move water toward the trench drain with a natural slope, and map routes from pools to the channel to avoid extra turns. Prepare the trench with a consistent depth, a compacted sand base, and side fills, keeping the surface just below the top layer. Install in sequence from the lowest point, seal joints and end caps, then test with water to confirm proper drainage—you’ll reveal even better tips as you go.
Plan Layout for Effective Water Flow Toward the Drainage Channel

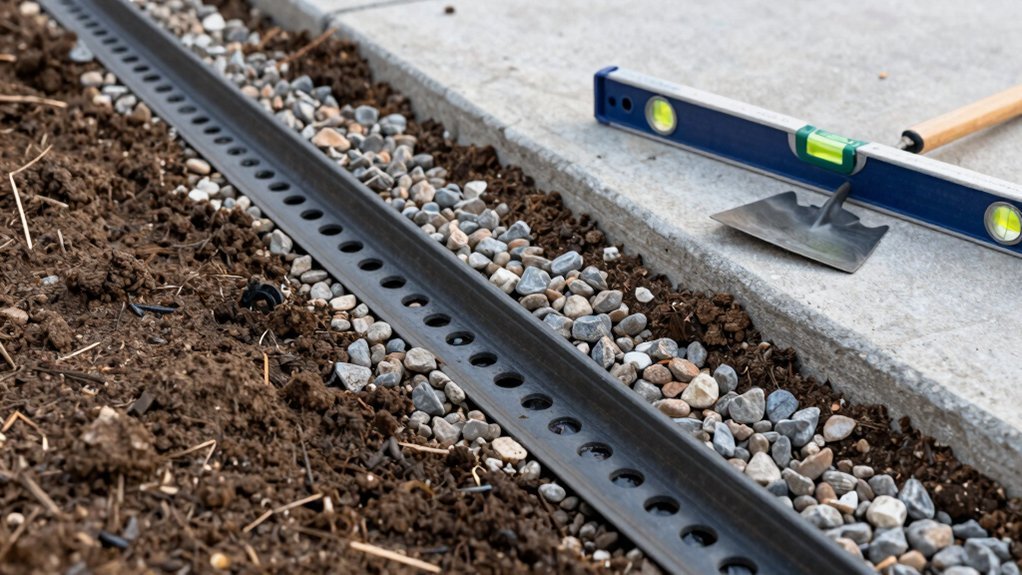
To move water efficiently, plan a downward grade toward the trench drain using the site’s natural slope or on-site grading. From a plan view, map the route from where water pools to the channel, avoiding unnecessary turns that raise flow resistance. Align the trench drain with the slope so water moves continuously and there are no flat spots that foster stagnation. Consider perimeter drainage or a central low point to capture water efficiently from a 16×36 garage layout and feed it toward the drain. Mark the lowest point first and install end caps and joints to maintain a sealed path that directs all water into the drain system. Keep notes on changes, confirm alignment with the slope, and review drainage performance during rainfall tests.
Prepare Trench, Slope, and Substrate for Installation
Begin by excavating a trench sized to support a 50mm compacted sand base and 100mm side-fill concrete on each side to carry the bar drain system. Keep the trench aligned to the natural slope so water heads toward the outlet and minimize flat areas where debris can accumulate. Use a string line to set and maintain consistent depth along the entire trench, marking depth at 1-meter intervals. Clear the trench of rocks and large debris during excavation to prevent channel damage and ensure proper bed preparation. Align and level the trench so the final surface sits roughly 2mm below the intended top layer after sand compaction.
| Step | Detail |
|---|---|
| Level | Confirm |
| Slope | Maintain |
| Depth | 1m marks |
| Debris | Remove |
| Bed | Prepare |
Proceed to next subtopic after.
Install Channel Drain System Components in Proper Sequence

Sequencing the channel drain components correctly guarantees a continuous, watertight path from inlet to outlet. Start at the lowest point of the trench, insert the channel drain, and then connect the end caps before sealing joints and adding grates. Slot channel lengths together to maximize alignment, placing future cuts farthest from the outlet to minimize flow disruption. After you install the end caps, seal the joints with silicone to ensure a continuous watertight path prior to backfilling.
Next, connect the lowest point of the gutter to an underground drainage pipe outlet using a 90mm PVC pipe to guarantee proper slope toward disposal. Finally, attach grates only after end caps and joints are sealed to prevent debris from entering during the final assembly for testing.
Seal Joints, End Caps, and Connections for a Tight System
Are you ensuring every seam is truly watertight before backfilling? You seal joints with silicone after slot channels connect, and install end caps to prevent leaks at both ends. Use PERMINATOR TAPE to secure fabric flaps and seal penetrations like pipes, stopping backfill intrusion. Seal seams where MEL-DRAIN rolls meet, making sure fabric flaps are taped or bonded to create a continuous water path. Apply edge sealing or tape at cuts wider than 2 inches, with a patch of filter fabric extending at least 3 inches beyond the cut. For vertical installs, backfill to the minimum depth and seal all joints first for a reliable system.
| Column A | Column B |
|---|---|
| Visualize | tight joints |
| silicone | at every seam |
| tape | securing flaps |
| patch | extends 3 inches |
Backfill, Grade, and Test the System for Proper Operation
Backfill the MEL-DRAIN to the designer-specified compaction, with at least 3 inches of soil above the drain to accommodate settlement. Place fabric side toward the soil for vertical wall installations and toward the shoring or concrete for horizontal installations, ensuring no debris remains in contact with the core. Seal all seams and penetrations with PERMINATOR TAPE and patch wider cuts with a 3-inch fabric extension secured with tape or spray adhesive. Use a level or string line to confirm consistent grade toward the outlet before backfilling, ensuring water flows toward the discharge point.
After backfilling, perform a test by gradually running water through the system to verify no leaks at seams or joints and to confirm proper drainage. Document results for inspection and agreement.
Frequently Asked Questions
How Do You Install a Drainage System?
To install a drainage system, you plan gravity route, dig a trench with slope, set a level, lay interlocked channels, seal joints, cap ends, install a grate, connect outlet to pipe, test for leaks, finish.
What Is the Most Effective Drainage System?
It’s the most effective drainage system: a sloped trench drain with a matching grate and a non-porous HDPE or polymer concrete channel. For you, heavy loads require cast-iron grate; widen to 6–12 inches, seal seams.
How Should I Have a Good Drainage System?
You install a graded slope toward the drain, pick a trench drain with appropriate width and material, guarantee solid bed and anchoring, backfill properly, and maintain an outlet slope to prevent pooling in all conditions.
What Is the Best Slope for a Drain Pipe?
The best slope’s about a 1% grade, roughly 1/8 inch per foot, toward the outlet. Keep a steady fall, adjust for length and diameter, and avoid dips or flat spots that trap water underground too.

Leave a Reply