Turn your yard into a seamless entertainment hub by centering a versatile grilling zone that anchors prep, dining, and social spaces. Place the grill on a flat, level surface away from the house, and near the kitchen for easy food transfer. Create a grilling hub that anchors circulation, with open paths and safe clearances. Merge dining with social areas using a BBQ bar or island, and add weatherproof surfaces and year-round lighting. More ideas await.
Choosing the Ideal Location for Your BBQ Landscaping
Where should you start when choosing a BBQ spot that blends with your outdoor flow? Begin by locating the grill on a flat, level surface, with at least 10 feet from the house or deck railings and away from eaves or overhangs for safety.
Place it near the kitchen for easy transfer of food and supplies, while keeping the dining area adjacent but sufficiently distant to minimize smoke exposure.
Aim for a central, hub-like grilling zone that lines up with your outdoor dining and kitchen spaces, creating a cohesive flow and easy access.
Balance sun and shade with trees, pergolas, or umbrellas so the grill doesn’t turn into a solar oven.
Ensure clear pathways and signage guide guests and prevent bottlenecks near the grill.
Designing the Grilling Hub as the Centerpiece
Position the grilling hub as the centerpiece to anchor circulation and connect the prep, cook, and dining zones.
Keep it near the kitchen to streamline access to ingredients and supplies without breaking the flow.
Ensure clear, safe movement around the grill while it blends with adjacent dining and outdoor kitchen areas.
Grill as Central Focus
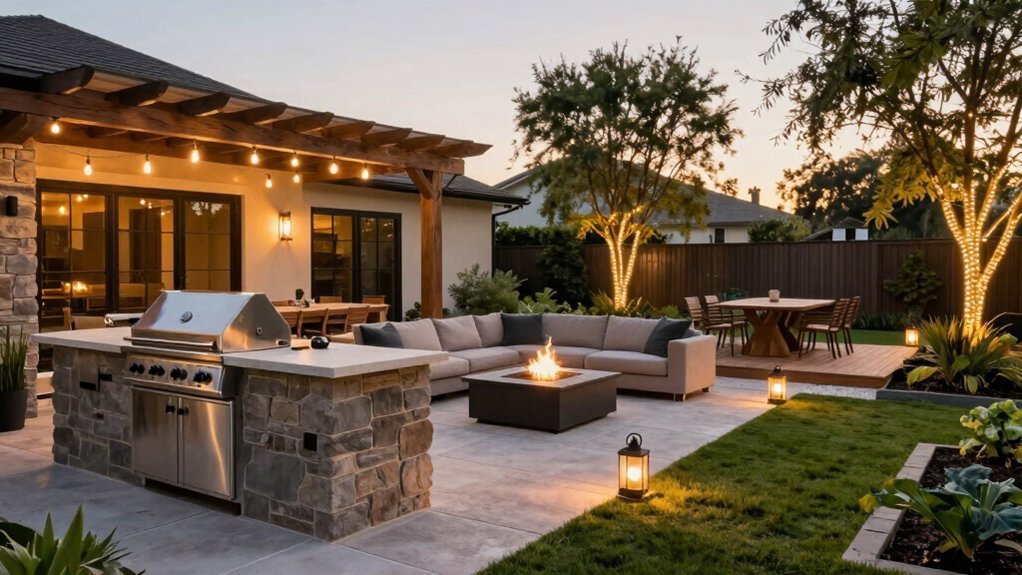
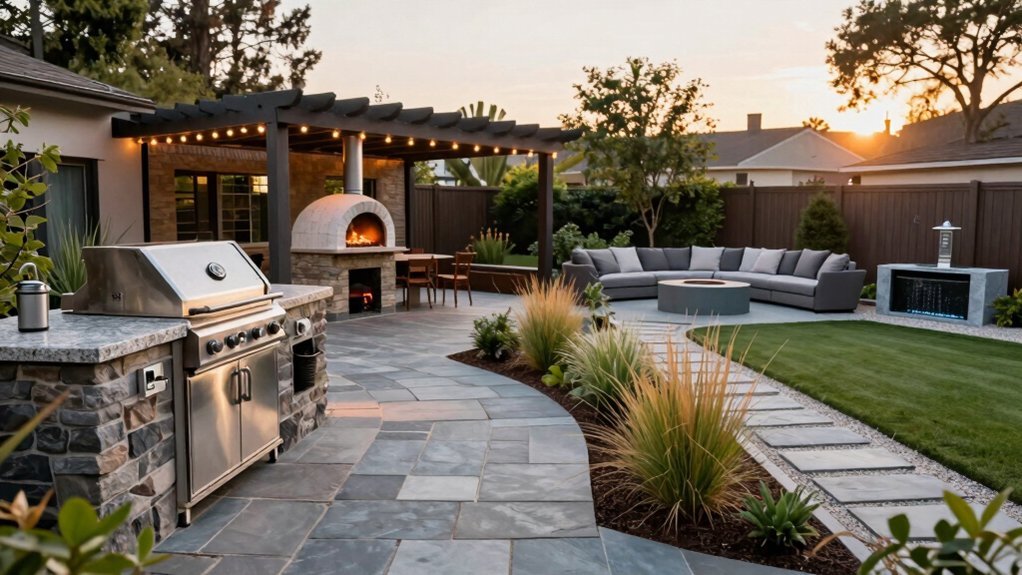
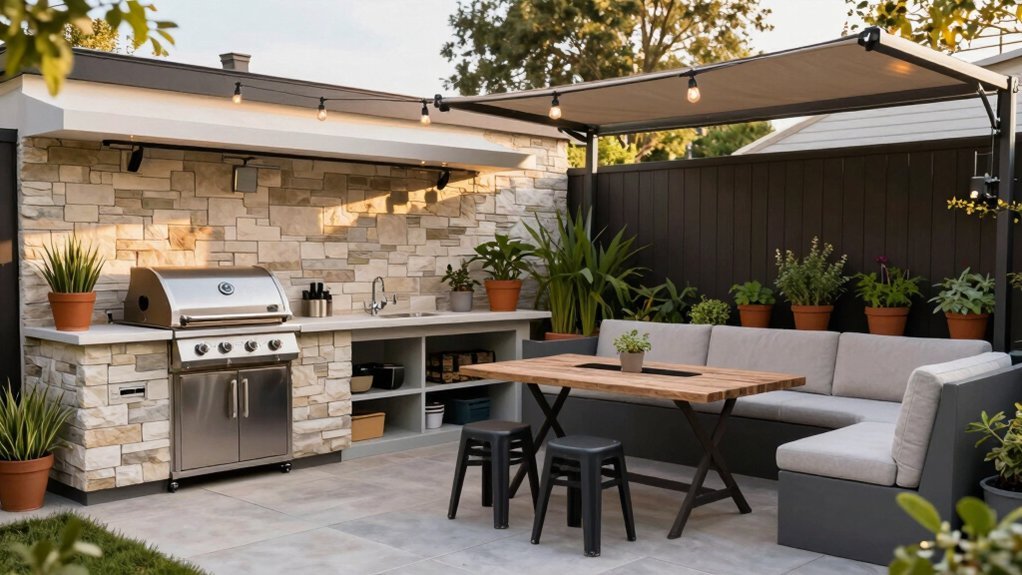
How you design the grill as the centerpiece sets the flow of your outdoor space. Position the grill as the central hub of the patio, enabling easy transfer of food and clear movement around the cook zone. A defined safety perimeter with sufficient clearance around hot surfaces prevents accidents and keeps guests at a safe distance. If your area is covered, add ventilation to manage smoke and fumes, preserving comfort for diners and cooks alike. Finally, integrate the grill with adjacent dining and outdoor kitchen zones to form a cohesive, multi-functional entertaining space. This alignment supports effortless service, reduces trips, and keeps the focus on social interaction around a well-defined, durable centerpiece. Prioritize clean lines, smart lighting, and weather resistance too. Your guests will feel invited tonight.
Proximity to Kitchen
The grilling hub should sit close to the kitchen so transfers of food and supplies happen in a single, smooth arc. Position it as the central feature to streamline workflow and boost social interaction. You’ll benefit from efficient prep, quick ingredient restocking, and reduced movement across the yard during cooking. Ensure the area has clear safety clearance and adequate ventilation, especially if covered or beside the dining zone, so comfort and airflow stay high.
- Incorporate extended countertops or a BBQ island to centralize prep and serving near the kitchen.
- Design a direct line from pantry or fridge to grills to minimize trips and clutter.
- Connect dining and outdoor kitchen elements with cohesive materials and sightlines to reduce steps for a smooth, uninterrupted hosting flow.
Integrating Dining and Social Areas
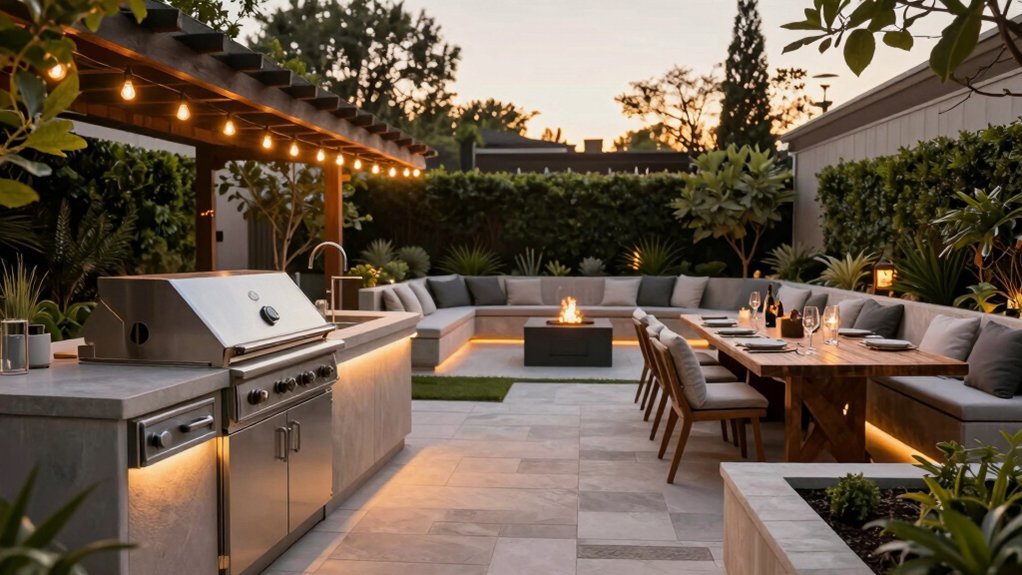
Keep your dining area close to the grilling zone so guests can mingle without missing the action, and make sure the food transfer stays quick and easy.
Plan guest flow with wide paths that separate cooking, dining, and socializing to prevent bottlenecks while still feeling connected.
Use a BBQ bar island or extended countertops to blend dining surfaces with the kitchen, reinforcing proximity and cohesion without crowding the grill.
Proximity to Grill
Why place dining far from the grill when proximity keeps guests engaged with cooking and makes it easy to transfer food from the kitchen to the table?
Keep the grill, dining area, and outdoor kitchen in close but separated enough to minimize smoke and heat exposure. A cohesive flow means movement between zones requires minimal steps, avoiding bottlenecks. Use multi-functional surfaces like extended countertops that double as serving spaces, cutting down on extra tables. Maintain clear sightlines and 3-foot-wide pathways so grill masters stay connected with guests while circulating safely. It also enhances overall comfort.
- Position dining near the grill with ample air flow and sightlines.
- Use extended countertops as serving and casual dining surfaces.
- Design 3-foot-wide walkways to keep guests and cooks connected.
Guest Flow Options
How you lay out dining and social zones shapes how guests mingle and how smoothly food moves from grill to table. Place the dining area near the grill for engagement, but keep a gap to avoid smoke exposure. Widen paths, add signs or varied paving, so guests flow easily between grill, dining, and outdoor kitchen. Extend countertops or install a BBQ bar island to fuse seating with the cooking action. Position seating to invite interaction with the cook area, aiming for 4+ seats and multiple viewing angles.
Consider a multi-zone layout that separates prep/cooking, dining, and lounging while preserving visual and functional connection for easy service and conversation. Keep sightlines open, use consistent materials, and ensure lighting supports all zones after dark for comfort.
Outdoor Kitchen Features and Workflow for Seamless Prep
An efficient outdoor kitchen centers on a grill, solid countertops, and a sink, with a fridge optional, to form a smooth prep workflow. Durable, weather-resistant materials and weatherproof storage protect utensils and supplies from the elements. Design for an efficient food flow by placing the grill near the kitchen and ensuring it’s clear, wide pathways for moving ingredients and platters. Ventilation matters in roofed areas; include venting or gaps to let smoke escape. Plan storage integrated into the layout to house utensils, cookware, and propane or fuel sources, reducing trips indoors and keeping essential gear within reach.
- Integrated storage for utensils, cookware, and fuel sources near prep.
- Weatherproof cabinets and countertops with drainable surfaces for rain.
- Clear pathway design with ample turning space and accessibility.
Managing Traffic Flow and Movement
From the outdoor kitchen setup you’ve designed, managing traffic flow means keeping pathways unobstructed and easy to navigate, with wide routes that prevent crowding near the hot grill. Establish access points for guests and service areas to avoid bottlenecks and ensure smooth movement around the cooking, dining, and bar zones.
Proximity constraints require avoiding bottlenecks near the grill while still keeping the dining area within engaging distance. Use directional cues like paving differences or signage to guide guests through distinct zones (grill, prep, seating, storage).
On large patios, design multiple functional zones (cooking, dining, lounging) to ease flow and reduce foot traffic conflicts. Regularly reassess layouts as crowds grow, adjusting routes, access points, and signage to maintain effortless movement and safety during peak events.
Materials Selection for Durability and Aesthetics
Assess durability first—how materials like granite, stone, marble, tile, and wood stand up to sun, wear, and moisture.
Consider aesthetics alongside, weighing sleek granite, timeless stone, veined marble, or warm wood against your space’s vibe.
Then factor in maintenance and sealing, since sealing needs and upkeep vary and influence long-term performance.
Durability of Materials
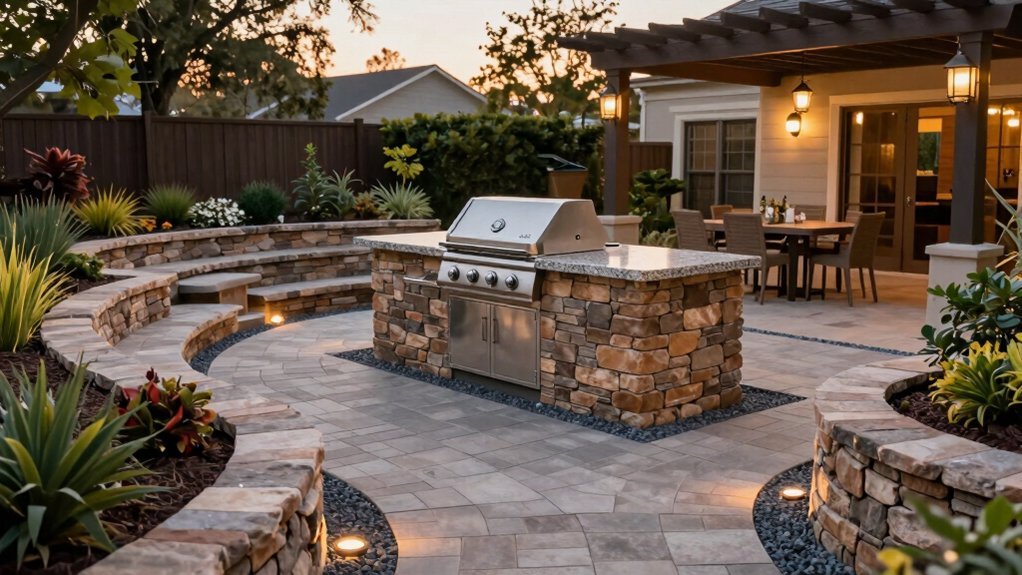
Durable options like granite stand up to wear and heat, but they can get warm in sun, so adding shade or a pergola helps keep temperatures comfortable. Granite is durable and scratch-resistant for outdoor use, but you’ll want shade to keep surfaces cool consistently.
Stone offers a timeless, sturdy outdoor surface but requires sealing to prevent stains and cracks.
Marble provides an elegant look with patina under sun exposure, making shade recommendations important for longevity.
Tile is budget-friendly and customizable but generally less durable and more prone to cracking than stone or granite.
Wood countertops (pressure-treated or teak) add warmth but require sealants and ongoing maintenance to withstand outdoor conditions.
- Granite with shade for cooling
- Seal stone to prevent damage
- Teak requires regular sealant
Aesthetic Material Options
Looking for a countertop that blends beauty with resilience? When you choose aesthetic options, you balance form and function. Granite delivers durability and scratch resistance, and it stays bold under sun, provided you add shading or a pergola to curb heat.
Marble brings an elegant, timeless look, but it develops a sun patina, so choose lighting and color to preserve it.
Stone materials offer a classic outdoor vibe.
Tile keeps costs down and lets you experiment with patterns, but it’s less durable and can crack under heavy use.
Wood tops, usually pressure-treated pine or teak, introduce warmth and value.
Pair options with shade to maintain color and texture across seasons, so your BBQ setup stays inviting and cohesive for entertaining all year long outdoors.
Maintenance and Sealing Needs
Ever wonder how to keep your outdoor surfaces looking fresh and performing well year after year? You focus on maintenance and sealing to balance durability with aesthetics. Granite, stone, and brick resist wear, while wood needs sealants and regular upkeep. Granite stays sleek and scratch-resistant but can warm in sun, so add shading or an overhead pergola. Stone needs sealing to prevent stains and cracks; marble patinas in sun and is best in shade. Regular maintenance includes sealing, twice-yearly pressure washing of stone or concrete, and annual resealing of wood pergolas to extend longevity.
- Schedule sealing for all materials and recheck product dates annually carefully
- Pressure wash stone or concrete twice a year to prevent buildup
- Reseal wood pergolas annually and monitor weathered surfaces
Essential Features for a Functional BBQ Patio
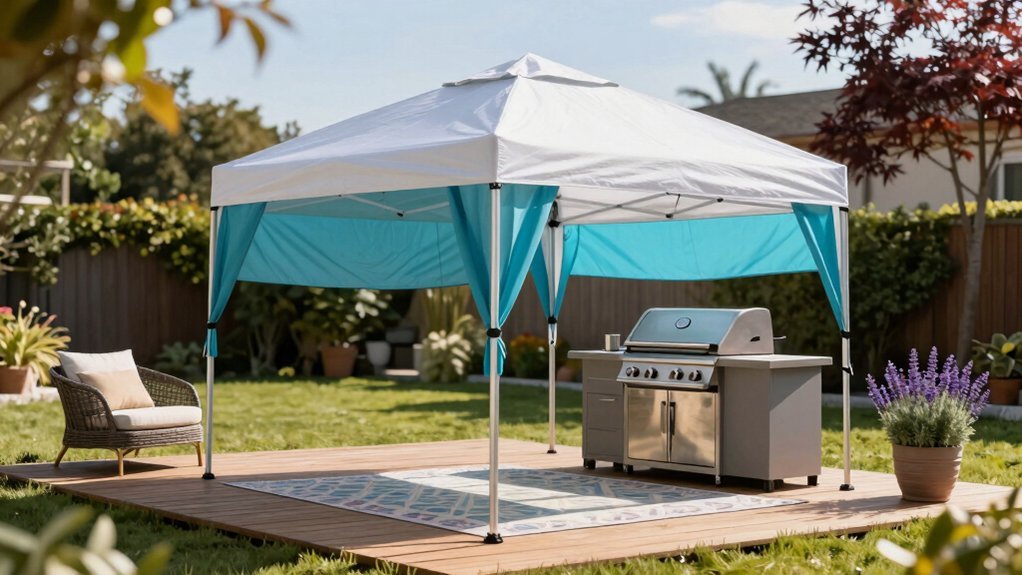
Where should your BBQ patio begin? Start with a central grill station surrounded by ample counter space for prep and serving, plus integrated storage for utensils and supplies. Plan lighting for evening use and safety, using LED under-counter strips, string lights, and post lighting. Add shade or shelter, like a pergola or a large umbrella, to boost comfort and protect equipment from weather.
Ensure clear traffic flow with unobstructed pathways and distinct zones to prevent bottlenecks around the grill and dining area. Choose durable, weather‑resistant materials—granite countertops, stone or brick flooring, and weatherproof cabinets—to withstand outdoor use and grease exposure. Keep maintenance simple with smooth edges, easy-clean surfaces, and proper ventilation for smoke. You’ll enjoy safer cooks, faster upkeep, and durable entertainment spaces outdoors.
Innovative Backyard BBQ Landscaping Elements
How can you elevate your backyard with innovative BBQ landscaping elements? Start with a self-contained BBQ island that fits your space, choosing foundations on pavers or wood, and select heat-resistant lumber when needed. Surface choices set the tone: granite stays cool to the touch and scratch-resistant; stone remains timeless, though sealing helps long-term durability; tile offers budget flexibility, while wood fits tight budgets but needs easier cleaning. Pair the island with bold landscaping accents, practical pathways, and seating zones that invite social cooking. Will you tap Willow Gates Landscaping for a free project consultation to spark ideas and review galleries of outdoor kitchens and hardscaping designed to inspire?
> Build a compact BBQ island with durable surfaces, bold landscaping, and inviting seating zones.
- Island foundation options and materials
- Surface selections: granite, stone, tile
- Seating areas, pathways, and traffic flow
Lighting, Shade, and Weatherproofing for Year-Round Use
Why plan lighting, shade, and weatherproofing for year-round usability in your BBQ area? You’ll rely on pergolas or patio umbrellas to provide shade and weather protection, aiding comfort any season. Pair that with a roofed or vented cooking zone to improve smoke management when the grill area is covered, so you stay comfortable and safe as you cook.
Choose durable, weather-resistant materials like stone, brick, or concrete pavers for floors and surfaces to withstand rain, heat, and grease. Use weatherproof seating and storage options, with cushions stored indoors when not in use and cabinets built to resist elements for propane and tools. Finally, employ lighting designed for outdoor use—string lights, LED strips, and post lights—to keep safety and usability high as the weather shifts.
Small-Space Solutions and Flexible Furniture Arrangements
On a compact patio or balcony, a 10×10 ft BBQ setup gives you a dedicated grill, a 4×6 ft prep area, and 3 ft of walkways to keep traffic flowing.
You’ll swap rigid furniture for flexible pieces you can move as guests mingle. Portable chairs, benches, and foldable tables let you reconfigure the zone without crowding the grill. Extend countertops or add a small island to double as dining surfaces, trimming the need for extra tables. Use multi‑use surfaces that serve prep and social tasks, keeping footprints tight while still inviting conversation. Plan seating for at least four nearby, but keep clear pathways for cooking and traffic.
- Compact seating by the grill for mingling.
- Foldable surfaces double as counters.
- Storage keeps essentials within reach.
Frequently Asked Questions
What Is a Catchy Phrase for Barbecue?
Try ‘Grill, thrill, and chill’—a bold, punchy phrase that sparks appetite and gathering. You’re firing up flavor, inviting neighbors, and turning smoke into social scenes under open skies where flames unite friends and family together.
How to Make a Backyard Barbecue Fun?
Make it fun by designing a functional grill area with safety zones, prep surfaces, and dining space; it’s where guests stay energized and engaged, featuring versatile stations, theme menus, lighting, seating, yard games, and activities.
How to Feed 30 People at a Barbecue?
Feed 30 by planning 1 pound meat per person plus sides, run multiple stations, and time batches. Cook burgers, chicken, ribs in a schedule, prep salads ahead, set buffet, and monitor temps to stay safe.
Where Is the Best Place to Put a BBQ in Your Backyard?
Put your BBQ at least 10 feet from the house and eaves, on a flat surface, perpendicular to prevailing winds, with shade nearby, creating a grilling hub that flows to dining and outdoor kitchen zones.

Leave a Reply