
To build durable outdoor bar countertops, start by measuring your island perimeter and planning a 1½ inch overhang. Create a two-layer form, seal joints, and secure it beneath the top layer. Choose reinforcement (mesh or composite rebar) and place it correctly. Mix and pour in layers, screed level, and cure properly. Fill voids, sand edges, and trim excess for a clean edge. Seal with a food-safe outdoor sealer; more tips await as you continue on.
Create the Concrete Countertop Form
How should you begin the concrete countertop form? Measure the island’s top perimeter, including grill and sink cutouts, and plan for a 1 1/2 inch overhang if desired. Build a two-layer form: bottom flat planks to catch the base and side forms attached to the bottom planks, with cuts to fit around appliances and edges. Attach the form to the top layer of outdoor kitchen, securing it with cement board to the underside and ensuring the form has a lip to screw into and is supported. Seal joints with silicone caulk to prevent leaks, removing excess caulk for clean edges, and verify the form remains stable and aligned after sealing. Use additional supports for large overhangs and ensure all pieces are level before pouring properly.
Put the Form in Place
Secure the form to top layer of the outdoor kitchen, using cement board to anchor it to the underside even if cabinets are installed. Attach the form to the top layer, ensure a lip to screw into, and support it; for overhangs, add wood planks, ground or column kickers as needed. Measure and place the form around appliances and edges, matching the top perimeter and including grill or sink cutouts. Verify all pieces are level before you pour, correcting any misalignment to prevent tilting or concrete leakage. Seal joints with silicone caulk after assembly to keep leaks out and maintain a tight seal during pouring.
| Step | Action |
|---|---|
| Lip | Attach and screw |
| Support | Add planks or kickers |
| Measure | Fit around appliances |
| Level | Check before pour |
Prepare Reinforcements
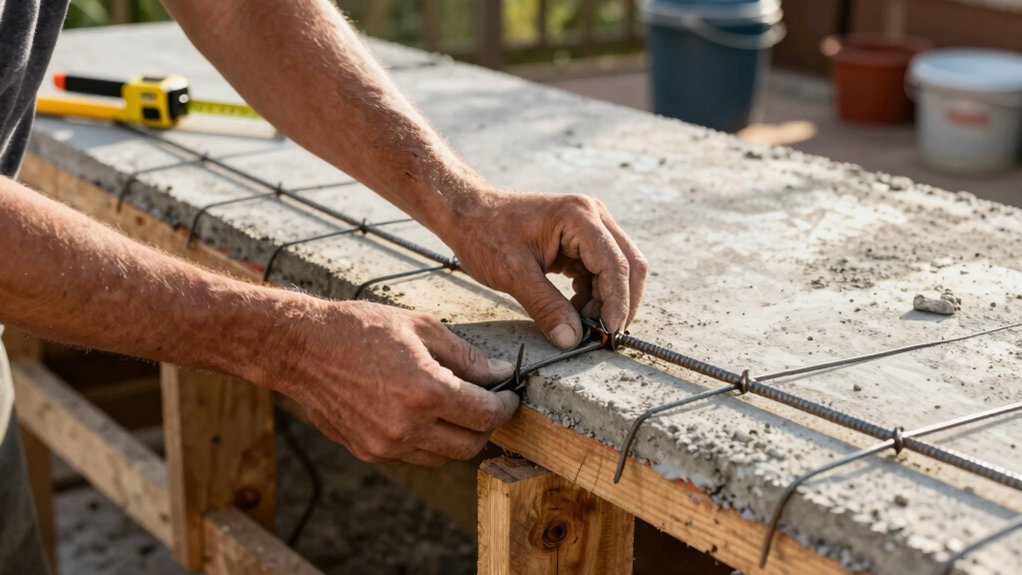
Reinforcement minimizes cracking and boosts durability for outdoor concrete countertops, giving you a more reliable, long-lasting pour. Choose mesh for easy DIY use, or composite rebar for higher strength and reduced ghosting. If you go with rebar, use composite—not steel—and position it in a tight grid, keeping it about 1/4 inch off the bottom of the form. Place the pieces before pouring, and support them so they stay in the correct position as you fill.
Mesh reinforcement should cover the entire surface by rolling out to the form boundaries and cutting to fit, providing flexural strength especially along edges. Avoid placing reinforcement too close to the surface to maintain a consistent finish and ensure bonding with the form. This setup reduces ghosting and cracks.
Prepare the Concrete Countertop Mix
Now that you’ve set up the reinforcement, mix the countertop concrete using cement, aggregate (crushed stone, gravel, or sand), and water according to the manufacturer’s ratios for the desired workability. Consider adding fibers to reduce cracking and boost flexural strength, while keeping aggregates in the mix. You can optionally incorporate pigments per manufacturer recommendations to reach your color goal, mixing with water and sand. For outdoor pours, mix in batches using a wheelbarrow or 5-gallon bucket, then blend until uniform and smooth enough to spread with a float. Plan multi‑layer pours if reinforcement is used, placing mesh or rebar first, then adding subsequent layers to reach target thickness.
| Tip | Benefit |
|---|---|
| Fibers | Crack resistance |
| Pigments | Color option |
| Batch | Uniform mix |
| Placement | Layering aid |
| Cure | Consistency |
How to Pour Outdoor Concrete Countertops
How do you pour outdoor concrete countertops to get a smooth, durable finish? Attach a form to the outdoor island, ensuring a level base and a tight seal, then place reinforcement (mesh or composite rebar) before pouring. Pour concrete in the form from one end to the other, filling evenly and avoiding excessive speed. Screed the surface with a 2×4 to achieve a level top, then use vibration or tapping to settle the mix and minimize voids. Keep the pour at the correct thickness, layering to final height with reinforcements positioned about 1/4 inch from the bottom. After pouring, let it set, then flood or mist-cure as recommended and wait for the cure time before removing forms and continuing finishing for the next steps.
Remove Air Pockets
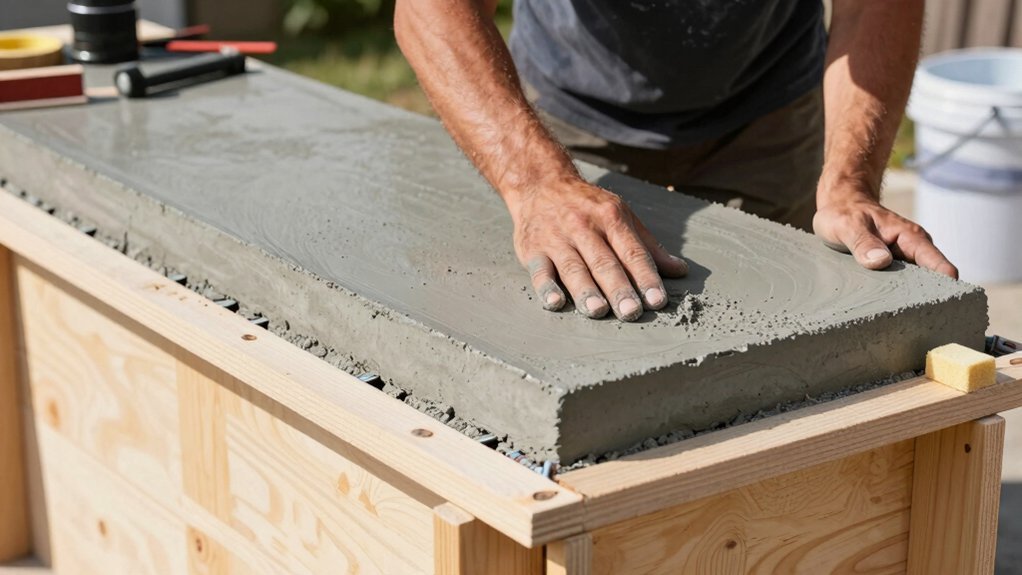
Immediately after pouring, remove air pockets by using vibration methods or tapping along the perimeter with a rubber mallet, palm sander (edge only), or a hammer to shake loose bubbles from the still-wet concrete. Target the perimeter first, since bubbles rise and accumulate along edges, then address the interior in repeating passes until the surface feels stable and smooth. Keep the concrete wet and workable during the air-elimination process to prevent rapid setting that could trap voids; use gentle vibration rather than heavy compaction to avoid segregation. After initial screeding, run a light vibration or tapping routine across all areas to release trapped air before finishing with troweling or additional smoothing. Inspect for visible voids or pockmarks and fill them with a small batch of fresh concrete, then re-screed, and smooth the top surface.
How to Finish Outdoor Concrete Countertops
After pouring, let the concrete cure for 72 hours while keeping it moist to minimize surface cracking and build strength.
> Cure concrete for 72 hours while keeping it moist to prevent cracking and build strength.
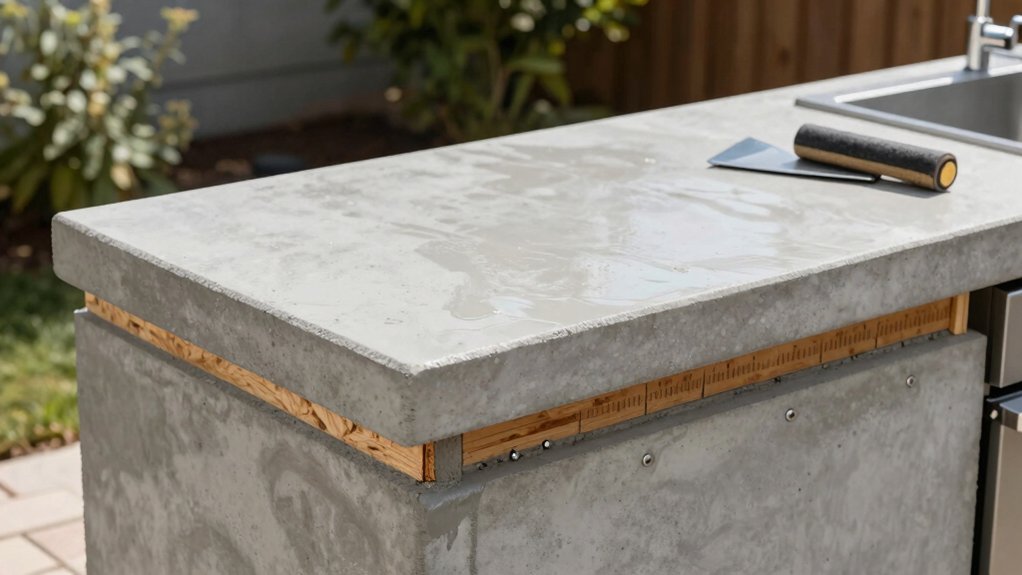
Then inspect the surface for voids and fill any you find with fresh concrete, smoothing to match the surrounding area, and proceed to sealing.
Sand the surface starting with an orbital sander and a rough pad, moving to finer grits for a smooth finish, and wear a respirator during sanding.
Seal outdoor concrete countertops with a food-safe sealer, applying at least one or two coats using a foam roller for the top and a foam brush for edges and crevices.
For ongoing protection, consider a second sealing layer and re-sealing periodically according to the sealer manufacturer’s recommendations.
Keep your work area clean between steps.
Remove the Forms
Remove the forms carefully so you don’t pull concrete or nick edges. Inspect the exposed top for voids or honeycombing and plan to fill any defects with a fresh small batch. Use a stiff brush or trowel to clean the joint edges after removal, ensuring a clean transition and guarding the surface against rapid drying.
Detach Forms Safely
How can you detach forms safely without risking damage to the countertop? Wait until the concrete has gained sufficient strength after the initial set to minimize edge chipping and surface damage. Begin by carefully unscrewing or removing fasteners, then gently separate form sides from the cured countertop using a wedge or plastic pry tool to avoid gouging. Check for any remaining sealant or caulk along the edges and remove or trim excess before full removal to prevent tearing the surface. Lift or slide off melamine or wood forms evenly, supporting the underside to prevent flexing that could cause cracks or voids.
- Remove fasteners first.
- Use a wedge or plastic pry tool.
- Separate edges gently; avoid gouges before full removal.
- Inspect sealant and trim excess.
Inspect for Voids
When you pull the forms, inspect the surface for voids and incomplete pockets. After pouring, remove the forms and check for any gaps that could compromise strength or finish. Fill detected voids with a small batch of fresh concrete and smooth to match the surrounding area before sealing. Use a vibration method, rubber mallet, tapping, or a perimeter edge sander, to eliminate air pockets while the concrete is still wet. Check that the form remains stable and aligned during sealing to prevent leaks or new voids. Complete void remediation prior to final sealing to ensure a uniform, defect-free top surface. Ensure the surface looks uniform and consistent with the surrounding area as you prepare for the phase of finishing before you seal properly today.
Clean Edges Afterward
Once the concrete is sufficiently hard, carefully pry the edge forms away with a putty knife or flat bar to avoid gouging the surface. Remove the forms after the recommended curing time to prevent edge damage and to reveal a clean edge.
- Gently pry and lift edge forms away from the countertop to avoid gouging.
- Inspect the top and edges for voids or irregularities, filling defects with fresh concrete or epoxy filler.
- Lightly sand and round over edge transition(s) with progressively finer grits for a smooth, uniform edge.
- If needed, reseal or touch up edges to address micro-cracks or micro-voids after form removal.
This ensures a crisp edge before sealing. Document any fixes for future maintenance. Keep records for warranty and touch-ups as needed.
Fill the Voids
After pouring, inspect the countertop for voids—gaps or depressions—and fill each with a small batch of fresh concrete, smoothing to match the surrounding surface.
Voids are cosmetic, not structural, but fixing them early prevents uneven finishes and a uniform top plane. Use a stainless steel finishing trowel to feather and fill voids, then light sand once the filled areas set. If voids occur near edges or corners, apply more concrete and re-screed for a level, continuous surface across the countertop. Allow repaired areas to cure fully before sealing, then recheck for low spots and repeat filling if needed.
| Step | Tool | Result |
|---|---|---|
| Inspect & fill | Finishing trowel | Smooths and matches surface |
| Re-screed if needed | Fresh concrete | Level across edges |
| Cure & recheck | Sealant, light touch | Uniform top plane |
Sand the Top and Sides
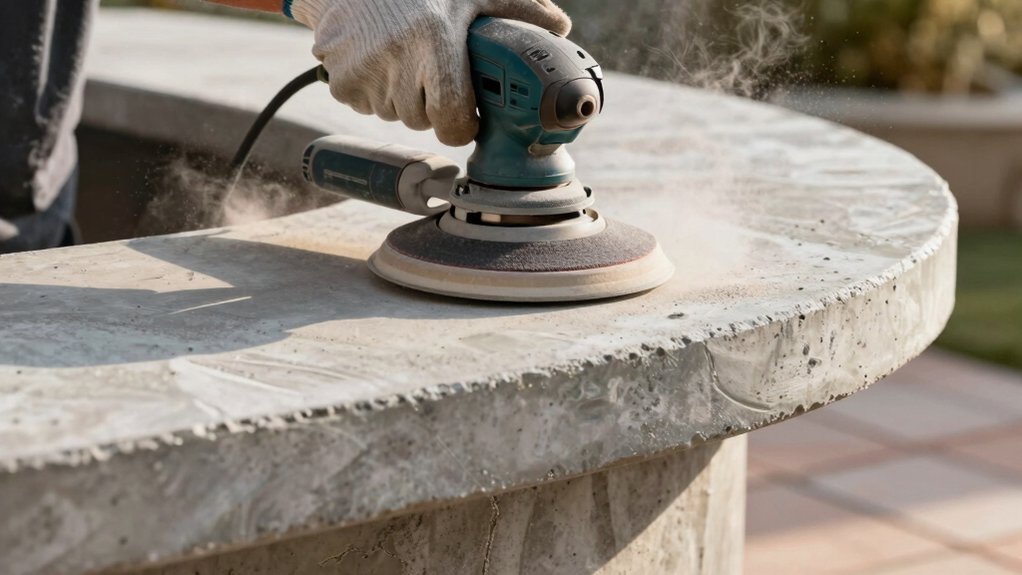
Having filled the voids, you’re ready to sand the top and sides to a smooth, uniform finish. Begin sanding after initial curing and form removal to flatten high spots, using an orbital sander with progressively finer grits from rough to smooth. Start with a coarser grit (80–120) to level, then move to 220–320 for a polished finish on top and sides. Shape edges during sanding to establish the desired profile and maintain consistent thickness around the perimeter. Wear a respirator and protect surrounding areas, since concrete dust is fine and pervasive. After you finish, thoroughly clean the surface to remove dust before applying sealer or additional coats. Keep work area well ventilated, and store tools safely until the next step for consistent results.
- Start with 80–120 grit to level high spots, then progress to 220–320 for a polished top and sides.
- Shape edges during sanding to control the profile and thickness around the perimeter.
- Wear a respirator and shield nearby surfaces from dust exposure.
- Clean the surface thoroughly after sanding before sealing or applying finish coats.
Cut Excess Pieces
Why trim excess pieces now to get a clean, flush edge with the surrounding surface? You remove excess concrete or form material beyond the boundary to prevent seepage and ensure the seal sits properly. Use a straightedge or circular saw with a suitable blade to cut precisely, and wear a respirator and eye protection during cutting. After cutting, smooth the exposed edges with sanding to match the finished profile and avoid sharp or uneven edges. Recheck alignment and levelness; adjust with a trowel or planer if minor deviations exist.
| Step | Tool/Action | Result |
|---|---|---|
| Mark boundary | Straightedge or guide | Clean cut edge |
| Cut excess | Circular saw with blade | Precise, safe edge |
| Sand edges | Sandpaper to finish | Smooth, flush surface |
That step now saves you trouble later.
How to Seal Outdoor Concrete Countertops
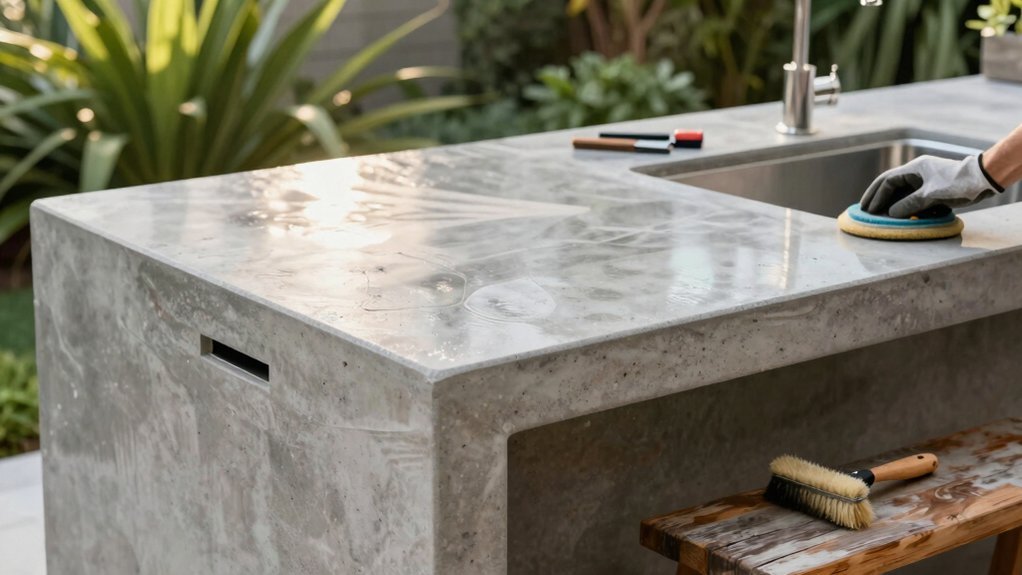
With the edges trimmed, you’re ready to seal for durability and a clean, food-safe finish today. Choose a food-safe sealer and apply it with a foam roller to the surface, then a foam brush for sides and crevices. Consider a second sealing layer for enhanced protection, and allow a 28-day cure before sealing to ensure maximum bonding, with ventilation and time. Apply sealer in coats and follow drying times between coats to prevent a cloudy or uneven finish. For best protection against dirt, oil, grease, and stains, use a high-quality outdoor sealer designed for concrete and re-apply as part of a regular maintenance. If desired, consider a multiple-coat approach (up to eight coats in some guides) for a durable, glossy finish on outdoor countertops.
Seal outdoor concrete countertops with food-safe sealers in coats after proper curing for durable, glossy protection.
- Use only food-safe outdoor sealers designed for concrete.
- Apply with a foam roller to the top surface, then a foam brush for edges.
- Re-apply periodically as part of routine maintenance.
- Allow full cure time between coats as directed by the manufacturer.
Frequently Asked Questions
How Thick Should an Outdoor Concrete Countertop Be?
Typically, you should aim for 2 inches minimum, up to 3 inches for overhangs or heavy use. You’ll reinforce the interior with mesh or rebar, then apply a final troweled top for durability and longevity.
How to Make a Concrete Countertop Step by Step?
You pour a two-layer form, place reinforcement, then pour and screed, push out air with vibration, remove forms, fix voids, let cure 28 days, seal with a food-safe sealer, and add finish after initial curing.
What Rebar for Concrete Bartop?
Use composite rebar, not traditional steel, for a bartop. Place it in a tight grid about 1/4–1/2 inch off the bottom, secure with ties, cut to fit, then pour and smooth before curing and finish.
What Kind of Concrete Do You Use for Outdoor Countertops?
You use an outdoor-rated concrete mix, like Quikrete 5000 or a countertop blend, reinforced with composite rebar or mesh, mixed with optional fibers and pigments, and sealed well to resist weather and staining UV exposure.

Leave a Reply