
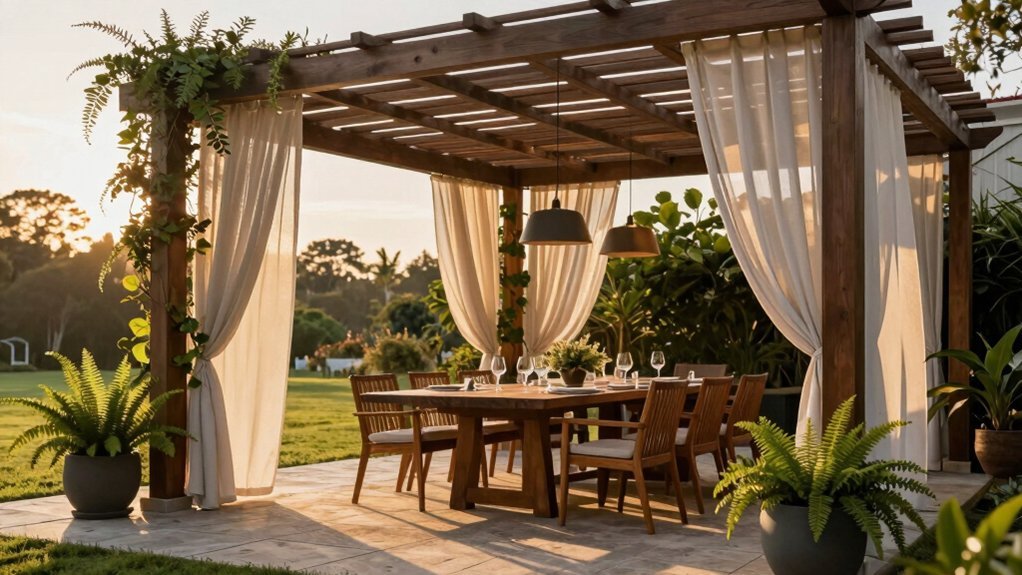
Design your pergola landscape by clearly defining outdoor entertainment zones under the pergola, with distinct lounge and dining areas that stay visually cohesive. Choose a pergola style that matches your home, and plan roof options for daylight and shade. Create a smooth indoor-outdoor flow with shared materials, then weave seating and dining into accessible zones. Add a focal point like a fire pit or fountain, weatherproof textures, and adaptable lighting to entertain after dark tonight. More ideas await as you continue.
Define Your Outdoor Entertainment Zones

How can you define your outdoor entertainment zones under a pergola? Use the structure to separate lounge and dining areas, giving you visual identity for each space.
Let climbing vines or lattice screens create privacy and clear boundaries without enclosing the whole yard.
> Climbing vines or lattice screens craft privacy and clear boundaries without enclosing the yard.
Position zones with sightlines toward garden features and keep pathways open for easy movement between areas.
For dining, consider a solid or two-layer roof to deliver shade while still letting breezes reach the lounge.
Mix in lighting and weatherproof fixtures so you can use every zone after dark.
By planning zones this way, you’ll enjoy cohesive flow, practical function, and a inviting atmosphere that enhances outdoor entertaining.
Keep buffers for future tweaks, like portable seating or grill placement, to refine comfort.
Choose a Pergola Style That Fits Your Home
To fit your home, choose a pergola style that echoes your exterior materials and colors for a seamless indoor–outdoor transition. Attaching a pergola to the house extends the roof outward, increasing shade under eaves and integrating seating with your exterior. Dark wood pergolas visually connect house sections and reinforce a cohesive architectural style.
When choosing a style, consider contrasts or complements with house rail detailing to reinforce overall design unity. A cantilevered or attached design can balance sun exposure and shade while aligning with the home’s existing architecture.
| Style cue | Visual cue | Integration cue |
|---|---|---|
| Dark timber | Dark stain | Roof extension |
| Cantilevered | Clean lines | Rail harmony |
| Attached | Cohesive rails | Outdoor seating |
Guests will barely notice the boundary while enjoying a seamless entertaining area all season.
Plan Roof Options for Daylight and Shade
You balance daylight and shade by selecting roof styles that filter light while keeping guests comfortable. Two-layer roofs add ventilation and dimensionality, influencing how the space feels beneath. Try flat, slatted, or lattice forms with thoughtful overhangs and gaps to tune the light and breeze.
Daylight-Shade Balance
Where daylight is strongest, choose roof options that mix sun and shade—single-layer roofs for simple shade and direct sun, or two-layer roofs to add depth and a more dynamic daytime silhouette. Plan overhangs to tune shelter extent and shading patterns, so seating stays comfy as sunlight travels.
Keep gaps between beams to boost ventilation and brighten daytime feel, so you’re not enclosing spaces. Light-colored roof surfaces reflect heat and light, helping you stay cooler, while dark finishes change shade tone. Decide whether the roof connects to indoors or stands alone to control how daylight transitions and where shade lands across adjacent areas. Tailor overhangs and gaps to balance brightness with comfort during peak sun and softer afternoon light for spaces you entertain outdoors.
Two-Layer Roof Options
Two-layer roofs add dimensionality and define distinct zones under your pergola, building on the daylight considerations you’ve already weighed. The upper and lower layers balance shelter with openness, so you get ventilation while still enjoying shade. Overhang length and layer spacing matter: they shape shelter, light diffusion, and the mood of daytime and evening spaces. A double-layer design can coordinate with surrounding elements, like matching rail detailing or brick accents, for a cohesive look you’ll notice from every angle. This setup also supports varied plantings and a more dynamic skyline, adding depth to your landscape as you entertain. By planning transitions between layers, you control breezes, shade intensity, and focal viewpoints. Refine the gap, test lighting, and adjust airflow to suit live gatherings outside.
Create a Connected Flow Between Indoors and Outdoors
Start by creating a seamless transition from indoors to outdoors, so conversations and meals feel naturally connected. You’ll use coordinated materials and colors on the pergola and adjacent walls to reinforce that continuity, echoing the interior palette in beams, railings, and finishes. Define shared threshold spaces—where doors meet deck or patio—so traffic and function flow smoothly between rooms and the outdoors.
Seamless Indoors to Outdoors
How do you create a seamless change from indoors to outdoors? Attach the pergola to the house and use the same materials and colors to blend with exterior, creating a seamless transition. Expanding the pergola from the exterior wall supports a cohesive space, aligning with the house’s style and improving sightlines between interior rooms and outdoor seating.
Coordinated roof spacing and color echo eaves and rail detailing, reinforcing a look that links indoor living areas to the lounge and dining zones. Connected pergola design can extend living outdoors, with furniture palettes and textures, so high-top tables and built-in seating feel like an extension of spaces.
Landscaping around the connected pergola—climbing vines, privacy screens, and matching paving—further integrates the indoor and outdoor areas, enhancing flow.
Coordinated Materials and Color
To create a connected flow between indoors and outdoors, use consistent materials and colors that mirror your house exterior. Choose dark wood pergola beams with a matching decking finish to create a seamless transition. Extend the same palette across the pergola, railings, and furniture to reinforce a cohesive architectural language. Align roof and canopy treatments with exterior elements—same stain or paint color as trim—to minimize disruption. Integrate lighting and outlets behind the pergola to mirror indoor living spaces, keeping a unified ambiance for gatherings. Choose a cohesive color story echoing the house palette.
| Element | Effect |
|---|---|
| Beams and decking | Seamless transition |
| Palette across spaces | Cohesive language |
| Roof color | Reduced disruption |
| Lighting and outlets | Unified ambiance |
| Color story | Echoes exterior |
This ties indoor comforts to outdoors.
Shared Threshold Spaces
Why design shared threshold spaces that knit indoors to outdoors with a single, connected pergola? Because a connected pergola extends from your back exterior wall and uses the same materials and colors, you create a seamless transition between indoors and outdoors. Design with coordinated styling and color echo reinforces visual continuity and invites easy movement between spaces. Position the pergola to support quick access and clear sightlines to garden features, maintaining smooth circulation from living areas to outdoor dining or lounging zones.
Aim for a higher level of integration by aligning roofing, rail detailing, and furniture finishes with adjacent home architecture, achieving cohesive indoor-outdoor perception. Let the pergola act as a transitional waypoint that anchors pathways and landscaping, guiding traffic naturally between rooms. This flow reduces barriers and elevates entertaining with effortless, year-round connection for you and guests alike.
Integrate Seating and Dining Under the Pergola
Where you place seating and dining under the pergola matters as much as the structure itself. Design zones by using pendant lighting to separate living and dining areas, and keep sightlines clear to the house and paths. Large-scale pergolas with woven pendants define scale, while strings or lanterns provide ambient cues without clutter. Orient the dining table and lounge toward easy access to pathways, ensuring a smooth flow from indoors to the yard. Choose finishes that echo adjacent architecture—dark wood beams with matching decking—to unify both zones. Add practical features such as built-in bench seating and outlets behind the pergola to support prep, charging, and seamless movement between zones.
| Element | Benefit |
|---|---|
| Zoning | Visual separation |
| Access | Clear flow |
| Material | Echoes design |
| Seating | Comfort, flexible |
| Built-ins/outlets | Prep |
Add Lighting for Nighttime Ambiance
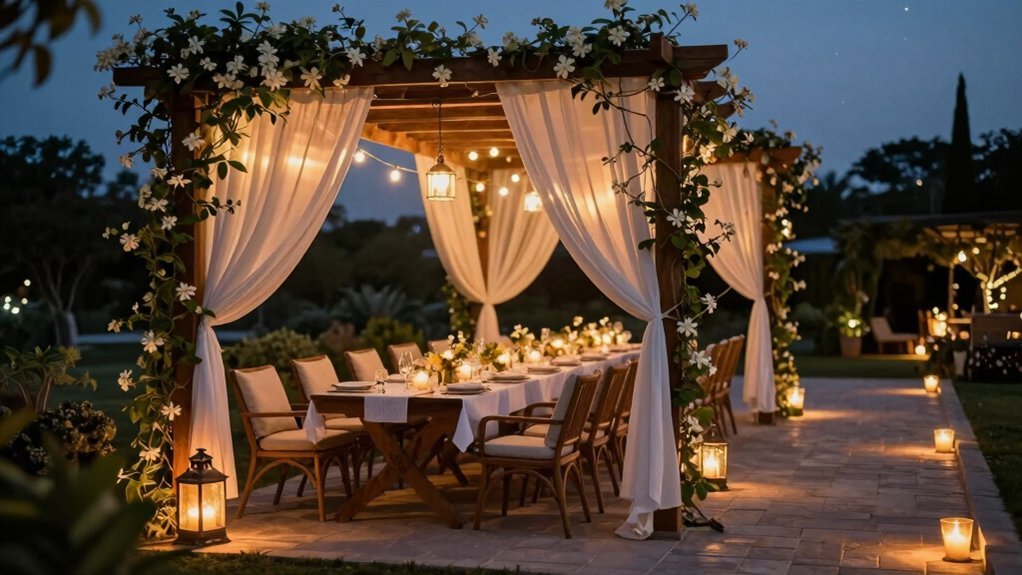
Choose lanterns and string lights to define spaces under your pergola and soften the glow as night falls.
Use dimmers and remote control to keep lighting soft, safe, and customizable along pathways.
Consider lightweight, durable lanterns and paper lantern accents to add decorative layers without overpowering conversations.
Lanterns and String Lights
Evenings glow brighter when you layer lanterns with string lights to extend outdoor use. You choose three brightness settings and a remote to adjust ambiance without fuss. Wayfair offers lightweight, durable lanterns you can tie around the pergola with a long rope for flexible placements. In a nighttime pergola living room scenario, they deliver ample illumination before dark and a romantic, breezy feel that encourages lingering outdoors.
When you pair lanterns with string lights, you create layered lighting that stretches usability into the evening hours. This setup acts as a core design element for a backyard escape and supports fall use with warm, inviting glow that stays put as temperatures drop. Keep the arrangement simple, and you’ll enjoy year-round gatherings with minimal effort daily.
Soft, Safe Path Lighting
Three simple steps set the tone for soft, safe path lighting along walkways and around the pergola perimeter, guiding guests without glare. Place low-profile fixtures along edges, aiming for even coverage that reduces shadows in transition zones. Use warm, 2700–3000K tones to welcome visitors without overpowering night views. Employ multiple sources—stakes, post lanterns, and recessed ground lights—to boost safety and minimize hot spots. Ensure weather resistance and fade protection so you can rely on color and brightness throughout evening gatherings. Integrate compatibility with hanging baskets or string lights to preserve cohesive aesthetics.
| Light Type | Placement | Benefit |
|---|---|---|
| stakes | along walkways | guides without glare |
| Recessed | at transitions | reduces shadows |
Choose dimming controls to adjust brightness as crowds move between zones. This setup scales with guest flow and outdoor rooms. Tweak fixtures seasonally for consistent warmth and safety.
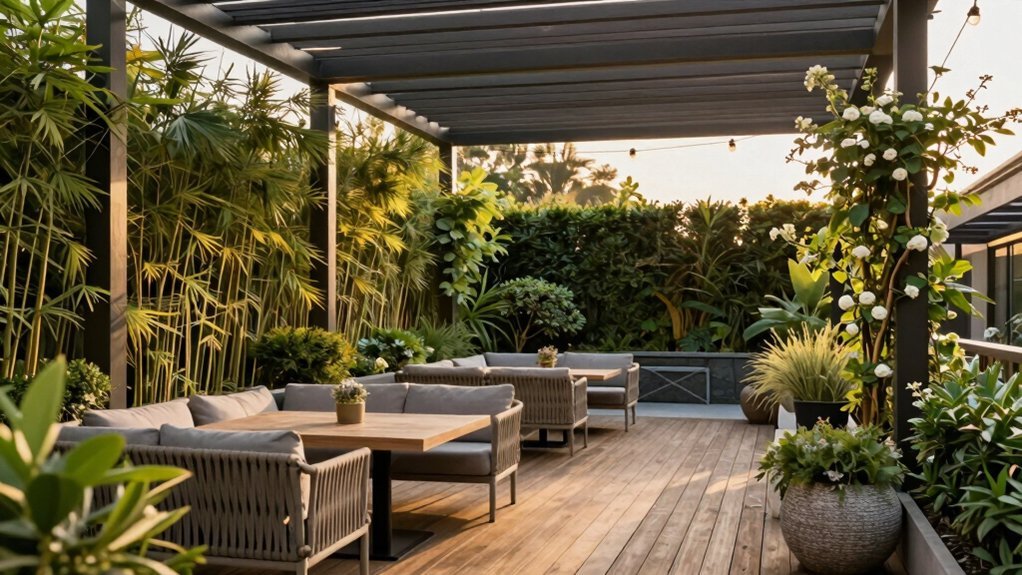
Use Plants and Greenery to Soften Structures
How can you soften a pergola’s hard lines with living color and texture?
Line the pergola with containers of bright blooms and train climbing plants to grow up and around the structure for vertical greenery. Use flowering vines like morning glory to add color and fragrance while softening the wood or metal framework. Hang pendant lights or lanterns among vines to extend greenery’s visual impact into evening hours. Choose low-maintenance plants suited to your local climate that thrive in dappled light under a pergola to minimize upkeep. By weaving vines through openings and along trellises, you create a living lattice that softens edges without closing the space, inviting guests to linger in shade and color. Keep maintenance practical with smart pruning and seasonal tweaks.
Incorporate Privacy and Screening Solutions
Consider trellis panels for privacy that still let light flow through your pergola, while keeping the space open. Pair a vine-covered privacy wall with climbing plants to block views from neighbors and add vertical greenery. Layer in layered shading solutions—side draping or curtains plus overhead lighting—to create flexible screening, shade, and after-dark ambiance.
Trellis Panels for Privacy
Trellis panels give you privacy while still letting light and air flow, balancing seclusion with an open outdoor feel. Use them as open-frame screens that coordinate with your pergola, reducing sightlines to the yard without fully enclosing the seating area. Climbing plants can be trained through or around the trellis, boosting vertical greenery and natural shading. White trellis accents pair nicely with brick walls, creating crisp contrast and a polished exterior look. Trellis screens help define lounge zones under a pergola while keeping you visually connected to the landscape. Position them to shade afternoon sun and frame views, so entertaining stays comfortable without isolating the gathering. If you add vines, choose species with manageable growth and seasonal color to enhance privacy over time nicely.
Vine-Covered Privacy Wall
A vine-covered privacy wall creates a secluded seating pocket under your pergola by blending visual screening with lush greenery, blocking direct views while still admitting light and air. Using climbing plants softens the wall’s edges, adds vertical interest, and helps with privacy when you train vines through openings.
A privacy wall can be open-frame or solid, but with a pergola, it’s an open feel while cutting direct sun. Choose climb-friendly, climate-appropriate species to keep things lush and low-maintenance, aligning with greenery around pergolas. The wall enhances lounge and entertaining areas with shading, visual separation, and a cohesive outdoor transition today.
- Start with a sturdy frame that supports growth.
- Pick vines that suit your climate and maintenance preference.
- Train and manage vines to maintain airflow.
Layered Shading Solutions
How can you layer shading under a pergola to boost privacy while keeping airflow and light intact? By combining a roof with side elements like bamboo screens or privacy walls, you create adjustable light levels without cutting visibility or airflow. A bamboo screen adds depth and privacy under the pergola, supporting a layered, open feel.
Install curtains or fabric panels on multiple sides for flexible sun control and zone separation, boosting comfort for different activities.
Integrate a retractable canopy or louvers in the roof design for modulated shading that moves with the sun.
Pair climbing vines with screening materials to soften lines and amplify privacy while maintaining a cohesive outdoor aesthetic.
This layered approach adapts to seasons, events, and afternoon glare, without compromising comfort.
Select Durable Materials and Finishes
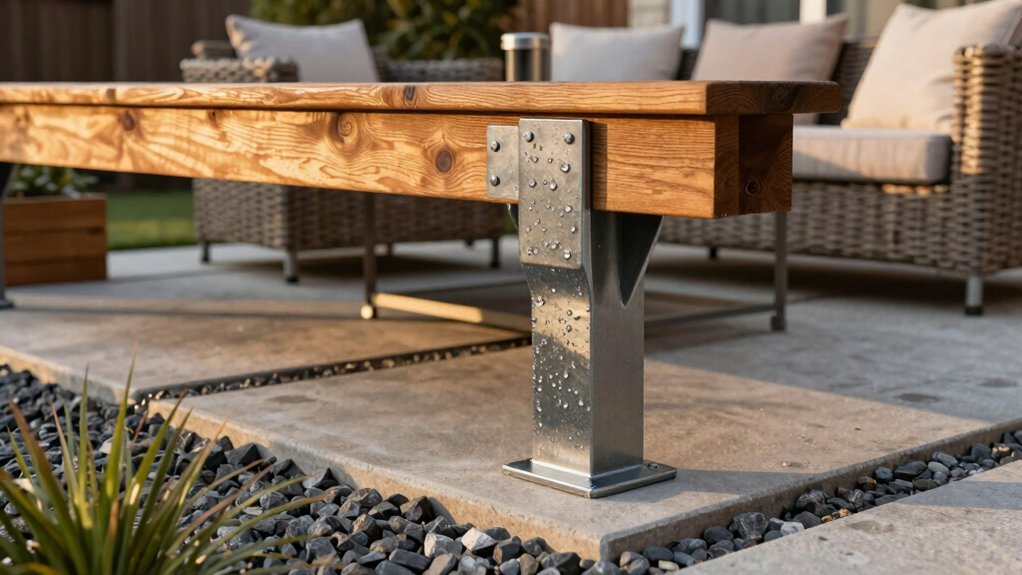
Why settle for a flimsy pergola when you can build with durable, weather-ready materials? You want longevity, so choose galvanized metal for longevity and treated wood to resist rot and pests. Mix cedarwood with composite decking to balance beauty and low maintenance. Finish with weatherproof seals for wood and powder-coated metal to curb rust, so your structure ages gracefully.
- Choose durable materials that withstand outdoor conditions, like galvanized metal and treated wood, ensuring your pergola stays strong.
- Mix materials thoughtfully to balance aesthetics and maintenance, cedarwood with composite decking, reducing upkeep while preserving warmth.
- Plan finishes and utilities now—weatherproof seals for wood, powder-coated metal for rust resistance, and built-in outlets.
With these choices, you create a durable, guest-ready space that lasts season after season.
Layer Textures With Wood, Metal, and Stone
Building on your durable-material choices, layer textures by pairing wood beams and slats with metal accents and grounding the design with stone.
Combine cedar framing with dark metal hardware to create a contemporary silhouette, then add a stone patio or veneer near the pergola to anchor the space and heighten tactile variety alongside wood and metal.
Integrate lighting into different textures—metal fixtures glow against stone, wood lantern housings softly illuminate slats—to emphasize surface differences after dark.
Mix materials thoughtfully: select rot-resistant wood for structure, sturdy metal for joints, and stone pavers or planter bases to form cohesive focal points.
Plan maintenance and weathering, choosing weatherproof metal, sealed wood, and stone finishes to keep texture layering balanced over time for lasting curb appeal and comfort.
Build in a Focal Point: Fire Pit or Water Element
Want to make your pergola the centerpiece of entertaining? You can frame a seating area around a fire pit for warm, gathering-centered evenings.
A water element beneath or beside the pergola adds soothing sound and visual interest that heightens your guests’ enjoyment.
A fire feature under a two-layer roof pergola shelters from wind while keeping a clear view to dining and lounge zones, extending use on cooler nights.
Position the fire feature as the visual anchor to define lounge and dining spaces within your open-plan outdoor room.
Include these moves:
- Frame seating around the fire pit to create a social hub.
- Place a fountain or pond to introduce calm sound and movement.
- Coordinate dark beams with brick or stone to reinforce the focal point.
Design Versatile Layouts for Small and Large Spaces
How can you design versatile layouts under a pergola that work in both small and large spaces? Start by defining zones for lounging, dining, and passage, so you can adjust seating without enclosing the area.
Versatile pergola layouts begin with defined zones for lounging, dining, and passage to adjust seating while keeping openness.
In small spaces, use a partial cover or cantilevered half pergola to create defined edges while keeping openness.
In larger areas, scale up with large pendants, layered roofs, and integrated planters to delineate separate living and dining zones.
Keep sightlines clear and pathways unobstructed to maintain flow between indoors and outdoors across both footprints.
Use adaptable furnishings, such as modular seating and movable tables, to reconfigure for different group sizes and activities.
This approach preserves flexibility while guiding people smoothly from entry to entertainment areas without sacrificing continuity overall.
Enhance Weatherproof Comfort With Curtains and Screens
Ready to boost comfort under your pergola with curtains and screens? Outdoor curtains made for outdoor use resist fading, provide sun shading, privacy, and flexible coverage when tied back or drawn. Retractable screens or curtains let you dynamically control airflow and light as weather and sun angles shift, keeping guests comfortable. Curtains and screens help create distinct zones under the pergola, making dining, lounging, or breezy resting areas feel intentional. Proper installation matters: weatherproof hardware and fade-resistant fabrics ensure longevity across climates. Pair curtains with lighting—lanterns or string lights—to extend usability into the evening while keeping the space cohesive.
- Install weatherproof hardware and fade-resistant fabrics
- Use retractable options to adapt to sun and wind
- Group lighting with curtains for ambiance tonight.
Tie the Space to Landscaping and Pathways
To tie the space to landscaping, define the pergola seating area with surrounding plantings and a soft edge that echoes garden lines, using climbing vines on the structure to blur the boundary between hardscape and greenery. Use a clear backdrop like a wall or trellis behind the pergola to anchor plantings and create cohesive sightlines from house to yard. Integrate pathways that flow from the house to the pergola, keeping them unobstructed and guiding guests toward the seating zone. Choose plantings that frame the pergola edges and soften hardscape, such as roses, bougainvillea, clematis, or morning glory, to draw the eye along the approach. Ensure ground materials extend under and beyond the pergola for a continuous transition between outdoor living and landscape at night.
Frequently Asked Questions
What Are Budget-Friendly Pergola Materials for Durability?
Use pressure-treated wood, vinyl, aluminum, or durable fiberglass for budget-friendly pergola durability. They resist rot and weather; seal, maintain, and recoat regularly. Compare costs and warranties, install yourself when possible, and choose value over savings.
How to Incorporate Local Climate Considerations Into Design?
You’re tailoring the design to your climate by selecting drought- or moisture-tolerant materials, orienting the pergola for sun and wind, adding windbreaks or shade, and using proper drainage, insulation, and ventilation to keep comfort year-round.
What Maintenance Schedule Keeps Pergola Finishes Looking New?
You’re advised to seal or repaint every 2-3 years, clean annually, and address wear promptly. Inspect for cracking or rot after winter, re-stain every 1-3 years, and protect finishes with gentle cleaners and soft brushes.
How Can I Maximize Accessibility Around the Pergola?
You maximize accessibility by keeping clear paths, widening entrances, and using non-slip surfaces; remove obstacles, add gentle ramps, install bright lighting, and plan seating with ample circulation, so everyone moves easily around the pergola today.
What Are Safety Tips for Elevated Pergola Elements?
Prioritize guardrails on all elevated elements, keep handrails sturdy, and install non-slip surfaces. Check load limits, secure lighting, and shield edges with rounded profiles. Regular inspections catch loose bolts, wobble, or corrosion before hazards appear.


Leave a Reply