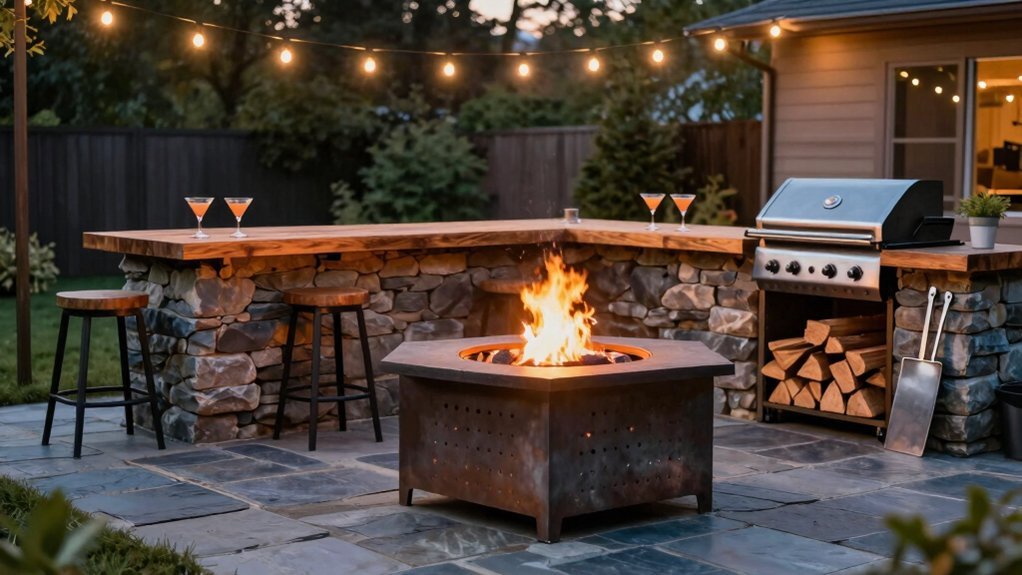
To build a fire pit bar combo, start by centering a level fire pit inside a defined, accessible seating area and clear a six to eight foot safety zone. Create a base with weed barrier, gravel, and drainage, then install heat-resistant countertops like concrete or granite with noncombustible underlayment. Add built-in storage, weatherproof seating, and subtle lighting on 12V LEDs. Seal and rust-proof the pit, then finish with non-slip coatings; you’ll discover more steps ahead.
Defining the Fire Pit Bar Layout
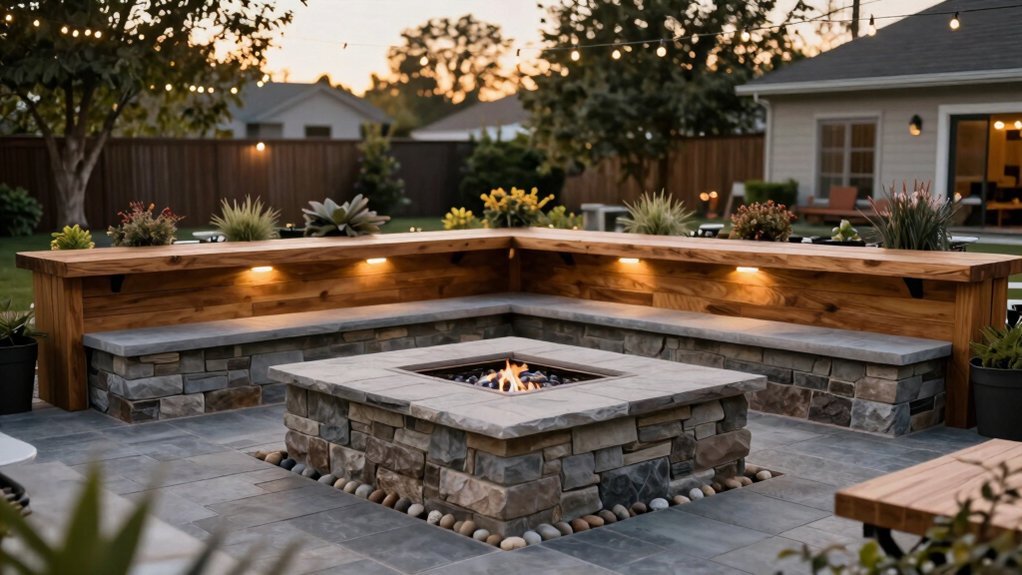
To define your fire pit bar layout, center the fire pit within a circular or rectangular seating area so everyone has equal access from all sides. Mark a perimeter with stakes and string or spray paint to create a working circle that fits the fire pit insert and seating. Plan a zone with six to eight feet of clearance around the pit, a 36–48 inch bar counter, and drink stations today. Build on a level surface by removing grass, excavating, and compacting soil, then lay a gravel base topped with landscape fabric to prevent weed growth under the bar area. Choose durable, heat-safe materials for the bar front and seating—stone, concrete pavers, or treated lumber—and ensure drainage to avoid standing water near the pit.
Selecting Heat-Resistant Materials for the Counter
Now that you’ve laid out the bar area, pick countertops that shrug off heat and messy cooking splatters.
- Concrete, granite, soapstone, or quartz.
- For concrete and quartz, ensure a minimum 1.5–2 inch thickness to resist cracking from heat transfer and weight.
- Use heat-safe backer board and non-combustible underlayment beneath the countertop for added fire resistance.
- Consider slate or granite with a sealed, non-porous surface to resist staining and clean easily.
Apply a high-heat, outdoor-rated sealer or epoxy to porous materials to boost weather and heat resistance. This setup keeps surfaces cooler to touch, simplifies cleanup, and extends the counter’s life in sun, rain, and heat outdoors.
Planning Built-In Storage for Tools and Beverages
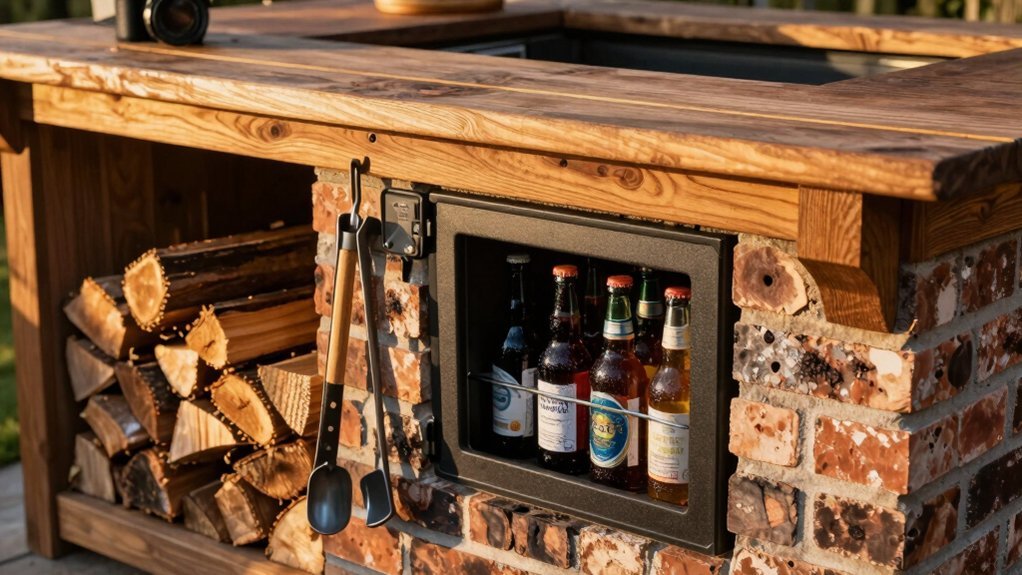
Where should you place built-in storage so guests and prep stations stay within easy reach of the fire pit bar without blocking traffic? Position it near the seating area to keep drinks, glassware, and tools within arm’s reach while preserving flow. Include a weatherproof cabinet or drawer system with a dedicated beverage cooler and utensil organizers so you can access essentials without last-minute hunts. Design recessed or concealed storage for fire pit tools (poker, tongs, brush) and barware, using magnetic strips or labeled bins to minimize clutter. Use durable, heat-resistant materials for surface shelves and doors, such as powder-coated metal or treated teak, to withstand heat, spills, and outdoor exposure. Add a charging station and bottle opener nearby, plus a hidden trash/recycling bin inside.
Achieving a Level, Defined Fire Pit Area
Start by mapping your fire pit area: stake the center and mark a defined circle to guide digging and layout.
Then dig out grass to form a clean, defined working circle and level the soil so seating and features sit evenly.
Recheck measurements after digging, adjust to keep a consistent radius for the final ring and plan a slight slope away from the pit for drainage.
Map and Mark Circle
How do you establish a true fire pit circle you can work from? Start by staking the center with a labeled point and marking the perimeter to establish the working zone. Choose a circle size that accommodates the fire pit insert while leaving 12–18 inches of clearance to avoid heat damage. After laying out the circle, recheck all measurements with a tape measure and string line to ensure a true circle and perimeter before construction.
- Map out the fire pit area by staking the center point and labeling it.
- Mark the perimeter to define the working zone.
- Choose a circle size that allows the required clearance.
- Recheck measurements with a tape measure and string line to confirm a true circle.
Keep the layout accurate.
Dig and Level Ground
Why settle for uneven ground when you can map, dig, and level a defined fire pit area?
Map the fire pit area by staking the center and marking a perimeter that accommodates the insert, then dig out grass to create a defined working circle.
Choose a defined circle size, about 4–5 feet in diameter, based on the insert and seating plan for safe clearances.
Remove existing grass and cultivate the soil to a level surface, filling low spots with sand or gravel as needed for a consistent plane.
Use a straightedge or string line to verify levelness across the circle, adjusting soil in low/high spots until the surface reads within 1/2 inch of level at checkpoints, lightly tamping as you go.
Add a sub-base.
Building the Seating Bar With Weatherproof Surfaces

Choose weatherproof seating materials, like high-density polyethylene or powder-coated aluminum, that stand up to sun, rain, and temperature swings.
Plan a compact seating bar with a 12–14 inch overhang and a 1.5–2 inch edge so plates and drinks stay within reach.
Use stainless steel or coated fasteners and UV-stable sealants, and install a water-resistant countertop (quartz composite or sealed concrete) with a shallow slope for drainage to keep joints and surfaces durable.
Weatherproof Seating Materials
For seating around your fire pit bar, choose weatherproof surfaces like marine-grade plywood with sealant, HDPE lumber, or powder-coated aluminum to stand up to moisture and temperature swings.
1) Use 3/4-inch plywood with exterior-grade waterproof glue and a UV-resistant sealer for the seating surface, then apply a non-slip coating to prevent slickness when wet.
2) Install a durable, heat-resistant top such as quartz composite or stainless steel for the bar counter to withstand accidental sparks and high heat near the fire pit.
3) Attach weatherproof, low-maintenance seating components with stainless steel or galvanized hardware to prevent rust and ensure long-term performance.
4) Seal all seams and edges with marine-grade or exterior silicone and consider removable or modular cushions designed for outdoor use.
Keep seating durable with this approach.
Seating Bar Surface Options
How do you pick a seating bar surface that stands up to weather while staying comfortable and easy to clean? Choose weatherproof materials like high-pressure laminate, powder-coated aluminum, or marine-grade teak that resist outdoor exposure. Aim for a surface depth of 1.25 to 2 inches so bowls, drinks, and utensils fit without feeling cramped. Seal wood with a water-resistant coat and pick non-porous options to reduce staining from sauces and beverages. Consider a curved or radius edge to boost comfort and ease of movement when people sit or stand. Attach the surface with corrosion-resistant fasteners and use removable panels or caps to simplify cleaning and maintenance around the fire pit area. Choose finishes that resist heat and wipe clean with effort year after year.
Integrating Safe Lighting Along the Bar and Pit
Why should you install low-voltage lighting along the bar and pit? You want safe, reliable illumination that stays cool near heat, using 12V LED lanterns or flush-mounted LEDs to minimize heat exposure and ensure safe operation around the fire area.
- Run low-voltage lighting along the bar and pit using 12V LEDs to minimize heat near the fire area.
- Bury wiring 6–12 inches deep and shield it with outdoor-rated conduit or LED channels.
- Place lighting at eye level for the bar and ensure the pit is evenly lit from multiple hotspots.
- Use weatherproof connectors and waterproof seals, plus a dedicated switch or dimmer at the bar, with 2700–3000K warmth.
Keep transitions soft, and color consistency around 2700–3000K to unify the space for a welcoming glow.
Preparing the Ground: Weed Barrier and Gravel Base
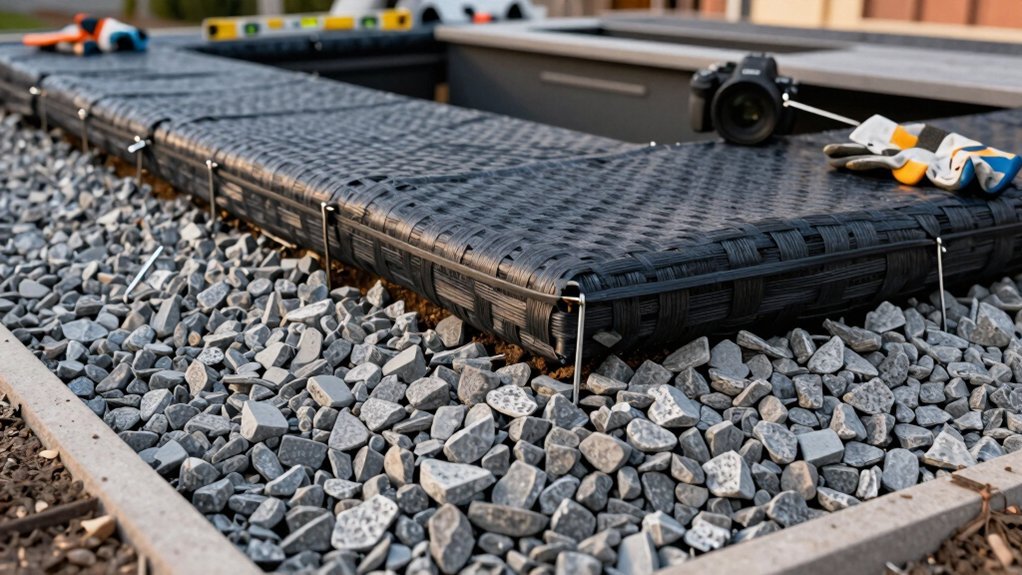
Start by laying a weed barrier fabric over the prepared ground to suppress grass and weeds, then secure it with outdoor staples and anchor it with perimeter pavers to prevent shifting.
Next, spread a base layer of gravel to create a stable, well-draining foundation, and use a rake to level it for a uniform thickness. Plan a 4–6 inch compacted layer for durability, balancing stability with maintenance access as you move toward the fire pit bar area.
Weed Barrier Setup
What’s the easiest way to keep weeds from creeping under your fire pit bar area?
- Install weed block fabric over the prepared ground to prevent weed growth beneath the space.
- Secure the weed barrier with outdoor staples along the edges to prevent shifting during gravel addition.
- Place perimeter pavers or edging to hold the barrier in place and define the gravel base boundary.
- Spread a layer of gravel on top of the weed barrier to create a stable, well-draining base for the fire pit and seating area.
Ensure the gravel base is level and compacted, using a rake and a hand tamper as needed before proceeding with construction. This setup helps drainage and weed control without delaying your build process.
Gravel Base Layer
Gravel base forms the sturdy, level foundation under your fire pit bar. After you lay the weed block fabric over the prepared ground, secure it with outdoor staples along the edges and joints to prevent shifting. Then spread a uniform layer of gravel on top of the weed barrier to create a stable, non-compact base for the fire pit area. Use a rake to level the gravel and ensure a consistent thickness that’s comfortable for foot traffic and equipment clearance. Finally, lightly compact the gravel base with a plate compactor or hand tamper to achieve a solid, level foundation you can rely on. Keep the edges flush with surrounding paving, and recheck for dips before you invite guests to gather around the finished setup.
Keep the edges flush with surrounding paving, and recheck for dips before you invite guests to gather around the finished setup.
Installing Quick-Setting Concrete for Sturdy Posts
How can you ensure sturdy posts when installing quick-setting concrete? Dig holes for the 4×4 posts to the required depth, typically 6–12 inches below the frost line, and loosen the soil to prevent settling. Place a level on each post and use temporary braces to keep them plumb while the quick-setting concrete cures.
Dig holes to frost depth, level posts, brace, and cure with quick-setting concrete.
Mix quick-setting concrete according to the manufacturer’s instructions, adding water gradually to achieve a stiff, workable consistency. Pour the concrete into each hole around the post, fill to the ground line, and slope the surface slightly away from the post to shed water.
Allow the concrete to cure undisturbed for the recommended time—often 24–48 hours for initial set, with full strength after several days.
1) Dig holes
2) Level posts
3) Mix concrete
4) Pour
Adding 4×4 Post Supports for Ambient Lighting

Ready to add ambient lighting? Dig holes for 4×4 posts to support the lights, making sure each hole’s depth and width meet local code requirements and accommodate the post diameter for stability. Call 811 before digging to check for underground utilities and prevent strikes when placing lighting posts. Set posts in quick-setting concrete, and pour a gravel base at the bottom of each hole to improve drainage and leveling. Install weed-block fabric and perimeter pavers around the post bases to create a clean, weed-free foundation for the lighting system. Attach lighting fixtures to the posts with sturdy hardware, securing wiring with outdoor-rated conduit or zip-ties and weatherproof seals for safe operation. Maintain clear sightlines and keep paths unobstructed for safe access at all times.
Finishing Touches: Rust-Proofing and Paint for the Pit
Now that the pit’s base and stones are in place, you’ll finish the look by rust-proofing and painting the insert.
Follow these steps:
> Rust-proof and paint the insert for a durable, non-reflective finish.
- Clean the insert thoroughly to remove dirt, rust, and debris for optimal coating adhesion.
- Apply a rusty metal primer to seal rust and improve paint adhesion before finishing with high-heat paint.
- Use matte black, high-heat paint rated for prolonged temperatures to prevent peeling and maintain a uniform, non-reflective finish.
- Reassemble surrounding stones with even circle sizing and gaps so the pit perimeter is stable and aesthetically pleasing after painting.
Let the primer dry, then apply the high-heat paint and cure per product instructions to maximize rust protection and finish durability. This keeps your pit sharp, reliable seasonally.
Curbing Moisture and Slippage With Non-Slip Coatings
Why risk slips when you can lock in grip and resist moisture on your fire pit bar? You’ll choose textured, high-heat coatings that stand up to 1200°F, keeping traction on hot surfaces. Add moisture-curing sealants to form a hydrophobic layer beneath the coating, cutting water absorption that can blister and creep underfoot. Epoxy-based or ceramic-infused coatings give you a durable, semi-flexible film that tolerates temperature cycling without cracking. Start with a rust-inhibiting or metal-ready primer to boost adhesion and slow moisture ingress at joints. Thorough surface prep—remove oils, dust, and debris, then ensure a dry, clean substrate—significantly boosts longevity and grip in wet conditions. This combination minimizes slip risk across seasons and pairs well with established finishes from the prior topic in your setup.
Maintenance Rituals for Seasonal Outdoor Bar Sets
How can you keep your outdoor bar set performing at its best across the seasons? Start with a seasonal maintenance calendar that aligns with your setup, scheduling monthly cleaning tasks and quarterly deep cleans to prevent residue buildup on surfaces and tools. Use a gentle, pH-balanced cleaner for stainless steel hardware and a soft brush to lift oils and fingerprints after use; rinse and dry thoroughly before storage. Inspect wooden components each spring and reseal to guard against moisture, cracking, and fading, using a weatherproof sealant compatible with outdoor finishes. Store glassware and tools in covered, ventilated bins to deter corrosion and pests, rotating inventory for freshness and minimizing breakage. Also check metal accents for rust.
> Adopt a seasonal maintenance calendar: monthly cleans, quarterly deep cleans, seal wood, rotate inventory, check metal.
1) Calendar
2) Clean
3) Seal
4) Rotate
Frequently Asked Questions
Is It Cheaper to Build a Fire Pit or Buy One?
Cheaper to build or buy? It depends, but you’ll save money DIY if you already have materials and time, while buying is quicker, safer, and includes warranties—worth it when you value convenience or professional setup.
How Long Will a 20 Lb Propane Tank Run a Fire Pit?
A 20 lb propane tank will run your fire pit for about seven hours at 60,000 BTU/hr. If you lower the flame or use fewer burners, expect longer runtime; higher flames cut it shorter dramatically.
How to Make a Perfect Circle for a Firepit?
To make a perfect circle for a firepit, stake the center, stretch a string equal to your radius, and mark ground with chalk. Dig inside the circle, level the soil, and check symmetry with chords.
How to Stack Logs for a Fire Pit?
Stack the logs in a base with largest flat ends down, then layer crisscross for airflow, keep similar diameters per layer, reserve a top layer for kindling, and add bent logs to spread the flame.

Leave a Reply