You’ll build a large dining pergola by starting with proper site planning—aim for at least 12×12 feet on level ground. Set 6×6 posts 8–12 feet apart in concrete footings 30–36 inches deep. Frame with pressure-treated 2×8 or 2×10 beams, spacing rafters 12 inches on center. Install shade elements like lattice or fabric panels for comfort, then weatherproof with UV-resistant sealers. Add LED lighting and climbing plants for ambiance. The details that’ll truly transform your outdoor space await.
Planning Your Dining Pergola: Size, Location, and Design Considerations
When you’re ready to build a large dining pergola, where should you start? Begin with sizing—you’ll need at least 12×12 feet to comfortably accommodate six to eight people, a dining table, and chairs.
Next, scout your location. Choose a level, flat site with minimal shade conflicts. Orient your pergola’s long side toward your house or align it with prevailing winds to reduce exposure and enhance natural breezes. Consider adding 1–2 feet of overhang past the posts for foundation protection and extended shade.
Finally, plan for clear circulation. Ensure at least 3 feet of aisle width between your pergola and adjacent structures or planting beds so you can move freely around the dining space.
Essential Tools and Materials for Large Pergola Construction
Once you’ve finalized your pergola’s dimensions and location, you’ll need the right tools and materials to bring your design to life.
Start with pressure-treated lumber or decay-resistant wood like cedar or redwood rated for ground contact. Select beam sizes—typically 2×8 or 2×10 rafters—based on your span length. You’ll also need 6×6 posts for large structures, concrete for deep footings (24–36 inches), and galvanized steel hardware including bolts, washers, and screws to prevent corrosion.
Invest in a quality long level for plumb verification, a drill for pre-drilling holes, and end grain sealer or paint for protection. Temporary bracing materials support the assembly during construction, ensuring structural integrity throughout the building process.
Preparing Your Site: Grading, Leveling, and Marking Layout
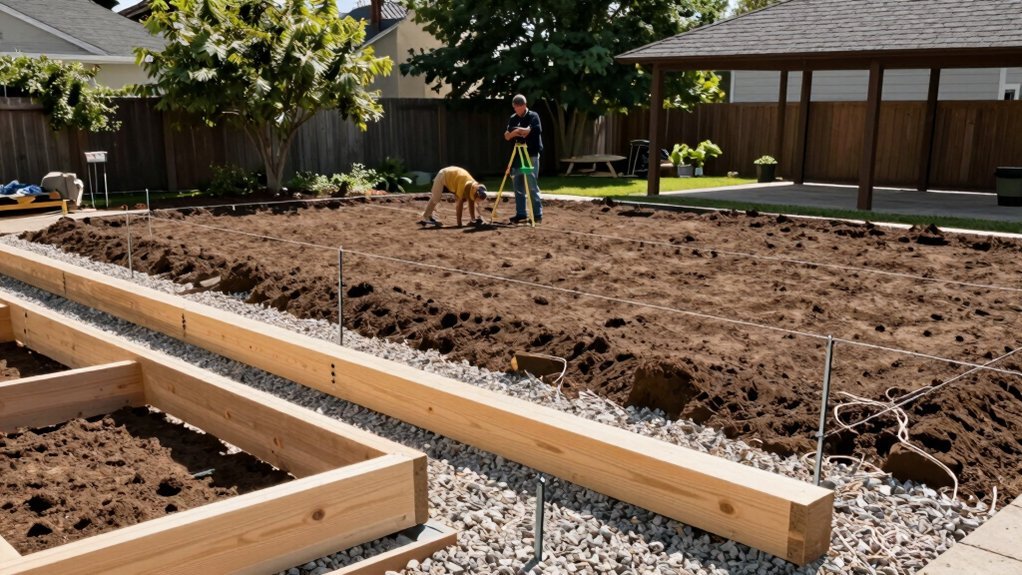
You’ll start by selecting a flat area and grading it to create a stable base for your pergola posts.
Next, you’ll mark your post locations with stakes and a masonry line, spacing them equally (typically 8–12 feet apart) and aligning them with your house or dining area.
Finally, you’ll verify the layout’s squareness by checking that diagonals are equal lengths on your marked rectangle.
Grading and Ground Level
How do you build a sturdy pergola on uneven terrain? You’ll need to grade and level the ground first. Start by choosing a flat area, or plan grading work to create a true horizontal plane for your pergola frame. Uneven ground will compromise your structure’s stability and make installation unnecessarily complicated.
Use a long carpenter’s level to assess your site. If you find slopes or depressions, grade the area by removing or adding soil until you achieve a level surface. This foundational step prevents shifting, settling, and structural problems down the road.
Proper grading also ensures water drains away from your posts, protecting them from rot and extending your pergola’s lifespan. Don’t skip this critical preparation—it’s the difference between a pergola that lasts decades and one that fails prematurely.
Layout Marking and Verification
With your ground properly graded and leveled, it’s time to establish your pergola’s precise footprint. Start by marking a flat, level area and lay out a rectangle—say, 6 by 8 feet—using stakes at each corner and a masonry line for alignment.
Verify squareness by measuring the diagonals across opposite corners; they should be equal. This confirms you’ve got a true rectangle.
Next, mark your post locations with stakes, then run a string line between endpoints to ensure posts stay straight and evenly spaced.
Don’t forget to plan for 1–2 feet of overhang beyond the outer posts. This overhang accommodates your shade beams and improves drainage around the structure’s base, protecting it from water damage long-term.
Setting Posts and Establishing a Solid Foundation
You’ll dig post holes 9–12 inches in diameter and 30–36 inches deep, then add gravel at the bottom for drainage and leveling.
Next, you’ll set your posts in concrete, using temporary 1×2 braces and a level to ensure they’re plumb on all sides before the concrete cures.
Finally, you’ll protect the post bases from soil contact with proper flashing or concrete and prepare for secure bolt connections between posts and beams.
Post Hole Preparation
What makes the difference between a pergola that stands firm for decades and one that shifts or sinks? Proper post hole preparation. You’ll need to dig holes sized for your large pergola—typically 9 to 12 inches in diameter and 30 to 48 inches deep, depending on your local frost line and soil conditions. Start by marking your post locations with stakes and mason’s line, ensuring equal spacing of 8 to 12 feet apart for large spans. Once you’ve marked everything, dig your holes and add gravel or crushed stone to the bottom of each one. This drainage layer helps with leveling and prevents water accumulation. You’re now ready to set your posts securely.
Ensuring Vertical Alignment
Now that your holes are prepped with gravel and proper drainage, the real work begins: getting those posts perfectly plumb. You’ll need a long torpedo or post level to verify vertical alignment on all four sides of each post. Don’t skip this step—even slight tilts compound across your structure. While the concrete sets, temporarily brace posts with 1×2 supports and cross-bracing to maintain alignment. These braces prevent movement from wind, vibration, or settling. Check plumb regularly as the cement cures, making minor adjustments as needed. Once concrete fully hardens—typically 24 to 48 hours—you can remove the temporary bracing. Properly aligned posts ensure your pergola’s structural integrity and prevent future sagging or leaning issues.
Concrete Setting Process
Once your posts are properly braced and plumb, it’s time to mix and pour the concrete that’ll anchor them. Follow the bag instructions carefully, paying close attention to water-to-powder ratios. Pour the mixture around each post, ensuring it reaches ground level or slightly above for proper drainage.
| Phase | Duration | Action |
|---|---|---|
| Initial Set | 24–48 hours | Avoid disturbance |
| Curing | Several days | Maintain moisture |
| Full Strength | 7 days | Ready for loading |
| Inspection | Day 7 | Check for cracks |
Shield the concrete from direct sunlight and rain during curing to prevent rapid drying, which causes cracking. Keep the surface moist but not saturated. Once fully cured, your posts will provide the stable foundation your pergola demands for years of reliable outdoor dining enjoyment.
Building the Frame: Beams, Rafters, and Structural Integrity
How you construct your pergola’s frame determines whether it’ll stand firm through seasons of entertaining or sag under weight and weather.
You’ll build structural integrity by implementing these key strategies:
- Install end beams leveled and bolted to posts for maximum shear strength
- Space rafters 12 inches on center from the ledger outward for uniform load distribution
- Drill through-bolts with washers and nuts to lock components permanently
- Use pressure-treated lumber and cap post tops with metal brackets to prevent decay
Select naturally rot-resistant wood or pressure-treated materials for all frame members. Tighten every fastener securely—this prevents future loosening under stress. For high-wind zones, ensure your concrete footings extend below the frost line with properly sized rebar for added post stability. This foundation makes your pergola reliable and durable.
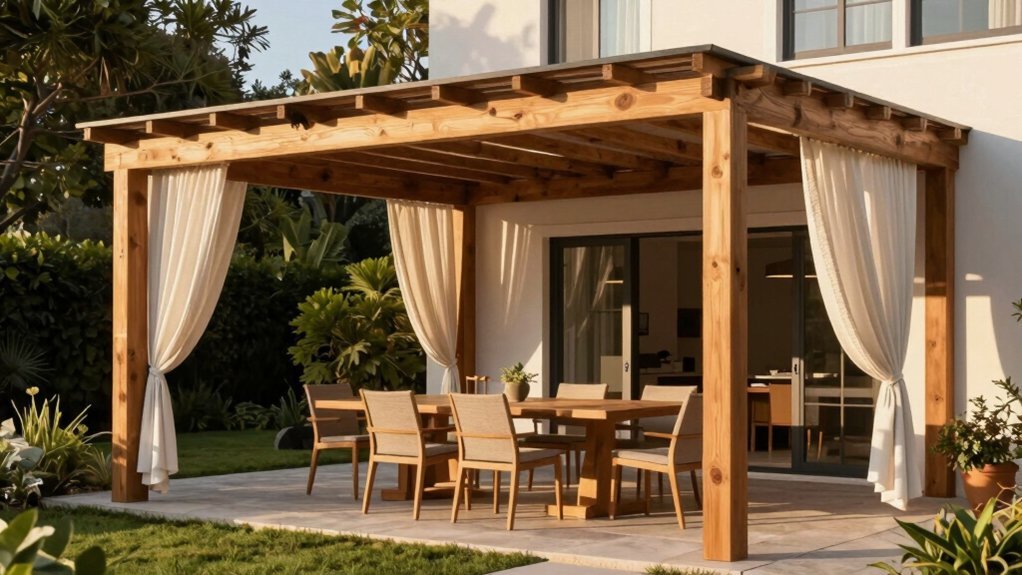
Installing Shade Elements and Finishing Details
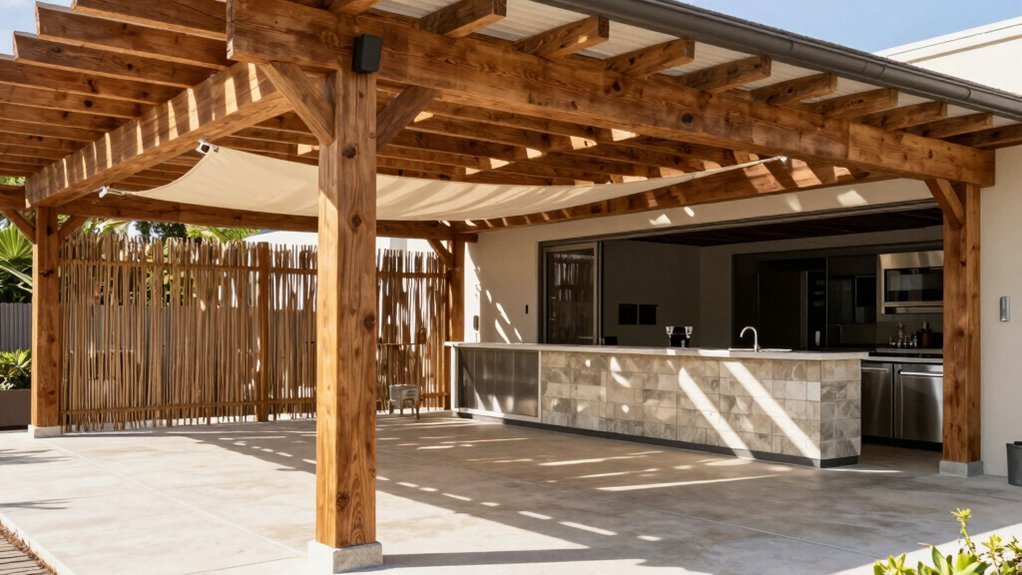
Because your pergola’s frame now stands solid, you’re ready to install the shade elements that’ll transform it into a comfortable dining retreat. You’ll choose from solid roof panels, lattice, or fabric canopies to balance UV protection with airflow. Space components 12–24 inches apart using an on-center layout for structural support and consistent shade coverage.
| Material | Benefit |
|---|---|
| Pressure-treated lumber | Extended durability |
| Galvanized hardware | Rust resistance |
| Louvered sections | Adjustable sun control |
| Retractable fabric | Flexible coverage |
Seal all wood joints with UV-resistant finishes and reapply every 3–5 years. Incorporate adjustable shading options like louvered roofs or retractable fabric to vary sun exposure throughout the day. These finishing details ensure your pergola withstands weather while maintaining comfort for years.
Weatherproofing and Protective Finishes
With your shade elements and finishing details in place, protecting your pergola’s wood structure becomes the next priority. You’ll want to implement a multi-layered weatherproofing strategy to ensure longevity and durability.
Protect your pergola’s wood structure with a multi-layered weatherproofing strategy to ensure lasting durability and longevity.
- Select weather-resistant lumber like cedar or redwood, with pressure-treated wood for in-ground posts to combat moisture and decay.
- Seal all cut ends and joints with penetrating sealer before assembly, then recoat after curing to minimize moisture ingress.
- Apply exterior-grade finish with UV protection and water repellency, especially on end grain and post bottoms.
- Establish maintenance routines by annually tightening fasteners, inspecting for cracks, and ensuring proper drainage around the base to prevent water pooling.
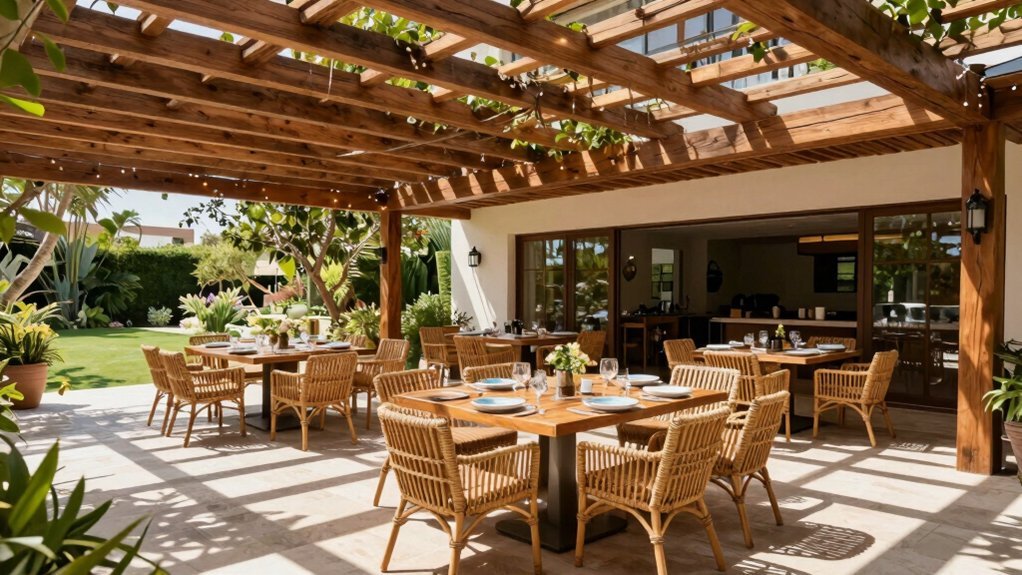
Enhancing Your Dining Space: Lighting, Plants, and Canopies
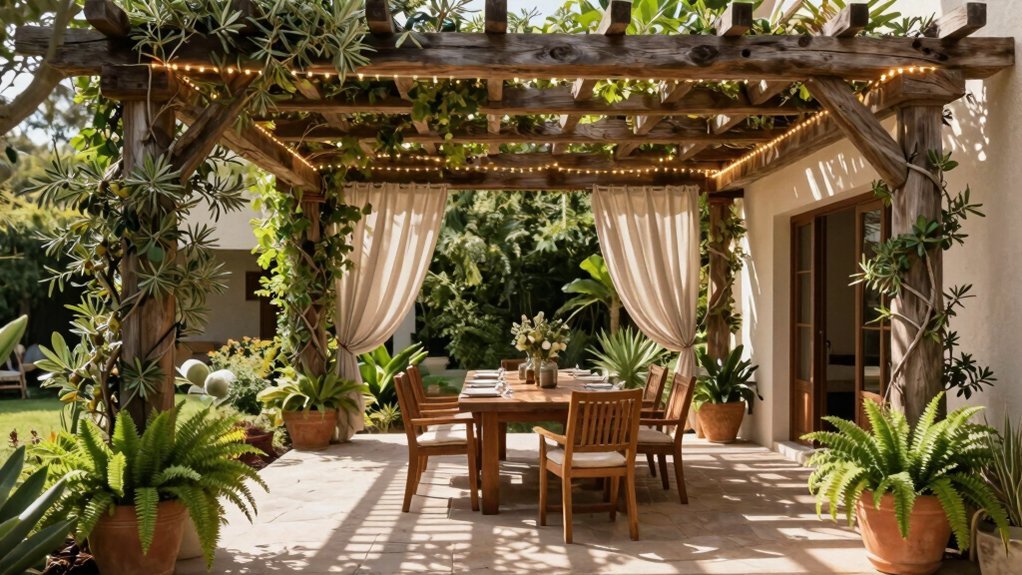
Once you’ve secured your pergola’s structural integrity, you’ll want to transform it into an inviting outdoor dining destination. Start by installing climate-rated LED string lights or recessed lighting along the beam pockets, targeting 20–40 lumens per square foot for comfortable ambiance without glare. Next, add climbing plants like wisteria or honeysuckle on integrated trellises to create natural shade and seasonal greenery. For additional protection, install weather-resistant shade sails to block peak sun and light rain. Incorporate aromatic herbs and fruiting vines in corner planters to enhance scent and edibility while maintaining sightlines. Finally, establish drought-tolerant plantings with drip irrigation around your space, ensuring your dining area remains lush and inviting with minimal maintenance.
Frequently Asked Questions
Is It Cheaper to Build a Pergola or Buy One?
Building a pergola yourself is typically cheaper than buying one. You’ll save over 50% on labor costs with DIY construction using standard materials under $3,000. Pre-built kits cost more per square foot, making self-building your most economical option.
How to Build a Large Pergola?
You’ll build a large pergola by setting 6×6 posts deep in concrete, spacing rafters 12 inches apart, and reinforcing with diagonal braces. Use galvanized bolts, add a lattice roof, integrated lighting, and climbing plants for a sturdy dining structure.
What Size Pergola for Dining Table?
You’ll want a pergola that’s at least 10 feet wide and 12 feet long for comfortable dining. This size gives you enough clearance around a standard 6-foot table, allowing chairs to move freely while maintaining proper headroom beneath the beams.
How Tall Can a Pergola Be Without Planning Permission?
You’ll typically find that pergolas under 2.5 to 3 meters (8–10 feet) don’t need permission in many UK areas, while U.S. rules vary by location. You should always check your local planning department or HOA first, since regulations differ considerably.


Leave a Reply